HTTP 支持
HTTP 支持
Spring 集成的 HTTP 支持允许运行 HTTP 请求和处理入站 HTTP 请求。
HTTP 支持包括以下网关实现:HttpInboundEndpoint和HttpRequestExecutingMessageHandler.
另请参阅 WebFlux 支持。
您需要将此依赖项包含在您的项目中:
<dependency>
    <groupId>org.springframework.integration</groupId>
    <artifactId>spring-integration-http</artifactId>
    <version>6.0.9</version>
</dependency>compile "org.springframework.integration:spring-integration-http:6.0.9"
这jakarta.servlet:jakarta.servlet-api依赖项。
Http 入站组件
要通过 HTTP 接收消息,您需要使用 HTTP 入站通道适配器或 HTTP 入站网关。
要支持 HTTP 入站适配器,需要将它们部署在 servlet 容器(如 Apache Tomcat 或 Jetty)中。
最简单的方法是使用 Spring 的HttpRequestHandlerServlet,通过在web.xml文件:
<servlet>
    <servlet-name>inboundGateway</servlet-name>
    <servlet-class>o.s.web.context.support.HttpRequestHandlerServlet</servlet-class>
</servlet>
请注意,Servlet 名称与 Bean 名称匹配。
有关使用HttpRequestHandlerServlet,请参阅使用 Spring 的远程处理和 Web 服务,这是 Spring 框架参考文档的一部分。
如果你在 Spring MVC 应用程序中运行,那么上述显式 servlet 定义就不是必需的。 在这种情况下,网关的 Bean 名称可以与 URL 路径匹配,就像对 Spring MVC 控制器 Bean 所做的那样。 有关更多信息,请参阅 Web MVC 框架,它是 Spring 框架参考文档的一部分。
| 有关示例应用程序和相应的配置,请参阅 Spring 集成示例存储库。 它包含 HTTP 示例应用程序,该应用程序演示了 Spring 集成的 HTTP 支持。 |
以下示例 Bean 定义了一个 HTTP 入站端点:
<bean id="httpInbound"
  class="org.springframework.integration.http.inbound.HttpRequestHandlingMessagingGateway">
  <property name="requestChannel" ref="httpRequestChannel" />
  <property name="replyChannel" ref="httpReplyChannel" />
</bean>这HttpRequestHandlingMessagingGateway接受HttpMessageConverterinstances 否则依赖于 default 列表。
转换器允许自定义HttpServletRequest自Message.
默认转换器封装了简单的策略,例如,这些策略会创建一个Stringmessage 的POST内容类型开头的请求text.
有关完整详细信息,请参阅 Javadoc。
附加标志 (mergeWithDefaultConverters) 可以与 list 一起设置自定义HttpMessageConverter以在 Custom Converters(自定义转换器)之后添加 Default Converters(默认转换器)。
默认情况下,此标志设置为false,这意味着自定义转换器将替换默认列表。
消息转换过程使用(可选)requestPayloadType属性和传入的Content-Type页眉。
从版本 4.3 开始,如果请求没有内容类型标头,application/octet-stream假设,如RFC 2616.
以前,此类消息的正文被忽略。
Spring Integration 2.0 实现了多部分文件支持。
如果请求已包装为MultipartHttpServletRequest,当您使用默认转换器时,该请求将转换为Messagepayload 的MultiValueMap包含的值可以是字节数组、字符串或 Spring 的MultipartFile,具体取决于各个部分的内容类型。
HTTP 入站端点会找到一个MultipartResolver在上下文中,如果 bean 名称为multipartResolver(与 Spring 的DispatcherServlet).
如果它确实找到了该 bean,则会在入站请求映射器上启用对 multipart 文件的支持。
否则,当它尝试将 multipart 文件请求映射到 Spring 集成时,它将失败Message.
有关 Spring 对MultipartResolver,请参阅 Spring Reference Manual。 |
|
如果您希望代理 |
当您向客户端发送响应时,您可以通过多种方式自定义网关的行为。
默认情况下,网关通过发送200状态代码返回。
可以通过提供 Spring MVC 解析的 'viewName' 来自定义此响应ViewResolver.
如果网关应该期望收到对Message中,您可以设置expectReplyflag(构造函数参数)使网关等待回复Message在创建 HTTP 响应之前。
下面的示例将网关配置为用作具有视图名称的 Spring MVC 控制器:
<bean id="httpInbound"
  class="org.springframework.integration.http.inbound.HttpRequestHandlingController">
  <constructor-arg value="true" /> <!-- indicates that a reply is expected -->
  <property name="requestChannel" ref="httpRequestChannel" />
  <property name="replyChannel" ref="httpReplyChannel" />
  <property name="viewName" value="jsonView" />
  <property name="supportedMethodNames" >
    <list>
      <value>GET</value>
      <value>DELETE</value>
    </list>
  </property>
</bean>由于constructor-arg的值true,则等待回复。
前面的示例还显示了如何自定义网关接受的 HTTP 方法,这些方法是POST和GET默认情况下。
回复消息在模型映射中可用。 默认情况下,该映射条目的键是 'reply',但您可以通过在终端节点的配置上设置 'replyKey' 属性来覆盖此默认值。
有效载荷验证
从版本 5.2 开始,HTTP 入站端点可以被提供Validator在发送到通道之前检查 payload。
此有效负载已经是 after 转换和提取的结果payloadExpression缩小与有价值数据相关的验证范围。
验证失败的处理与我们在 Spring MVC 错误处理中的处理完全相同。
HTTP 出站组件
本节描述了 Spring 集成的 HTTP 出站组件。
用HttpRequestExecutingMessageHandler
要配置HttpRequestExecutingMessageHandler中,编写类似于以下内容的 bean 定义:
<bean id="httpOutbound"
  class="org.springframework.integration.http.outbound.HttpRequestExecutingMessageHandler">
  <constructor-arg value="http://localhost:8080/example" />
  <property name="outputChannel" ref="responseChannel" />
</bean>
此 bean 定义通过委托给RestTemplate.
该模板反过来又委托给HttpMessageConverter实例从Message有效载荷。
您可以配置这些转换器以及ClientHttpRequestFactory实例,如下例所示:
<bean id="httpOutbound"
  class="org.springframework.integration.http.outbound.HttpRequestExecutingMessageHandler">
  <constructor-arg value="http://localhost:8080/example" />
  <property name="outputChannel" ref="responseChannel" />
  <property name="messageConverters" ref="messageConverterList" />
  <property name="requestFactory" ref="customRequestFactory" />
</bean>
默认情况下,HTTP 请求是使用SimpleClientHttpRequestFactory,它使用 JDKHttpURLConnection.
还支持通过以下方式使用 Apache Commons HTTP ClientCommonsClientHttpRequestFactory,您可以注入它(如前所述)。
| 对于出站网关,网关生成的回复消息包含请求消息中存在的所有消息标头。 |
使用 Cookie
基本的 cookie 支持由transfer-cookies属性。
当设置为true(默认值为false)、一个Set-Cookie在响应中从服务器收到的标头将转换为Cookie在回复消息中。
然后,此标头将用于后续发送。
这可实现简单的有状态交互,例如:
…→logonGateway→…→doWorkGateway→…→logoffGateway→…
如果transfer-cookies是false任何Set-Cookie收到的标头保持为Set-Cookie,并在后续发送时被丢弃。
|
空响应正文
HTTP 是一种请求-响应协议。
但是,响应可能没有正文,只有标头。
在这种情况下, |
|
预期响应类型
进一步说明空响应正文,如果响应确实包含正文,则必须提供适当的 |
从版本 5.5 开始,HttpRequestExecutingMessageHandler暴露一个extractResponseBody标志(即true)以仅返回响应正文,或返回整个ResponseEntity作为回复消息有效负载,独立于提供的expectedResponseType.
如果ResponseEntity,则忽略此标志,并且整个ResponseEntity返回。
HTTP 命名空间支持
Spring 集成提供了一个httpnamespace 和相应的 schema definition 创建。
要将其包含在您的配置中,请在您的应用程序上下文配置文件中提供以下命名空间声明:
<?xml version="1.0" encoding="UTF-8"?>
<beans xmlns="http://www.springframework.org/schema/beans"
  xmlns:xsi="http://www.w3.org/2001/XMLSchema-instance"
  xmlns:int="http://www.springframework.org/schema/integration"
  xmlns:int-http="http://www.springframework.org/schema/integration/http"
  xsi:schemaLocation="
    http://www.springframework.org/schema/beans
    https://www.springframework.org/schema/beans/spring-beans.xsd
    http://www.springframework.org/schema/integration
    https://www.springframework.org/schema/integration/spring-integration.xsd
    http://www.springframework.org/schema/integration/http
    https://www.springframework.org/schema/integration/http/spring-integration-http.xsd">
    ...
</beans>
入境
XML 命名空间提供了两个组件来处理 HTTP 入站请求:inbound-channel-adapter和inbound-gateway.
为了在不返回专用响应的情况下处理请求,请使用inbound-channel-adapter.
以下示例显示如何配置一个:
<int-http:inbound-channel-adapter id="httpChannelAdapter" channel="requests"
supported-methods="PUT, DELETE"/>要处理需要响应的请求,请使用inbound-gateway.
以下示例显示如何配置一个:
<int-http:inbound-gateway id="inboundGateway"
    request-channel="requests"
    reply-channel="responses"/>
请求映射支持
Spring Integration 3.0 通过引入IntegrationRequestMappingHandlerMapping.
该实现依赖于 Spring Framework 3.1 或更高版本提供的增强 REST 支持。 |
HTTP 入站网关或 HTTP 入站通道适配器的解析会注册一个integrationRequestMappingHandlerMapping类型的 beanIntegrationRequestMappingHandlerMapping,以防尚未注册。
这个HandlerMapping将其 logic 委托给RequestMappingInfoHandlerMapping.
该实现提供类似于org.springframework.web.bind.annotation.RequestMapping注解。
有关更多信息,请参阅将请求映射到@RequestMapping. |
为此,Spring Integration 3.0 引入了<request-mapping>元素。
您可以将此可选元素添加到<http:inbound-channel-adapter>和<http:inbound-gateway>.
它与path和supported-methods属性。
以下示例显示如何在入站网关上配置它:
<inbound-gateway id="inboundController"
    request-channel="requests"
    reply-channel="responses"
    path="/foo/{fooId}"
    supported-methods="GET"
    view-name="foo"
    error-code="oops">
   <request-mapping headers="User-Agent"
     params="myParam=myValue"
     consumes="application/json"
     produces="!text/plain"/>
</inbound-gateway>根据前面的配置,命名空间解析器会创建一个IntegrationRequestMappingHandlerMapping(如果不存在)和HttpRequestHandlingControllerbean 并与之关联的RequestMapping.
这RequestMapping实例反过来又转换为 Spring MVCRequestMappingInfo.
这<request-mapping>元素提供以下属性:
-
headers -
params -
consumes -
produces
使用path和supported-methods的属性<http:inbound-channel-adapter>或<http:inbound-gateway>,<request-mapping>attributes 直接转换为org.springframework.web.bind.annotation.RequestMapping注解。
这<request-mapping>元素允许您将多个 Spring 集成 HTTP 入站端点配置为相同的path(甚至相同supported-methods),并允许根据传入的 HTTP 请求提供不同的下游消息流。
或者,你也可以只声明一个 HTTP 入站端点,并在 Spring 集成流中应用路由和过滤逻辑来实现相同的结果。
这样,您就可以获取Message尽可能早地进入流中。
以下示例显示了如何执行此作:
<int-http:inbound-gateway request-channel="httpMethodRouter"
    supported-methods="GET,DELETE"
    path="/process/{entId}"
    payload-expression="#pathVariables.entId"/>

<int:router input-channel="httpMethodRouter" expression="headers.http_requestMethod">
    <int:mapping value="GET" channel="in1"/>
    <int:mapping value="DELETE" channel="in2"/>
</int:router>

<int:service-activator input-channel="in1" ref="service" method="getEntity"/>

<int:service-activator input-channel="in2" ref="service" method="delete"/>
有关处理程序映射的更多信息,请参阅 Spring Framework Web Servlet 文档或 Spring Framework Web Reactive 文档。
这IntegrationRequestMappingHandlerMapping扩展 Spring MVCRequestMappingHandlerMapping类,继承了它的大部分逻辑,尤其是handleNoMatch(Set, String, HttpServletRequest),它会抛出一个特定的4xx当映射由于某种原因不匹配时,HTTP 响应的错误,阻止调用应用程序上下文中任何剩余的映射处理程序。
出于这个原因,为 Spring Integration 和 Spring MVC 请求映射配置相同的路径(例如POST合一和GET在另一个)不受支持;找不到 MVC 映射.. |
跨域资源共享 (CORS) 支持
从版本 4.2 开始,您可以配置<http:inbound-channel-adapter>和<http:inbound-gateway>替换为<cross-origin>元素。
它表示与 Spring MVC 的@CrossOrigin为@Controller注释并允许为 Spring 集成 HTTP 端点配置跨域资源共享 (CORS):
-
origin:允许的源列表。 表示允许所有源。 这些值位于*Access-Control-Allow-Origin标头。 默认值为 .* -
allowed-headers:指示在实际请求期间可以使用哪些请求标头。 这意味着允许客户端请求的所有标头。 此属性控制飞行前响应的*Access-Control-Allow-Headers页眉。 默认值为 .* -
exposed-headers:用户代理允许客户端访问的响应标头列表。 此属性控制实际响应的Access-Control-Expose-Headers页眉。 -
method:允许的 HTTP 请求方法:GET,POST,HEAD,OPTIONS,PUT,PATCH,DELETE,TRACE. 此处指定的方法会覆盖supported-methods. -
allow-credentials:设置为true如果浏览器应包含与请求的域关联的任何 Cookie,或者false如果不应该。 空字符串 (“”) 表示未定义。 如果true,则飞行前响应包括Access-Control-Allow-Credentials=true页眉。 默认值为true. -
max-age:控制飞行前响应的缓存持续时间。 将此值设置为合理的值可以减少浏览器所需的飞行前请求-响应交互的数量。 此属性控制Access-Control-Max-Age标头。 值-1表示 undefined。 默认值为 1800 秒(30 分钟)。
CORS Java 配置由org.springframework.integration.http.inbound.CrossOrigin类,其实例可以注入到HttpRequestHandlingEndpointSupport豆。
响应状态代码
从版本 4.1 开始,您可以配置<http:inbound-channel-adapter>替换为status-code-expression以覆盖默认值200 OK地位。
表达式必须返回一个可以转换为org.springframework.http.HttpStatusenum 值。
这evaluationContext具有BeanResolver并且,从版本 5.1 开始,随RequestEntity<?>作为根对象。
例如,在运行时解决一些返回状态代码值的作用域 bean。
但是,它很可能被设置为一个固定值,例如status-code=expression="204"(无内容),或status-code-expression="T(org.springframework.http.HttpStatus).NO_CONTENT".
默认情况下,status-code-expression为 null,则表示返回正常的 '200 OK' 响应状态。
使用RequestEntity<?>作为根对象,状态码可以是有条件的,例如在请求方法、某些标头、URI 内容甚至请求正文上。
以下示例演示如何将状态代码设置为ACCEPTED:
<http:inbound-channel-adapter id="inboundController"
       channel="requests" view-name="foo" error-code="oops"
       status-code-expression="T(org.springframework.http.HttpStatus).ACCEPTED">
   <request-mapping headers="BAR"/>
</http:inbound-channel-adapter>这<http:inbound-gateway>解析http_statusCode回复的标头Message.
从版本 4.2 开始,当在reply-timeout是500 Internal Server Error.
有两种方法可以修改此行为:
-
添加
reply-timeout-status-code-expression. 这与status-code-expression在入站适配器上。 -
添加
error-channel并返回带有 HTTP 状态代码标头的相应消息,如下例所示:<int:chain input-channel="errors"> <int:header-enricher> <int:header name="http_statusCode" value="504" /> </int:header-enricher> <int:transformer expression="payload.failedMessage" /> </int:chain>
的ErrorMessage是一个MessageTimeoutException.
它必须转换为网关可以转换的内容,例如String.
一个很好的候选对象是异常的 message 属性,这是您在使用expression技术。
如果错误流在主流超时后超时,500 Internal Server Error返回,或者,如果返回reply-timeout-status-code-expression存在,则对其进行评估。
以前,超时的默认状态代码为200 OK.
要恢复该行为,请将reply-timeout-status-code-expression="200". |
同样从版本 5.4 开始,准备请求消息时遇到的错误将发送到错误通道(如果提供)。
应该通过检查异常来决定在错误流中引发适当的异常。
以前,任何异常都只是简单地抛出,导致 HTTP 500 服务器错误响应状态,但在某些情况下,问题可能是由不正确的请求参数引起的,因此ResponseStatusException对于 4xx 客户端错误,应改为引发 status。
看ResponseStatusException了解更多信息。
这ErrorMessagesent to this error 通道包含原始异常作为 analysis 的有效负载。
==== URI 模板变量和表达式
通过使用path属性与payload-expression属性和header元素中,您可以高度灵活地映射入站请求数据。
在以下示例配置中,入站通道适配器配置为使用以下 URI 接受请求:
/first-name/{firstName}/last-name/{lastName}当您使用payload-expression属性、{firstName}URI 模板变量映射到Messagepayload 的{lastName}URI 模板变量映射到lnamemessage 标头,如以下示例中所定义:
<int-http:inbound-channel-adapter id="inboundAdapterWithExpressions"
    path="/first-name/{firstName}/last-name/{lastName}"
    channel="requests"
    payload-expression="#pathVariables.firstName">
    <int-http:header name="lname" expression="#pathVariables.lastName"/>
</int-http:inbound-channel-adapter>
有关 URI 模板变量的更多信息,请参阅 Spring Reference Manual 中的 uri 模板模式。
从 Spring Integration 3.0 开始,除了现有的#pathVariables和#requestParams变量中,我们添加了其他有用的表达式变量:
-
#requestParams:这MultiValueMap从ServletRequestparameterMap. -
#pathVariables:这Map从 URI 模板占位符及其值。 -
#matrixVariables:这Map之MultiValueMap根据 Spring MVC 规范。 请注意,#matrixVariables需要 Spring MVC 3.2 或更高版本。 -
#requestAttributes:这org.springframework.web.context.request.RequestAttributes与当前请求关联。 -
#requestHeaders:这org.springframework.http.HttpHeaders对象。 -
#cookies:这MultiValueMap<String, Cookie>之jakarta.servlet.http.Cookie实例。
请注意,所有这些值(和其他值)都可以在下游消息流的表达式中通过ThreadLocal org.springframework.web.context.request.RequestAttributesvariable,如果该消息流是单线程的并且位于请求线程中。
以下示例配置一个使用expression属性:
<int-:transformer
    expression="T(org.springframework.web.context.request.RequestContextHolder).
                  requestAttributes.request.queryString"/>
出境
要配置出站网关,您可以使用命名空间支持。 以下代码片段显示了出站 HTTP 网关的可用配置选项:
<int-http:outbound-gateway id="example"
    request-channel="requests"
    url="http://localhost/test"
    http-method="POST"
    extract-request-payload="false"
    expected-response-type="java.lang.String"
    charset="UTF-8"
    request-factory="requestFactory"
    reply-timeout="1234"
    reply-channel="replies"/>
最重要的是,请注意,提供了 'http-method' 和 'expected-response-type' 属性。
这是两个最常见的配置值。
默认的http-method是POST,默认响应类型为 null。
对于 null 响应类型,则回复的有效负载Message包含ResponseEntity,只要其 HTTP 状态为 successful(不成功的状态代码会引发异常)。
如果您需要不同的类型,例如String,将其作为完全限定的类名 (java.lang.String在前面的示例中)。
另请参阅有关 HTTP 出站组件中空响应正文的说明。
从 Spring Integration 2.1 开始,request-timeoutHTTP 出站网关的属性已重命名为reply-timeout以更好地反映其意图。 |
|
从 Spring Integration 2.2 开始,默认情况下不再启用基于 HTTP 的 Java 序列化。
以前,在设置 但是,由于这可能会导致与现有应用程序不兼容,因此决定不再自动将此转换器添加到 HTTP 端点。
如果您希望使用 Java 序列化,则可以添加 |
从 Spring Integration 2.2 开始,你还可以使用 SPEL 和http-method-expression属性。
请注意,此属性与http-method.
您还可以使用expected-response-type-expression属性而不是expected-response-type并提供确定响应类型的任何有效 SpEL 表达式。
以下配置示例使用expected-response-type-expression:
<int-http:outbound-gateway id="example"
    request-channel="requests"
    url="http://localhost/test"
    http-method-expression="headers.httpMethod"
    extract-request-payload="false"
    expected-response-type-expression="payload"
    charset="UTF-8"
    request-factory="requestFactory"
    reply-timeout="1234"
reply-channel="replies"/>如果您的出站适配器要以单向方式使用,您可以使用outbound-channel-adapter相反。
这意味着成功的响应执行时不会向回复通道发送任何消息。
如果出现任何不成功的响应状态代码,则会引发异常。
该配置看起来与网关非常相似,如下例所示:
<int-http:outbound-channel-adapter id="example"
    url="http://localhost/example"
    http-method="GET"
    channel="requests"
    charset="UTF-8"
    extract-payload="false"
    expected-response-type="java.lang.String"
    request-factory="someRequestFactory"
    order="3"
auto-startup="false"/>|
要指定 URL,您可以使用 'url' 属性或 'url-expression' 属性。
'url' 属性采用一个简单的字符串(带有 URI 变量的占位符,如下所述)。
'url-expression' 是一个 SpEL 表达式,其中 在以前的版本中,一些用户使用占位符将整个 URL 替换为 URI 变量。 Spring 3.1 中的更改可能会导致一些转义字符问题,例如 '?'。 因此,如果您希望完全在运行时生成 URL,我们建议您使用 'url-expression' 属性。 |
映射 URI 变量
如果您的 URL 包含 URI 变量,则可以使用uri-variable元素。
此元素可用于 HTTP 出站网关和 HTTP 出站通道适配器。
以下示例映射zipCodeURI 变量添加到表达式中:
<int-http:outbound-gateway id="trafficGateway"
url="https://local.yahooapis.com/trafficData?appid=YdnDemo&zip={zipCode}"
request-channel="trafficChannel"
http-method="GET"
expected-response-type="java.lang.String">
<int-http:uri-variable name="zipCode" expression="payload.getZip()"/>
</int-http:outbound-gateway>这uri-variable元素定义两个属性:name和expression.
这name属性标识 URI 变量的名称,而expression属性用于设置实际值。
通过使用expression属性,您可以利用 Spring 表达式语言 (SpEL) 的全部功能,它为您提供对消息有效负载和消息标头的完全动态访问。
例如,在前面的配置中,getZip()方法在Message,该方法的结果用作名为 'zipCode' 的 URI 变量的值。
从 Spring Integration 3.0 开始,HTTP 出站端点支持uri-variables-expression属性来指定expression,从而得到一个MapURL 模板中所有 URI 变量占位符的 URL 变量占位符。
它提供了一种机制,通过该机制,您可以根据出站消息使用不同的变量表达式。
此属性与<uri-variable/>元素。
以下示例演示如何使用uri-variables-expression属性:
<int-http:outbound-gateway
     url="https://foo.host/{foo}/bars/{bar}"
     request-channel="trafficChannel"
     http-method="GET"
     uri-variables-expression="@uriVariablesBean.populate(payload)"
expected-response-type="java.lang.String"/>uriVariablesBean可能定义如下:
public class UriVariablesBean {
    private static final ExpressionParser EXPRESSION_PARSER = new SpelExpressionParser();

    public Map<String, ?> populate(Object payload) {
        Map<String, Object> variables = new HashMap<String, Object>();
        if (payload instanceOf String.class)) {
            variables.put("foo", "foo"));
        }
        else {
            variables.put("foo", EXPRESSION_PARSER.parseExpression("headers.bar"));
        }
        return variables;
    }

}
这uri-variables-expression必须计算为Map.
的Map必须是String或Expression.
这Map提供给ExpressionEvalMap通过在出站的上下文中使用这些表达式来进一步解析 URI 变量占位符Message. |
重要
这uriVariablesExpressionproperty 提供了一种非常强大的机制来评估 URI 变量。
我们预计人们主要使用简单的表达式,例如前面的示例。
但是,您也可以配置诸如"@uriVariablesBean.populate(#root)"返回的 map 中的表达式为variables.put("thing1", EXPRESSION_PARSER.parseExpression(message.getHeaders().get("thing2", String.class)));,其中表达式在名为thing2.
由于标头可能来自不受信任的源,因此 HTTP 出站终端节点使用SimpleEvaluationContext在计算这些表达式时。
这SimpleEvaluationContext仅使用 SPEL 功能的子集。
如果您信任您的消息源并希望使用受限制的 SPEL 结构,请将trustedSpel属性设置为true.
通过使用自定义url-expression以及一些用于构建和编码 URL 参数的实用程序。
以下示例显示了如何执行此作:
url-expression="T(org.springframework.web.util.UriComponentsBuilder)
                           .fromHttpUrl('https://HOST:PORT/PATH')
                           .queryParams(payload)
                           .build()
.toUri()"这queryParams()method 需要一个MultiValueMap<String, String>作为参数,因此您可以在执行请求之前提前构建一组真实的 URL 查询参数。
整个queryString也可以显示为uri-variable,如下例所示:
<int-http:outbound-gateway id="proxyGateway" request-channel="testChannel"
url="http://testServer/test?{queryString}">
<int-http:uri-variable name="queryString" expression="'a=A&b=B'"/>
</int-http:outbound-gateway>在这种情况下,您必须手动提供 URL 编码。
例如,您可以使用org.apache.http.client.utils.URLEncodedUtils#format()为此目的。
如前所述,手动构建的MultiValueMap<String, String>可以转换为List<NameValuePair> format()method 参数:
List<NameValuePair> nameValuePairs =
    params.entrySet()
            .stream()
            .flatMap(e -> e
                    .getValue()
                    .stream()
                    .map(v -> new BasicNameValuePair(e.getKey(), v)))
            .collect(Collectors.toList());
控制 URI 编码
默认情况下,URL 字符串是编码的(请参阅UriComponentsBuilder) 添加到 URI 对象。
在某些具有非标准 URI(例如 RabbitMQ REST API)的情况下,不需要执行编码。
这<http:outbound-gateway/>和<http:outbound-channel-adapter/>提供encoding-mode属性。
要禁用 URL 编码,请将此属性设置为NONE(默认情况下,它是TEMPLATE_AND_VALUES).
如果您希望对 URL 的某些部分进行部分编码,请使用expression在<uri-variable/>,如下例所示:
<http:outbound-gateway url="https://somehost/%2f/fooApps?bar={param}" encoding-mode="NONE">
          <http:uri-variable name="param"
            expression="T(org.apache.commons.httpclient.util.URIUtil)
                                             .encodeWithinQuery('Hello World!')"/>
</http:outbound-gateway>
对于 Java DSL,此选项可以通过BaseHttpMessageHandlerSpec.encodingMode()选择。
相同的配置适用于 WebFlux 模块和 Web 服务模块中的类似出站组件。
对于更复杂的场景,建议配置UriTemplateHandler在外部提供的RestTemplate;或者,如果是 WebFlux -WebClientwith itUriBuilderFactory.
使用 Java 配置 HTTP 端点
以下示例显示如何使用 Java 配置入站网关:
@Bean
public HttpRequestHandlingMessagingGateway inbound() {
    HttpRequestHandlingMessagingGateway gateway =
        new HttpRequestHandlingMessagingGateway(true);
    gateway.setRequestMapping(mapping());
    gateway.setRequestPayloadType(String.class);
    gateway.setRequestChannelName("httpRequest");
    return gateway;
}

@Bean
public RequestMapping mapping() {
    RequestMapping requestMapping = new RequestMapping();
    requestMapping.setPathPatterns("/foo");
    requestMapping.setMethods(HttpMethod.POST);
    return requestMapping;
}
以下示例显示如何使用 Java DSL 配置入站网关:
@Bean
public IntegrationFlow inbound() {
    return IntegrationFlow.from(Http.inboundGateway("/foo")
            .requestMapping(m -> m.methods(HttpMethod.POST))
            .requestPayloadType(String.class))
        .channel("httpRequest")
        .get();
}
以下示例显示如何使用 Java 配置出站网关:
@ServiceActivator(inputChannel = "httpOutRequest")
@Bean
public HttpRequestExecutingMessageHandler outbound() {
    HttpRequestExecutingMessageHandler handler =
        new HttpRequestExecutingMessageHandler("http://localhost:8080/foo");
    handler.setHttpMethod(HttpMethod.POST);
    handler.setExpectedResponseType(String.class);
    return handler;
}
以下示例显示如何使用 Java DSL 配置出站网关:
@Bean
public IntegrationFlow outbound() {
    return IntegrationFlow.from("httpOutRequest")
        .handle(Http.outboundGateway("http://localhost:8080/foo")
            .httpMethod(HttpMethod.POST)
            .expectedResponseType(String.class))
        .get();
}
超时处理
在 HTTP 组件的上下文中,必须考虑两个计时区域:
-
与 Spring 集成通道交互时的超时
-
与远程 HTTP 服务器交互时超时
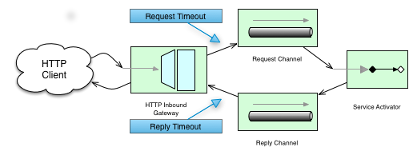
这些组件与消息通道交互,可以为其指定超时。 例如,HTTP 入站网关将从连接的 HTTP 客户端收到的消息转发到消息通道(使用请求超时),因此 HTTP 入站网关从用于生成 HTTP 响应的回复通道(使用回复超时)接收回复消息。 下图提供了直观的说明:
对于出站终端节点,我们需要考虑在与远程服务器交互时 timing 的工作原理。 下图显示了此方案:
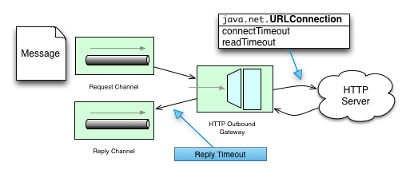
在使用 HTTP 出站网关或 HTTP 出站通道适配器发出活动 HTTP 请求时,您可能希望配置与 HTTP 相关的超时行为。
在这些情况下,这两个组件使用 Spring 的RestTemplate支持执行 HTTP 请求。
要为 HTTP 出站网关和 HTTP 出站通道适配器配置超时,您可以引用RestTemplatebean(通过使用rest-template属性),或者您可以提供对ClientHttpRequestFactorybean(通过使用request-factory属性)。
Spring 提供了以下ClientHttpRequestFactory接口:
-
SimpleClientHttpRequestFactory:使用标准 J2SE 工具发出 HTTP 请求 -
HttpComponentsClientHttpRequestFactory:使用 Apache HttpComponents HttpClient(自 Spring 3.1 起)
如果您没有显式配置request-factory或rest-template属性,则默认的RestTemplate(它使用SimpleClientHttpRequestFactory) 实例化。
|
对于某些 JVM 实现,由 例如,根据 Java™ Platform, Standard Edition 6 API 规范 此方法的某些非标准实现可能会忽略指定的超时。
要查看
如果您有特定需求,则应测试您的超时。
考虑使用 |
| 当您将 Apache HttpComponents HttpClient 与池连接管理器一起使用时,您应该知道,默认情况下,连接管理器为每个给定路由创建的并发连接不超过 2 个,总共不超过 20 个连接。 对于许多实际应用程序,这些限制可能被证明过于限制。 请参阅 Apache 文档 以了解有关配置此重要组件的信息。 |
以下示例使用SimpleClientHttpRequestFactory分别配置了 5 秒的 connect 和 read timeouts:
<int-http:outbound-gateway url="https://samples.openweathermap.org/data/2.5/weather?q={city}"
                           http-method="GET"
                           expected-response-type="java.lang.String"
                           request-factory="requestFactory"
                           request-channel="requestChannel"
                           reply-channel="replyChannel">
    <int-http:uri-variable name="city" expression="payload"/>
</int-http:outbound-gateway>

<bean id="requestFactory"
      class="org.springframework.http.client.SimpleClientHttpRequestFactory">
    <property name="connectTimeout" value="5000"/>
    <property name="readTimeout"    value="5000"/>
</bean>
HTTP 出站网关
对于 HTTP 出站网关,XML 架构仅定义 reply-timeout。
reply-timeout 映射到org.springframework.integration.http.outbound.HttpRequestExecutingMessageHandler类的sendTimeout属性。
更准确地说,该属性是在扩展的AbstractReplyProducingMessageHandler类,最终在MessagingTemplate.
sendTimeout 属性的值默认为 “-1”,并将应用于已连接的MessageChannel.
这意味着,根据实现,Message Channel 的 send 方法可能会无限期地阻塞。
此外,仅当实际的MessageChannel实现具有阻塞发送(例如“full”bounded QueueChannel)时,才使用sendTimeout属性。
HTTP 入站网关
对于 HTTP 入站网关,XML Schema 定义了request-timeout属性,用于设置requestTimeout属性HttpRequestHandlingMessagingGateway类(在扩展的MessagingGatewaySupport类)。
您还可以使用reply-timeout属性映射到replyTimeoutproperty 的 intent 属性。
这两个 timeout 属性的默认值都是1000ms(1000 毫秒或 1 秒)。
最终,request-timeout属性用于设置sendTimeout在MessagingTemplate实例。
这replyTimeout属性用于设置receiveTimeout属性MessagingTemplate实例。
| 要模拟连接超时,您可以连接到不可路由的 IP 地址,例如 10.255.255.10。 |
HTTP 代理配置
如果您位于代理后面,并且需要为 HTTP 出站适配器或网关配置代理设置,则可以应用以下两种方法之一。 在大多数情况下,您可以依赖控制代理设置的标准 Java 系统属性。 否则,你可以为 HTTP 客户端请求工厂实例显式配置 Spring Bean。
标准 Java 代理配置
您可以设置三个系统属性来配置 HTTP 协议处理程序使用的代理设置:
-
http.proxyHost:代理服务器的主机名。 -
http.proxyPort:端口号(默认为80). -
http.nonProxyHosts:应绕过代理直接访问的主机列表。 这是一个由|. 模式可能以通配符开头或结尾。 与这些模式之一匹配的任何主机都通过直接连接而不是代理来访问。*
对于 HTTPS,可以使用以下属性:
-
https.proxyHost:代理服务器的主机名。 -
https.proxyPort:端口号,默认值为 80。
Spring的SimpleClientHttpRequestFactory
如果你需要对代理配置进行更明确的控制,你可以使用 Spring 的SimpleClientHttpRequestFactory并配置其 'proxy' 属性,如下例所示:
<bean id="requestFactory"
    class="org.springframework.http.client.SimpleClientHttpRequestFactory">
    <property name="proxy">
        <bean id="proxy" class="java.net.Proxy">
            <constructor-arg>
                <util:constant static-field="java.net.Proxy.Type.HTTP"/>
            </constructor-arg>
            <constructor-arg>
                <bean class="java.net.InetSocketAddress">
                    <constructor-arg value="123.0.0.1"/>
                    <constructor-arg value="8080"/>
                </bean>
            </constructor-arg>
        </bean>
    </property>
</bean>
HTTP 标头映射
Spring 集成为 HTTP 请求和 HTTP 响应提供了对 HTTP 头映射的支持。
默认情况下,所有标准 HTTP 标头都从消息映射到 HTTP 请求或响应标头,而无需进一步配置。
但是,如果您确实需要进一步的自定义,则可以利用命名空间支持来提供其他配置。
您可以提供以逗号分隔的标头名称列表,并且可以包含以 '*' 字符作为通配符的简单模式。
提供此类值将覆盖默认行为。
基本上,它假设您在那时完全处于控制之中。
但是,如果您确实希望包含所有标准 HTTP 标头,则可以使用快捷方式模式:HTTP_REQUEST_HEADERS和HTTP_RESPONSE_HEADERS.
下面的清单显示了两个示例(第一个使用通配符):
<int-http:outbound-gateway id="httpGateway"
    url="http://localhost/test2"
    mapped-request-headers="thing1, thing2"
    mapped-response-headers="X-*, HTTP_RESPONSE_HEADERS"
    channel="someChannel"/>

<int-http:outbound-channel-adapter id="httpAdapter"
    url="http://localhost/test2"
    mapped-request-headers="thing1, thing2, HTTP_REQUEST_HEADERS"
channel="someChannel"/>适配器和网关使用DefaultHttpHeaderMapper,它现在为入站和出站适配器提供了两种静态工厂方法,以便可以应用正确的方向(根据需要将 HTTP 请求和响应映射到内部或外部)。
如果需要进一步自定义,还可以配置DefaultHttpHeaderMapper独立,并通过header-mapper属性。
在 5.0 版本之前,DefaultHttpHeaderMapper用户定义的非标准 HTTP 标头的默认前缀为X-.
版本 5.0 将默认前缀更改为空字符串。
根据 RFC-6648,现在不鼓励使用此类前缀。
您仍然可以通过设置DefaultHttpHeaderMapper.setUserDefinedHeaderPrefix()财产。
以下示例为 HTTP 网关配置标头映射器:
<int-http:outbound-gateway id="httpGateway"
    url="http://localhost/test2"
    header-mapper="headerMapper"
    channel="someChannel"/>

<bean id="headerMapper" class="o.s.i.http.support.DefaultHttpHeaderMapper">
    <property name="inboundHeaderNames" value="thing1*, *thing2, thing3"/>
    <property name="outboundHeaderNames" value="a*b, d"/>
</bean>如果您需要执行除DefaultHttpHeaderMapper支持,您可以实现HeaderMapperstrategy 接口,并提供对您的实施的引用。
集成图控制器
从版本 4.3 开始,HTTP 模块提供了一个@EnableIntegrationGraphControllerconfiguration 类注解和<int-http:graph-controller/>XML 元素公开IntegrationGraphServer作为 REST 服务。
有关更多信息,请参阅 Integration Graph。
HTTP 示例
本节通过几个示例总结了我们对 Spring 集成的 HTTP 支持的介绍。
分段 HTTP 请求 — RestTemplate(客户端)和 Http 入站网关(服务器)
此示例显示了使用 Spring 的RestTemplate并使用 Spring 集成 HTTP 入站适配器接收它。
我们创建一个MultiValueMap并使用 multipart 数据填充它。
这RestTemplate通过将其转换为MultipartHttpServletRequest.
此特定客户端发送一个由多个部分组成的 HTTP 请求,其中包含公司名称和图像文件(公司徽标)。
下面的清单显示了该示例:
RestTemplate template = new RestTemplate();
String uri = "http://localhost:8080/multipart-http/inboundAdapter.htm";
Resource s2logo =
   new ClassPathResource("org/springframework/samples/multipart/spring09_logo.png");
MultiValueMap map = new LinkedMultiValueMap();
map.add("company", "SpringSource");
map.add("company-logo", s2logo);
HttpHeaders headers = new HttpHeaders();
headers.setContentType(new MediaType("multipart", "form-data"));
HttpEntity request = new HttpEntity(map, headers);
ResponseEntity<?> httpResponse = template.exchange(uri, HttpMethod.POST, request, null);
这就是我们为客户提供的全部需求。
在服务器端,我们有以下配置:
<int-http:inbound-channel-adapter id="httpInboundAdapter"
    channel="receiveChannel"
    path="/inboundAdapter.htm"
    supported-methods="GET, POST"/>

<int:channel id="receiveChannel"/>

<int:service-activator input-channel="receiveChannel">
    <bean class="org.springframework.integration.samples.multipart.MultipartReceiver"/>
</int:service-activator>

<bean id="multipartResolver"
    class="org.springframework.web.multipart.commons.CommonsMultipartResolver"/>
'httpInboundAdapter' 接收请求并将其转换为Message的有效负载为LinkedMultiValueMap.
然后,我们在 'multipartReceiver' 服务激活器中解析它,如下例所示:
public void receive(LinkedMultiValueMap<String, Object> multipartRequest){
    System.out.println("### Successfully received multipart request ###");
    for (String elementName : multipartRequest.keySet()) {
        if (elementName.equals("company")){
            System.out.println("\t" + elementName + " - " +
                ((String[]) multipartRequest.getFirst("company"))[0]);
        }
        else if (elementName.equals("company-logo")){
            System.out.println("\t" + elementName + " - as UploadedMultipartFile: " +
                ((UploadedMultipartFile) multipartRequest
                    .getFirst("company-logo")).getOriginalFilename());
        }
    }
}
您应该会看到以下输出:
### Successfully received multipart request ###
   company - SpringSource
   company-logo - as UploadedMultipartFile: spring09_logo.png