|
对于最新的稳定版本,请使用 Spring Security 6.4.3! |
授权 HttpServletRequests
Spring Security 允许您在请求级别对授权进行建模。
例如,使用 Spring Security,您可以说/admin需要一个权限,而所有其他页面只需要身份验证。
默认情况下, Spring Security 要求对每个请求进行身份验证。
也就是说,无论何时使用一HttpSecurity实例,则必须声明您的授权规则。
只要您有HttpSecurity实例,您至少应该这样做:
-
Java
-
Kotlin
-
Xml
http
    .authorizeHttpRequests((authorize) -> authorize
        .anyRequest().authenticated()
    )
http {
authorizeHttpRequests {
authorize(anyRequest, authenticated)
}
}<http>
<intercept-url pattern="/**" access="authenticated"/>
</http>这告诉 Spring Security,应用程序中的任何端点都要求至少对安全上下文进行身份验证才能允许它。
在许多情况下,您的授权规则将比这更复杂,因此请考虑以下使用案例:
-
我有一个应用程序,它使用
authorizeRequests我想将其迁移到authorizeHttpRequests -
我想匹配 request,并将 Spring MVC 映射到默认 servlet 以外的其他内容
-
我想授权请求
-
我想将请求授权委托给策略代理
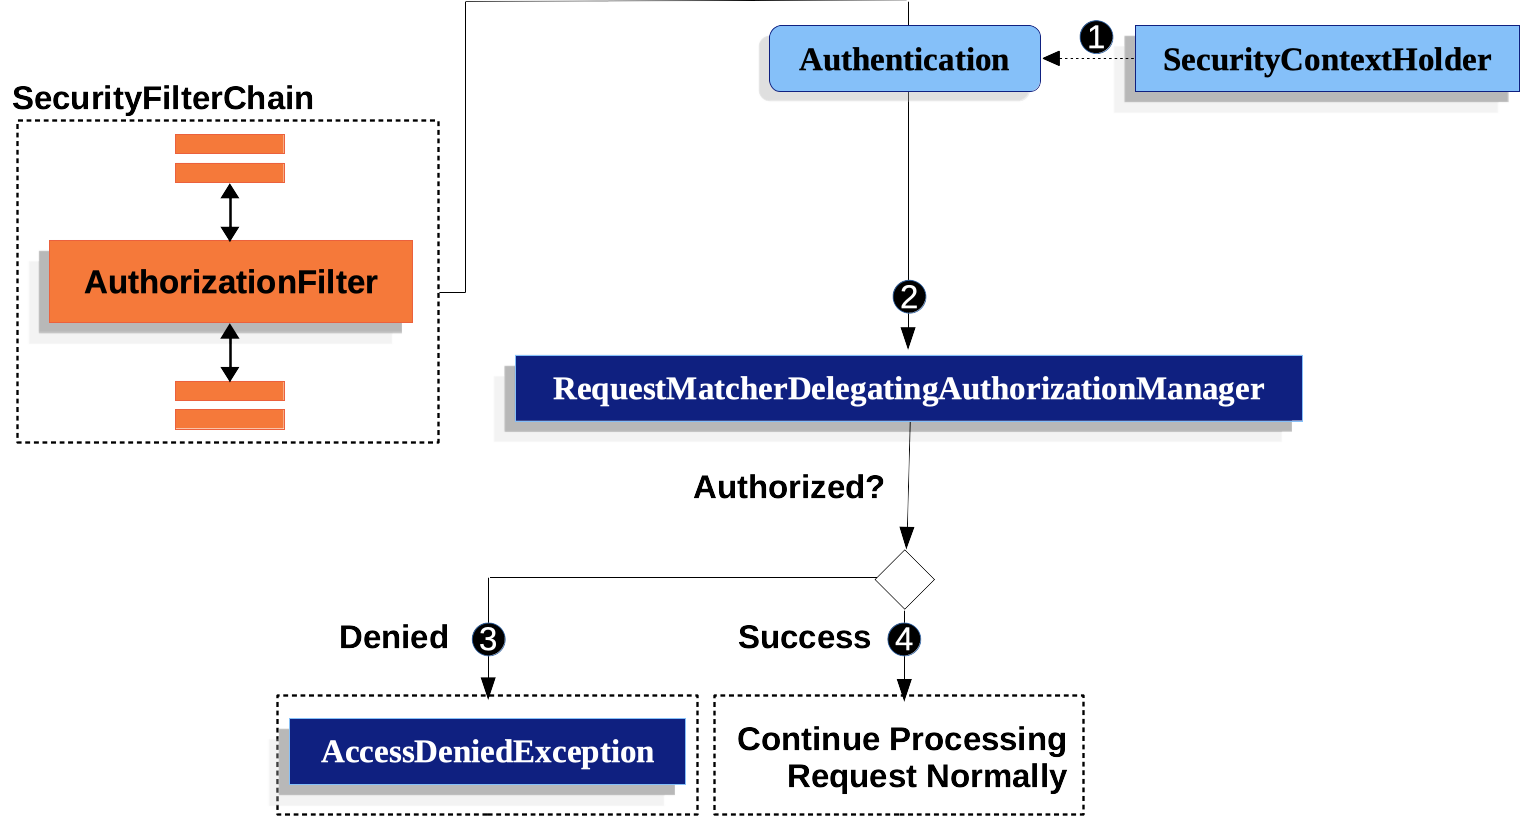
了解请求授权组件的工作原理
| 本节以 Servlet 体系结构和实现为基础,深入探讨了基于 Servlet 的应用程序在请求级别如何进行授权。 |
-
 首先,
首先,AuthorizationFilter构造一个Supplier从SecurityContextHolder检索Authentication。 -
 其次,它将
其次,它将Supplier<Authentication>和HttpServletRequest到AuthorizationManager. 这AuthorizationManager将请求与authorizeHttpRequests,并运行相应的规则。-
 如果授权被拒绝,一
AuthorizationDeniedEvent发布和AccessDeniedException被抛出。 在这种情况下,ExceptionTranslationFilter处理AccessDeniedException. -
 如果授予访问权限,一
AuthorizationGrantedEvent发布和AuthorizationFilter继续使用 FilterChain,它允许应用程序正常处理。
-
AuthorizationFilter默认是最后一个
这AuthorizationFilter默认情况下,在 Spring Security 过滤器链中排在最后。
这意味着 Spring Security 的身份验证过滤器、漏洞利用保护和其他过滤器集成不需要授权。
如果您在AuthorizationFilter,他们也不需要授权;否则,他们会。
这通常变得很重要的地方是当你添加 Spring MVC 端点时。
因为它们由DispatcherServlet这是在AuthorizationFilter,您的终端节点需要包含在authorizeHttpRequests被允许.
所有派单均已获得授权
这AuthorizationFilter不仅在每个请求上运行,而且在每个 dispatch 上运行。
这意味着REQUESTdispatch 需要授权,但也需要FORWARDs,ERRORs 和INCLUDEs.
例如,Spring MVC 可以FORWARD对呈现 Thymeleaf 模板的视图解析器的请求,如下所示:
-
Java
-
Kotlin
@Controller
public class MyController {
    @GetMapping("/endpoint")
    public String endpoint() {
        return "endpoint";
    }
}
@Controller
class MyController {
@GetMapping("/endpoint")
fun endpoint(): String {
return "endpoint"
}
}在这种情况下,授权发生两次;一次用于授权/endpoint一次用于转发到 Thymeleaf 以呈现“endpoint”模板。
因此,您可能希望允许所有FORWARD调度.
这个原则的另一个例子是 Spring Boot 如何处理错误。 如果容器捕获到异常,请说如下:
-
Java
-
Kotlin
@Controller
public class MyController {
    @GetMapping("/endpoint")
    public String endpoint() {
        throw new UnsupportedOperationException("unsupported");
    }
}
@Controller
class MyController {
@GetMapping("/endpoint")
fun endpoint(): String {
throw UnsupportedOperationException("unsupported")
}
}然后 Boot 会将其调度到ERROR遣。
在这种情况下,授权也会发生两次;一次用于授权/endpoint一次用于调度错误。
因此,您可能希望允许所有ERROR调度.
AuthenticationLookup is Deferred
这与authorizeHttpRequests当请求始终被允许或始终被拒绝时。
在这些情况下,这Authentication,从而加快请求速度。
授权终端节点
您可以通过按优先顺序添加更多规则来将 Spring Security 配置为具有不同的规则。
如果您想要求这样做/endpoint只能由具有USER权限,那么您可以执行以下作:
-
Java
-
Kotlin
-
Xml
@Bean
SecurityFilterChain web(HttpSecurity http) throws Exception {
	http
		.authorizeHttpRequests((authorize) -> authorize
			.requestMatchers("/endpoint").hasAuthority("USER")
			.anyRequest().authenticated()
		)
        // ...

	return http.build();
}
@Bean
SecurityFilterChain web(HttpSecurity http) throws Exception {
http {
authorizeHttpRequests {
authorize("/endpoint", hasAuthority("USER"))
authorize(anyRequest, authenticated)
}
}
return http.build();
}<http>
<intercept-url pattern="/endpoint" access="hasAuthority('USER')"/>
<intercept-url pattern="/**" access="authenticated"/>
</http>如您所见,声明可以分解为 pattern/rule 对。
AuthorizationFilter按列出的顺序处理这些对,仅将第一个匹配项应用于请求。
这意味着即使 would also match for/**/endpoint以上规则都不是问题。
阅读上述规则的方法是“如果请求是/endpoint,然后需要USER柄;否则,只需要身份验证”。
Spring Security 支持多种模式和多种规则;您还可以以编程方式创建自己的 each。
获得授权后,您可以通过以下方式使用 Security 的测试支持对其进行测试:
-
Java
@WithMockUser(authorities="USER")
@Test
void endpointWhenUserAuthorityThenAuthorized() {
    this.mvc.perform(get("/endpoint"))
        .andExpect(status().isOk());
}

@WithMockUser
@Test
void endpointWhenNotUserAuthorityThenForbidden() {
    this.mvc.perform(get("/endpoint"))
        .andExpect(status().isForbidden());
}

@Test
void anyWhenUnauthenticatedThenUnauthorized() {
    this.mvc.perform(get("/any"))
        .andExpect(status().isUnauthorized());
}
匹配请求
在上面,您已经看到了两种匹配请求的方法。
您看到的第一个是最简单的,即匹配任何请求。
使用 Ant 进行匹配
Ant 是 Spring Security 用于匹配请求的默认语言。
您可以使用它来匹配单个终端节点或目录,甚至可以捕获占位符以供以后使用。 您还可以对其进行优化以匹配一组特定的 HTTP 方法。
假设您不想匹配/endpointendpoint 中,您希望匹配/resource目录。
在这种情况下,您可以执行如下作:
-
Java
-
Kotlin
-
Xml
http
    .authorizeHttpRequests((authorize) -> authorize
        .requestMatchers("/resource/**").hasAuthority("USER")
        .anyRequest().authenticated()
    )
http {
authorizeHttpRequests {
authorize("/resource/**", hasAuthority("USER"))
authorize(anyRequest, authenticated)
}
}<http>
<intercept-url pattern="/resource/**" access="hasAuthority('USER')"/>
<intercept-url pattern="/**" access="authenticated"/>
</http>解读方式是 “如果请求是/resource或某个子目录中,需要USER柄;否则,只需要身份验证”
您还可以从请求中提取路径值,如下所示:
-
Java
-
Kotlin
-
Xml
http
    .authorizeHttpRequests((authorize) -> authorize
        .requestMatchers("/resource/{name}").access(new WebExpressionAuthorizationManager("#name == authentication.name"))
        .anyRequest().authenticated()
    )
http {
authorizeHttpRequests {
authorize("/resource/{name}", WebExpressionAuthorizationManager("#name == authentication.name"))
authorize(anyRequest, authenticated)
}
}<http>
<intercept-url pattern="/resource/{name}" access="#name == authentication.name"/>
<intercept-url pattern="/**" access="authenticated"/>
</http>获得授权后,您可以通过以下方式使用 Security 的测试支持对其进行测试:
-
Java
@WithMockUser(authorities="USER")
@Test
void endpointWhenUserAuthorityThenAuthorized() {
this.mvc.perform(get("/endpoint/jon"))
.andExpect(status().isOk());
}
@WithMockUser
@Test
void endpointWhenNotUserAuthorityThenForbidden() {
this.mvc.perform(get("/endpoint/jon"))
.andExpect(status().isForbidden());
}
@Test
void anyWhenUnauthenticatedThenUnauthorized() {
this.mvc.perform(get("/any"))
.andExpect(status().isUnauthorized());
}| Spring Security 仅匹配 paths。 如果要匹配查询参数,则需要自定义请求匹配器。 |
使用正则表达式进行匹配
Spring Security 支持针对正则表达式的匹配请求。
如果您想应用比子目录更严格的匹配条件,这会派上用场。**
例如,考虑一个包含 username 的路径和所有 username 都必须是字母数字的规则。
您可以使用RegexRequestMatcher要遵守此规则,如下所示:
-
Java
-
Kotlin
-
Xml
http
.authorizeHttpRequests((authorize) -> authorize
.requestMatchers(RegexRequestMatcher.regexMatcher("/resource/[A-Za-z0-9]+")).hasAuthority("USER")
.anyRequest().denyAll()
)http {
authorizeHttpRequests {
authorize(RegexRequestMatcher.regexMatcher("/resource/[A-Za-z0-9]+"), hasAuthority("USER"))
authorize(anyRequest, denyAll)
}
}<http>
<intercept-url request-matcher="regex" pattern="/resource/[A-Za-z0-9]+" access="hasAuthority('USER')"/>
<intercept-url pattern="/**" access="denyAll"/>
</http>通过 Http 方法匹配
您还可以通过 HTTP 方法匹配规则。
这很方便的一个地方是通过授予的权限进行授权时,例如被授予read或write特权。
要要求所有GETs 的read权限和全部POSTs 的write权限,您可以执行如下作:
-
Java
-
Kotlin
-
Xml
http
.authorizeHttpRequests((authorize) -> authorize
.requestMatchers(HttpMethod.GET).hasAuthority("read")
.requestMatchers(HttpMethod.POST).hasAuthority("write")
.anyRequest().denyAll()
)http {
authorizeHttpRequests {
authorize(HttpMethod.GET, hasAuthority("read"))
authorize(HttpMethod.POST, hasAuthority("write"))
authorize(anyRequest, denyAll)
}
}<http>
<intercept-url http-method="GET" pattern="/**" access="hasAuthority('read')"/>
<intercept-url http-method="POST" pattern="/**" access="hasAuthority('write')"/>
<intercept-url pattern="/**" access="denyAll"/>
</http>这些授权规则应为:“如果请求是 GET,则 requireread许可;否则,如果请求是 POST,则 requirewrite许可;否则,拒绝请求”
| 默认情况下拒绝请求是一种健康的安全做法,因为它会将规则集变成 allow 名单。 |
获得授权后,您可以通过以下方式使用 Security 的测试支持对其进行测试:
-
Java
@WithMockUser(authorities="read")
@Test
void getWhenReadAuthorityThenAuthorized() {
this.mvc.perform(get("/any"))
.andExpect(status().isOk());
}
@WithMockUser
@Test
void getWhenNoReadAuthorityThenForbidden() {
this.mvc.perform(get("/any"))
.andExpect(status().isForbidden());
}
@WithMockUser(authorities="write")
@Test
void postWhenWriteAuthorityThenAuthorized() {
this.mvc.perform(post("/any").with(csrf()))
.andExpect(status().isOk());
}
@WithMockUser(authorities="read")
@Test
void postWhenNoWriteAuthorityThenForbidden() {
this.mvc.perform(get("/any").with(csrf()))
.andExpect(status().isForbidden());
}按 Dispatcher 类型匹配
| XML 当前不支持此功能 |
如前所述,默认情况下, Spring Security 授权所有调度程序类型。
即使REQUESTdispatch 会延续到后续的 dispatch 中,细微的不匹配有时会导致意外的AccessDeniedException.
要解决此问题,您可以配置 Spring Security Java 配置以允许调度程序类型,例如FORWARD和ERROR这样:
http
.authorizeHttpRequests((authorize) -> authorize
.dispatcherTypeMatchers(DispatcherType.FORWARD, DispatcherType.ERROR).permitAll()
.requestMatchers("/endpoint").permitAll()
.anyRequest().denyAll()
)http {
authorizeHttpRequests {
authorize(DispatcherTypeRequestMatcher(DispatcherType.FORWARD), permitAll)
authorize(DispatcherTypeRequestMatcher(DispatcherType.ERROR), permitAll)
authorize("/endpoint", permitAll)
authorize(anyRequest, denyAll)
}
}使用 MvcRequestMatcher
一般来说,您可以使用requestMatchers(String)如上所示。
但是,如果将 Spring MVC 映射到不同的 servlet 路径,则需要在安全配置中考虑这一点。
例如,如果 Spring MVC 映射到/spring-mvc而不是(默认),则您可能有一个类似于//spring-mvc/my/controller。
您需要使用MvcRequestMatcher要像这样在配置中拆分 servlet 路径和控制器路径:
@Bean
MvcRequestMatcher.Builder mvc(HandlerMappingIntrospector introspector) {
return new MvcRequestMatcher.Builder(introspector).servletPath("/spring-mvc");
}
@Bean
SecurityFilterChain appEndpoints(HttpSecurity http, MvcRequestMatcher.Builder mvc) {
http
.authorizeHttpRequests((authorize) -> authorize
.requestMatchers(mvc.pattern("/my/controller/**")).hasAuthority("controller")
.anyRequest().authenticated()
);
return http.build();
}@Bean
fun mvc(introspector: HandlerMappingIntrospector): MvcRequestMatcher.Builder =
MvcRequestMatcher.Builder(introspector).servletPath("/spring-mvc");
@Bean
fun appEndpoints(http: HttpSecurity, mvc: MvcRequestMatcher.Builder): SecurityFilterChain =
http {
authorizeHttpRequests {
authorize(mvc.pattern("/my/controller/**"), hasAuthority("controller"))
authorize(anyRequest, authenticated)
}
}<http>
<intercept-url servlet-path="/spring-mvc" pattern="/my/controller/**" access="hasAuthority('controller')"/>
<intercept-url pattern="/**" access="authenticated"/>
</http>这种需求至少可以通过两种不同的方式出现:
-
如果您使用
spring.mvc.servlet.pathBoot 属性将默认路径 () 更改为其他路径/ -
如果您注册了多个 Spring MVC
DispatcherServlet(因此要求其中一个不是默认路径)
使用自定义匹配程序
| XML 当前不支持此功能 |
在 Java 配置中,您可以创建自己的RequestMatcher并将其提供给 DSL,如下所示:
RequestMatcher printview = (request) -> request.getParameter("print") != null;
http
.authorizeHttpRequests((authorize) -> authorize
.requestMatchers(printview).hasAuthority("print")
.anyRequest().authenticated()
)val printview: RequestMatcher = { (request) -> request.getParameter("print") != null }
http {
authorizeHttpRequests {
authorize(printview, hasAuthority("print"))
authorize(anyRequest, authenticated)
}
}因为RequestMatcher是一个功能接口,您可以在 DSL 中将其作为 lambda 提供。
但是,如果要从请求中提取值,则需要有一个具体的类,因为这需要覆盖default方法。 |
获得授权后,您可以通过以下方式使用 Security 的测试支持对其进行测试:
-
Java
@WithMockUser(authorities="print")
@Test
void printWhenPrintAuthorityThenAuthorized() {
this.mvc.perform(get("/any?print"))
.andExpect(status().isOk());
}
@WithMockUser
@Test
void printWhenNoPrintAuthorityThenForbidden() {
this.mvc.perform(get("/any?print"))
.andExpect(status().isForbidden());
}授权请求
一旦一个请求被匹配,你就可以用已经看到的几种方式来授权它,比如permitAll,denyAll和hasAuthority.
作为快速摘要,以下是 DSL 中内置的授权规则:
-
permitAll- 该请求不需要授权,并且是公共端点;请注意,在本例中,这Authentication从不从会话中检索 -
denyAll- 在任何情况下都不允许该请求;请注意,在本例中,Authentication从不从会话中检索 -
hasAuthority- 该请求要求Authentication有一个GrantedAuthority匹配给定值 -
hasRole- 快捷方式hasAuthoritythat 前缀ROLE_或配置为默认前缀的任何内容 -
hasAnyAuthority- 该请求要求Authentication有一个GrantedAuthority匹配任何给定值 -
hasAnyRole- 快捷方式hasAnyAuthoritythat 前缀ROLE_或配置为默认前缀的任何内容 -
access- 请求使用此自定义AuthorizationManager确定访问权限
现在,您已经了解了模式、规则以及如何将它们配对在一起,您应该能够理解这个更复杂的示例中发生了什么:
-
Java
import static jakarta.servlet.DispatcherType.*;
import static org.springframework.security.authorization.AuthorizationManagers.allOf;
import static org.springframework.security.authorization.AuthorityAuthorizationManager.hasAuthority;
import static org.springframework.security.authorization.AuthorityAuthorizationManager.hasRole;
@Bean
SecurityFilterChain web(HttpSecurity http) throws Exception {
http
// ...
.authorizeHttpRequests(authorize -> authorize (1)
.dispatcherTypeMatchers(FORWARD, ERROR).permitAll() (2)
.requestMatchers("/static/**", "/signup", "/about").permitAll() (3)
.requestMatchers("/admin/**").hasRole("ADMIN") (4)
.requestMatchers("/db/**").access(allOf(hasAuthority("db"), hasRole("ADMIN"))) (5)
.anyRequest().denyAll() (6)
);
return http.build();
}
1
There are multiple authorization rules specified.
Each rule is considered in the order they were declared.
2
Dispatches FORWARD and ERROR are permitted to allow Spring MVC to render views and Spring Boot to render errors
3
We specified multiple URL patterns that any user can access.
Specifically, any user can access a request if the URL starts with "/static/", equals "/signup", or equals "/about".
4
Any URL that starts with "/admin/" will be restricted to users who have the role "ROLE_ADMIN".
You will notice that since we are invoking the hasRole method we do not need to specify the "ROLE_" prefix.
5
Any URL that starts with "/db/" requires the user to have both been granted the "db" permission as well as be a "ROLE_ADMIN".
You will notice that since we are using the hasRole expression we do not need to specify the "ROLE_" prefix.
6
Any URL that has not already been matched on is denied access.
This is a good strategy if you do not want to accidentally forget to update your authorization rules.
Expressing Authorization with SpEL
While using a concrete AuthorizationManager is recommended, there are some cases where an expression is necessary, like with <intercept-url> or with JSP Taglibs.
For that reason, this section will focus on examples from those domains.
Given that, let’s cover Spring Security’s Web Security Authorization SpEL API a bit more in depth.
Spring Security encapsulates all of its authorization fields and methods in a set of root objects.
The most generic root object is called SecurityExpressionRoot and it forms the basis for WebSecurityExpressionRoot.
Spring Security supplies this root object to StandardEvaluationContext when preparing to evaluate an authorization expression.
Using Authorization Expression Fields and Methods
The first thing this provides is an enhanced set of authorization fields and methods to your SpEL expressions.
What follows is a quick overview of the most common methods:
-
permitAll - The request requires no authorization to be invoked; note that in this case, the Authentication is never retrieved from the session
-
denyAll - The request is not allowed under any circumstances; note that in this case, the Authentication is never retrieved from the session
-
hasAuthority - The request requires that the Authentication have a GrantedAuthority that matches the given value
-
hasRole - A shortcut for hasAuthority that prefixes ROLE_ or whatever is configured as the default prefix
-
hasAnyAuthority - The request requires that the Authentication have a GrantedAuthority that matches any of the given values
-
hasAnyRole - A shortcut for hasAnyAuthority that prefixes ROLE_ or whatever is configured as the default prefix
-
hasPermission - A hook into your PermissionEvaluator instance for doing object-level authorization
And here is a brief look at the most common fields:
-
authentication - The Authentication instance associated with this method invocation
-
principal - The Authentication#getPrincipal associated with this method invocation
Having now learned the patterns, rules, and how they can be paired together, you should be able to understand what is going on in this more complex example:
Authorize Requests Using SpEL
-
Xml
<http>
<intercept-url pattern="/static/**" access="permitAll"/> (1)
<intercept-url pattern="/admin/**" access="hasRole('ADMIN')"/> (2)
<intercept-url pattern="/db/**" access="hasAuthority('db') and hasRole('ADMIN')"/> (3)
<intercept-url pattern="/**" access="denyAll"/> (4)
</http>
1
We specified a URL pattern that any user can access.
Specifically, any user can access a request if the URL starts with "/static/".
2
Any URL that starts with "/admin/" will be restricted to users who have the role "ROLE_ADMIN".
You will notice that since we are invoking the hasRole method we do not need to specify the "ROLE_" prefix.
3
Any URL that starts with "/db/" requires the user to have both been granted the "db" permission as well as be a "ROLE_ADMIN".
You will notice that since we are using the hasRole expression we do not need to specify the "ROLE_" prefix.
4
Any URL that has not already been matched on is denied access.
This is a good strategy if you do not want to accidentally forget to update your authorization rules.
Using Path Parameters
Additionally, Spring Security provides a mechanism for discovering path parameters so they can also be accessed in the SpEL expression as well.
For example, you can access a path parameter in your SpEL expression in the following way:
Authorize Request using SpEL path variable
-
Xml
<http>
    <intercept-url pattern="/resource/{name}" access="#name == authentication.name"/>
    <intercept-url pattern="/**" access="authenticated"/>
</http>
This expression refers to the path variable after /resource/ and requires that it is equal to Authentication#getName.
Use an Authorization Database, Policy Agent, or Other Service
If you want to configure Spring Security to use a separate service for authorization, you can create your own AuthorizationManager and match it to anyRequest.
First, your AuthorizationManager may look something like this:
Open Policy Agent Authorization Manager
-
Java
@Component
public final class OpenPolicyAgentAuthorizationManager implements AuthorizationManager<RequestAuthorizationContext> {
@Override
public AuthorizationDecision check(Supplier<Authentication> authentication, RequestAuthorizationContext context) {
// make request to Open Policy Agent
}
}
Then, you can wire it into Spring Security in the following way:
Any Request Goes to Remote Service
-
Java
@Bean
SecurityFilterChain web(HttpSecurity http, AuthorizationManager<RequestAuthorizationContext> authz) throws Exception {
http
// ...
.authorizeHttpRequests((authorize) -> authorize
.anyRequest().access(authz)
);
return http.build();
}
Favor permitAll over ignoring
When you have static resources it can be tempting to configure the filter chain to ignore these values.
A more secure approach is to permit them using permitAll like so:
Example 4. Permit Static Resources
Java
http
.authorizeHttpRequests((authorize) -> authorize
.requestMatchers("/css/**").permitAll()
.anyRequest().authenticated()
)
Kotlin
http {
authorizeHttpRequests {
authorize("/css/**", permitAll)
authorize(anyRequest, authenticated)
}
}
It’s more secure because even with static resources it’s important to write secure headers, which Spring Security cannot do if the request is ignored.
In this past, this came with a performance tradeoff since the session was consulted by Spring Security on every request.
As of Spring Security 6, however, the session is no longer pinged unless required by the authorization rule.
Because the performance impact is now addressed, Spring Security recommends using at least permitAll for all requests.
Migrating from authorizeRequests
AuthorizationFilter supersedes FilterSecurityInterceptor.
To remain backward compatible, FilterSecurityInterceptor remains the default.
This section discusses how AuthorizationFilter works and how to override the default configuration.
The AuthorizationFilter provides authorization for HttpServletRequests.
It is inserted into the FilterChainProxy as one of the Security Filters.
You can override the default when you declare a SecurityFilterChain.
Instead of using authorizeRequests, use authorizeHttpRequests, like so:
Use authorizeHttpRequests
-
Java
@Bean
SecurityFilterChain web(HttpSecurity http) throws AuthenticationException {
http
.authorizeHttpRequests((authorize) -> authorize
.anyRequest().authenticated();
)
// ...
return http.build();
}
This improves on authorizeRequests in a number of ways:
-
Uses the simplified AuthorizationManager API instead of metadata sources, config attributes, decision managers, and voters.
This simplifies reuse and customization.
-
Delays Authentication lookup.
Instead of the authentication needing to be looked up for every request, it will only look it up in requests where an authorization decision requires authentication.
-
Bean-based configuration support.
When authorizeHttpRequests is used instead of authorizeRequests, then AuthorizationFilter is used instead of FilterSecurityInterceptor.
Migrating Expressions
Where possible, it is recommended that you use type-safe authorization managers instead of SpEL.
For Java configuration, WebExpressionAuthorizationManager is available to help migrate legacy SpEL.
To use WebExpressionAuthorizationManager, you can construct one with the expression you are trying to migrate, like so:
-
Java
-
Kotlin
.requestMatchers("/test/**").access(new WebExpressionAuthorizationManager("hasRole('ADMIN') && hasRole('USER')"))
.requestMatchers("/test/**").access(WebExpressionAuthorizationManager("hasRole('ADMIN') && hasRole('USER')"))
If you are referring to a bean in your expression like so: @webSecurity.check(authentication, request), it’s recommended that you instead call the bean directly, which will look something like the following:
-
Java
-
Kotlin
.requestMatchers("/test/**").access((authentication, context) ->
new AuthorizationDecision(webSecurity.check(authentication.get(), context.getRequest())))
.requestMatchers("/test/**").access((authentication, context): AuthorizationManager<RequestAuthorizationContext> ->
AuthorizationDecision(webSecurity.check(authentication.get(), context.getRequest())))
For complex instructions that include bean references as well as other expressions, it is recommended that you change those to implement AuthorizationManager and refer to them by calling .access(AuthorizationManager).
If you are not able to do that, you can configure a DefaultHttpSecurityExpressionHandler with a bean resolver and supply that to WebExpressionAuthorizationManager#setExpressionhandler.
Security Matchers
The RequestMatcher interface is used to determine if a request matches a given rule.
We use securityMatchers to determine if a given HttpSecurity should be applied to a given request.
The same way, we can use requestMatchers to determine the authorization rules that we should apply to a given request.
Look at the following example:
-
Java
-
Kotlin
@Configuration
@EnableWebSecurity
public class SecurityConfig {
@Bean
public SecurityFilterChain securityFilterChain(HttpSecurity http) throws Exception {
http
.securityMatcher("/api/**") (1)
.authorizeHttpRequests(authorize -> authorize
.requestMatchers("/user/**").hasRole("USER") (2)
.requestMatchers("/admin/**").hasRole("ADMIN") (3)
.anyRequest().authenticated() (4)
)
.formLogin(withDefaults());
return http.build();
}
}
@Configuration
@EnableWebSecurity
open class SecurityConfig {
@Bean
open fun web(http: HttpSecurity): SecurityFilterChain {
http {
securityMatcher("/api/**") (1)
authorizeHttpRequests {
authorize("/user/**", hasRole("USER")) (2)
authorize("/admin/**", hasRole("ADMIN")) (3)
authorize(anyRequest, authenticated) (4)
}
}
return http.build()
}
}
1
Configure HttpSecurity to only be applied to URLs that start with /api/
2
Allow access to URLs that start with /user/ to users with the USER role
3
Allow access to URLs that start with /admin/ to users with the ADMIN role
4
Any other request that doesn’t match the rules above, will require authentication
The securityMatcher(s) and requestMatcher(s) methods will decide which RequestMatcher implementation fits best for your application: If Spring MVC is in the classpath, then MvcRequestMatcher will be used, otherwise, AntPathRequestMatcher will be used.
You can read more about the Spring MVC integration here.
If you want to use a specific RequestMatcher, just pass an implementation to the securityMatcher and/or requestMatcher methods:
-
Java
-
Kotlin
import static org.springframework.security.web.util.matcher.AntPathRequestMatcher.antMatcher; (1)
import static org.springframework.security.web.util.matcher.RegexRequestMatcher.regexMatcher;
@Configuration
@EnableWebSecurity
public class SecurityConfig {
@Bean
public SecurityFilterChain securityFilterChain(HttpSecurity http) throws Exception {
http
.securityMatcher(antMatcher("/api/**")) (2)
.authorizeHttpRequests(authorize -> authorize
.requestMatchers(antMatcher("/user/**")).hasRole("USER") (3)
.requestMatchers(regexMatcher("/admin/.*")).hasRole("ADMIN") (4)
.requestMatchers(new MyCustomRequestMatcher()).hasRole("SUPERVISOR") (5)
.anyRequest().authenticated()
)
.formLogin(withDefaults());
return http.build();
}
}
public class MyCustomRequestMatcher implements RequestMatcher {
@Override
public boolean matches(HttpServletRequest request) {
// ...
}
}
import org.springframework.security.web.util.matcher.AntPathRequestMatcher.antMatcher (1)
import org.springframework.security.web.util.matcher.RegexRequestMatcher.regexMatcher
@Configuration
@EnableWebSecurity
open class SecurityConfig {
@Bean
open fun web(http: HttpSecurity): SecurityFilterChain {
http {
securityMatcher(antMatcher("/api/**")) (2)
authorizeHttpRequests {
authorize(antMatcher("/user/**"), hasRole("USER")) (3)
authorize(regexMatcher("/admin/**"), hasRole("ADMIN")) (4)
authorize(MyCustomRequestMatcher(), hasRole("SUPERVISOR")) (5)
authorize(anyRequest, authenticated)
}
}
return http.build()
}
}
1
Import the static factory methods from AntPathRequestMatcher and RegexRequestMatcher to create RequestMatcher instances.
2
Configure HttpSecurity to only be applied to URLs that start with /api/, using AntPathRequestMatcher
3
Allow access to URLs that start with /user/ to users with the USER role, using AntPathRequestMatcher
4
Allow access to URLs that start with /admin/ to users with the ADMIN role, using RegexRequestMatcher
5
Allow access to URLs that match the MyCustomRequestMatcher to users with the SUPERVISOR role, using a custom RequestMatcher
Further Reading
Now that you have secured your application’s requests, consider securing its methods.
You can also read further on testing your application or on integrating Spring Security with other aspects of you application like the data layer or tracing and metrics.