配置步骤
配置Step
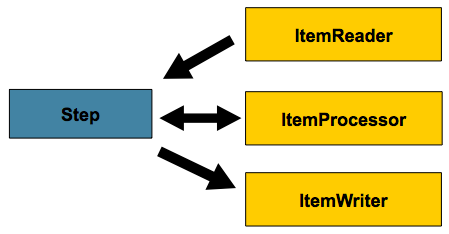
如域章节中所述,Step是一个
domain 对象,该对象封装了批处理作业的独立顺序阶段,并且
包含定义和控制实际批次所需的所有信息
加工。这必然是一个模糊的描述,因为任何给定Step由编写Job.一个Step可以像
或开发人员希望的复杂。一个简单的Step可能会将数据从文件加载到
数据库,只需要很少或不需要代码(取决于所使用的实现)。一个 更多
复杂Step可能具有复杂的业务规则,这些规则作为
正在处理,如下图所示:
面向数据块的处理
Spring Batch 在其最常见的 “面向块 ”的处理样式中使用
实现。面向数据块的处理是指一次读取一个数据,并且
创建在事务边界内写出的 'chunks' 。一旦
items read 等于提交间隔,则整个 chunk 由ItemWriter,然后提交事务。下图显示了
过程:
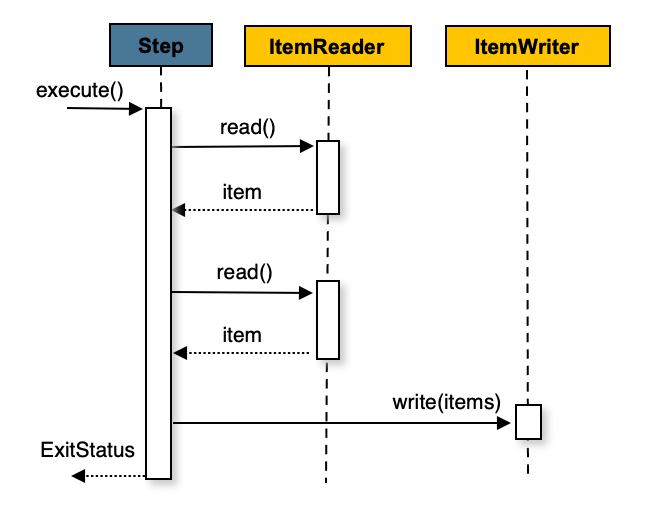
以下伪代码以简化的形式显示了相同的概念:
List items = new Arraylist();
for(int i = 0; i < commitInterval; i++){
    Object item = itemReader.read();
    if (item != null) {
        items.add(item);
    }
}
itemWriter.write(items);
您还可以使用可选的ItemProcessor在将项目传递给ItemWriter.下图
显示了ItemProcessor在步骤中注册:
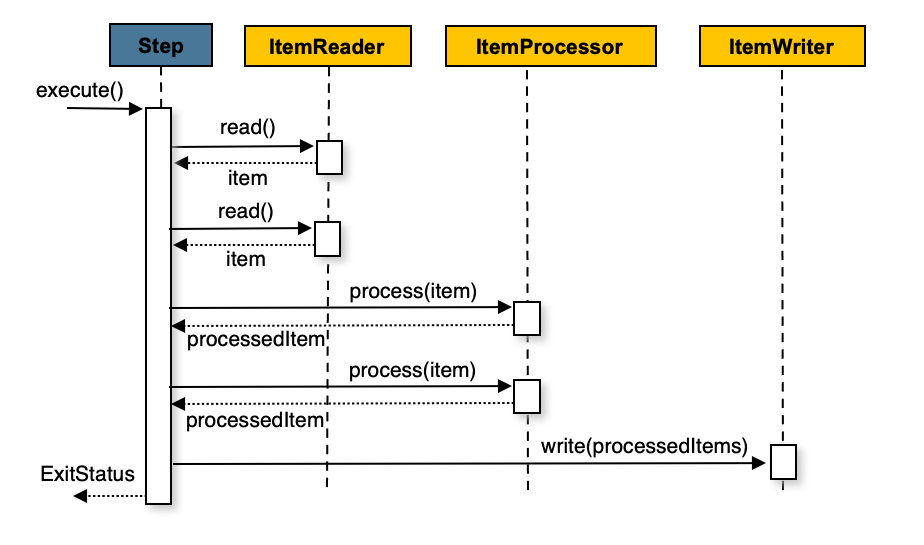
以下伪代码显示了如何以简化的形式实现这一点:
List items = new Arraylist();
for(int i = 0; i < commitInterval; i++){
    Object item = itemReader.read();
    if (item != null) {
        items.add(item);
    }
}

List processedItems = new Arraylist();
for(Object item: items){
    Object processedItem = itemProcessor.process(item);
    if (processedItem != null) {
        processedItems.add(processedItem);
    }
}

itemWriter.write(processedItems);
有关项目处理器及其使用案例的更多详细信息,请参阅项目处理部分。
配置步骤
尽管Step,它是一个
极其复杂的类,可能包含许多协作者。
为了简化配置,您可以使用 Spring Batch XML 命名空间,因为 以下示例显示:
<job id="sampleJob" job-repository="jobRepository">
    <step id="step1">
        <tasklet transaction-manager="transactionManager">
            <chunk reader="itemReader" writer="itemWriter" commit-interval="10"/>
        </tasklet>
    </step>
</job>
使用 Java 配置时,您可以使用 Spring Batch 构建器,因为 以下示例显示:
/**
 * Note the JobRepository is typically autowired in and not needed to be explicitly
 * configured
 */
@Bean
public Job sampleJob(JobRepository jobRepository, Step sampleStep) {
    return new JobBuilder("sampleJob", jobRepository)
                .start(sampleStep)
                .build();
}

/**
 * Note the TransactionManager is typically autowired in and not needed to be explicitly
 * configured
 */
@Bean
public Step sampleStep(JobRepository jobRepository, PlatformTransactionManager transactionManager) {
	return new StepBuilder("sampleStep", jobRepository)
				.<String, String>chunk(10, transactionManager)
				.reader(itemReader())
				.writer(itemWriter())
				.build();
}
前面的配置包括创建面向项的 步:
-
reader:这ItemReader,它提供用于处理的项目。 -
writer:这ItemWriter处理ItemReader.
-
transaction-manager: Spring的PlatformTransactionManager开始并提交 处理期间的事务。
-
transactionManager: Spring的PlatformTransactionManager开始并提交 处理期间的事务。
-
job-repository:特定于 XML 的JobRepository定期存储 这StepExecution和ExecutionContext在处理期间(就在提交之前)。为 内联<step/>(在<job/>),它是<job/>元素。对于独立的<step/>,它被定义为<tasklet/>.
-
repository:特定于 Java 的JobRepository定期存储 这StepExecution和ExecutionContext在处理期间(就在提交之前)。
-
commit-interval:要处理的项目数的 XML 特定名称 在提交事务之前。
-
chunk:依赖项的 Java 特定名称,指示这是一个 基于项目的步骤,交易前要处理的项目数为 承诺。
请注意,job-repository默认为jobRepository和transaction-manager默认为transactionManager.此外,ItemProcessor是
可选,因为该项可以直接从 Reader 传递给 Writer。
请注意,repository默认为jobRepository(通过@EnableBatchProcessing)
和transactionManager默认为transactionManager(从应用程序上下文提供)。
此外,ItemProcessor是可选的,因为 Item 可以是
直接从 reader 传递给 writer。
从 Parent 继承Step
如果一组Steps共享类似的配置,那么定义一个
“父级”Step从中得到混凝土Steps可以继承属性。与 class 相似
继承,即 “child”Step将其元素和属性与
父级的。子对象还会覆盖父对象的任何Steps.
在以下示例中,Step,concreteStep1继承自parentStep.是的
实例化itemReader,itemProcessor,itemWriter,startLimit=5和allowStartIfComplete=true.此外,commitInterval是5,因为它是
被concreteStep1 Step,如下例所示:
<step id="parentStep">
    <tasklet allow-start-if-complete="true">
        <chunk reader="itemReader" writer="itemWriter" commit-interval="10"/>
    </tasklet>
</step>

<step id="concreteStep1" parent="parentStep">
    <tasklet start-limit="5">
        <chunk processor="itemProcessor" commit-interval="5"/>
    </tasklet>
</step>这id属性在 job 元素中的步骤中仍然是必需的。这是两个人
原因:
-
这
id用作步骤名称,当保留StepExecution.如果相同 独立步骤在作业的多个步骤中引用,则会发生错误。
-
在创建任务流时,如本章后面所述,
next属性 应引用流程中的步骤,而不是独立步骤。
抽象Step
有时,可能需要定义父级Step那不是一个完整的Step配置。例如,如果reader,writer和taskletattributes 是
从Step配置,则初始化失败。如果父级必须
定义时,则abstract属性。一abstract Step仅扩展,从不实例化。
在以下示例中,Step (abstractParentStep) 不会被实例化,如果它
没有被宣布为抽象的。这Step, (concreteStep2) 具有itemReader,itemWriter和commit-interval=10.
<step id="abstractParentStep" abstract="true">
    <tasklet>
        <chunk commit-interval="10"/>
    </tasklet>
</step>

<step id="concreteStep2" parent="abstractParentStep">
    <tasklet>
        <chunk reader="itemReader" writer="itemWriter"/>
    </tasklet>
</step>
合并列表
上的一些可配置元素Steps是列表,例如<listeners/>元素。
如果父级和子级Steps声明一个<listeners/>元素中,
child's 列表将覆盖 parent's 列表。允许子项添加其他
listeners 添加到父级定义的 list 中,每个 list 元素都有一个merge属性。
如果元素指定merge="true",则子项的列表将与
parent's 而不是覆盖它。
在以下示例中,Step“concreteStep3” 是使用两个侦听器创建的:listenerOne和listenerTwo:
<step id="listenersParentStep" abstract="true">
    <listeners>
        <listener ref="listenerOne"/>
    <listeners>
</step>

<step id="concreteStep3" parent="listenersParentStep">
    <tasklet>
        <chunk reader="itemReader" writer="itemWriter" commit-interval="5"/>
    </tasklet>
    <listeners merge="true">
        <listener ref="listenerTwo"/>
    <listeners>
</step>
提交间隔
如前所述,步骤读入和写出项目,并定期提交
通过使用提供的PlatformTransactionManager.使用commit-interval的 1,它
在写入每个单独的项目后提交。这在许多情况下并不理想,
因为开始和提交事务的成本很高。理想情况下,最好是
在每笔交易中处理尽可能多的项目,这完全取决于
正在处理的数据类型以及步骤与之交互的资源。
因此,您可以配置提交中处理的项目数。
以下示例显示了step谁的tasklet具有commit-interval值 10,因为它将在 XML 中定义:
<job id="sampleJob">
    <step id="step1">
        <tasklet>
            <chunk reader="itemReader" writer="itemWriter" commit-interval="10"/>
        </tasklet>
    </step>
</job>以下示例显示了step谁的tasklet具有commit-interval值为 10,因为它将在 Java 中定义:
@Bean
public Job sampleJob(JobRepository jobRepository) {
    return new JobBuilder("sampleJob", jobRepository)
                     .start(step1())
                     .build();
}

@Bean
public Step step1(JobRepository jobRepository, PlatformTransactionManager transactionManager) {
	return new StepBuilder("step1", jobRepository)
				.<String, String>chunk(10, transactionManager)
				.reader(itemReader())
				.writer(itemWriter())
				.build();
}
在前面的示例中,每个事务中处理 10 个项目。在
开始处理,开始交易。此外,每次read在ItemReader,则计数器将递增。当它达到 10 时,聚合项的列表
传递给ItemWriter,并提交事务。
配置Step用于重启
在 “Configuring and Running a Job” 部分 ,重新启动Job进行了讨论。重新启动对步骤有许多影响,因此可能会
需要一些特定的配置。
设置起始限制
在许多情况下,您可能希望控制Step能
启动。例如,您可能需要配置特定的Step可能这样它
只运行一次,因为它会使某些资源失效,而这些资源必须先手动修复才能修复
再次运行。这可以在步骤级别上进行配置,因为不同的步骤可能具有
不同的要求。一个Step只能执行一次的
相同Job作为Step可以无限运行。
以下代码片段显示了 XML 中的启动限制配置示例:
<step id="step1">
    <tasklet start-limit="1">
        <chunk reader="itemReader" writer="itemWriter" commit-interval="10"/>
    </tasklet>
</step>
以下代码片段显示了 Java 中的启动限制配置示例:
@Bean
public Step step1(JobRepository jobRepository, PlatformTransactionManager transactionManager) {
	return new StepBuilder("step1", jobRepository)
				.<String, String>chunk(10, transactionManager)
				.reader(itemReader())
				.writer(itemWriter())
				.startLimit(1)
				.build();
}
前面示例中显示的步骤只能运行一次。尝试再次运行
导致StartLimitExceededException被扔出去。请注意,
start-limit 为Integer.MAX_VALUE.
重新启动已完成的Step
对于可重启的作业,可能有一个或多个步骤应始终为
运行,无论他们第一次是否成功。例如,可能
是验证步骤或Step,这会在处理之前清理资源。在
重新启动的作业的正常处理,状态为COMPLETED(意思是它
已成功完成),将被跳过。设置allow-start-if-complete自true覆盖此 URL,以便 STEP 始终运行。
以下代码片段显示了如何在 XML 中定义可重启的作业:
<step id="step1">
    <tasklet allow-start-if-complete="true">
        <chunk reader="itemReader" writer="itemWriter" commit-interval="10"/>
    </tasklet>
</step>
以下代码片段显示了如何在 Java 中定义可重启作业:
@Bean
public Step step1(JobRepository jobRepository, PlatformTransactionManager transactionManager) {
	return new StepBuilder("step1", jobRepository)
				.<String, String>chunk(10, transactionManager)
				.reader(itemReader())
				.writer(itemWriter())
				.allowStartIfComplete(true)
				.build();
}
Step重启配置示例
以下 XML 示例演示如何将作业配置为具有可以 重新 启动:
<job id="footballJob" restartable="true">
    <step id="playerload" next="gameLoad">
        <tasklet>
            <chunk reader="playerFileItemReader" writer="playerWriter"
                   commit-interval="10" />
        </tasklet>
    </step>
    <step id="gameLoad" next="playerSummarization">
        <tasklet allow-start-if-complete="true">
            <chunk reader="gameFileItemReader" writer="gameWriter"
                   commit-interval="10"/>
        </tasklet>
    </step>
    <step id="playerSummarization">
        <tasklet start-limit="2">
            <chunk reader="playerSummarizationSource" writer="summaryWriter"
                   commit-interval="10"/>
        </tasklet>
    </step>
</job>
以下 Java 示例演示如何将作业配置为具有可以 重新 启动:
@Bean
public Job footballJob(JobRepository jobRepository) {
	return new JobBuilder("footballJob", jobRepository)
				.start(playerLoad())
				.next(gameLoad())
				.next(playerSummarization())
				.build();
}

@Bean
public Step playerLoad(JobRepository jobRepository, PlatformTransactionManager transactionManager) {
	return new StepBuilder("playerLoad", jobRepository)
			.<String, String>chunk(10, transactionManager)
			.reader(playerFileItemReader())
			.writer(playerWriter())
			.build();
}

@Bean
public Step gameLoad(JobRepository jobRepository, PlatformTransactionManager transactionManager) {
	return new StepBuilder("gameLoad", jobRepository)
			.allowStartIfComplete(true)
			.<String, String>chunk(10, transactionManager)
			.reader(gameFileItemReader())
			.writer(gameWriter())
			.build();
}

@Bean
public Step playerSummarization(JobRepository jobRepository, PlatformTransactionManager transactionManager) {
	return new StepBuilder("playerSummarization", jobRepository)
			.startLimit(2)
			.<String, String>chunk(10, transactionManager)
			.reader(playerSummarizationSource())
			.writer(summaryWriter())
			.build();
}
前面的示例配置适用于加载有关足球的信息的作业
游戏并总结它们。它包含三个步骤:playerLoad,gameLoad和playerSummarization.这playerLoadstep 从平面文件加载玩家信息,
虽然gameLoadStep 对 Games 执行相同的作。最后一步playerSummarization,然后根据
提供的游戏。假设由playerLoad必须仅加载
只有一次gameLoad可以加载在特定目录中找到的任何游戏,
在它们成功加载到数据库后将其删除。因此,
这playerLoad步骤不包含其他配置。它可以启动任何数量
如果完成,则跳过 of times。这gameLoadStep 需要运行
每次,以防自上次运行以来添加了额外的文件。它有allow-start-if-complete设置为true始终启动。(假设
游戏加载到的 Database Table 上有一个进程指示器,以确保
新游戏可以通过 Summarization 步骤正确找到)。汇总步骤
这是作业中最重要的,配置为具有 2 的启动限制。这
非常有用,因为如果该步骤持续失败,则会向
作符,并且它不能再次启动,直到手动
干预已经发生。
此 job 为本文档提供了一个示例,与footballJob在 samples 项目中找到。 |
本节的其余部分描述了footballJob例。
运行 1:
-
playerLoad运行并成功完成,将 400 名玩家添加到PLAYERS桌子。 -
gameLoad运行和处理 11 个文件的游戏数据,加载其内容 到GAMES桌子。 -
playerSummarization开始处理,并在 5 分钟后失败。
运行 2:
-
playerLoad不会运行,因为它已经成功完成,并且allow-start-if-complete是false(默认值)。 -
gameLoad再次运行并处理另外 2 个文件,将它们的内容加载到GAMES表(带有一个过程指示符指示它们尚未 已处理)。 -
playerSummarization开始处理所有剩余的游戏数据(使用 进程指示器),并在 30 分钟后再次失败。
运行 3:
-
playerLoad不会运行,因为它已经成功完成,并且allow-start-if-complete是false(默认值)。 -
gameLoad再次运行并处理另外 2 个文件,将它们的内容加载到GAMES表(带有一个过程指示符指示它们尚未 已处理)。 -
playerSummarization未启动,并且 Job 会立即终止,因为这是 第三次执行playerSummarization,其限制仅为 2。要么是极限 必须引发,或者Job必须作为新的JobInstance.
配置 Skip Logic
在许多情况下,处理时遇到的错误不应导致Step失败,但应跳过。这通常是一个必须
由了解数据本身及其含义的人制作。财务数据,
例如,可能无法跳过,因为它会导致资金被转移,这
需要完全准确。另一方面,加载供应商列表可能会
允许跳过。如果供应商由于格式不正确或被
缺少必要的信息,可能没有问题。通常,这些
还会记录记录,稍后在讨论侦听器时将对此进行介绍。
下面的 XML 示例显示了使用跳过限制的示例:
<step id="step1">
   <tasklet>
      <chunk reader="flatFileItemReader" writer="itemWriter"
             commit-interval="10" skip-limit="10">
         <skippable-exception-classes>
            <include class="org.springframework.batch.item.file.FlatFileParseException"/>
         </skippable-exception-classes>
      </chunk>
   </tasklet>
</step>
下面的 Java 示例显示了使用跳过限制的示例:
@Bean
public Step step1(JobRepository jobRepository, PlatformTransactionManager transactionManager) {
	return new StepBuilder("step1", jobRepository)
				.<String, String>chunk(10, transactionManager)
				.reader(flatFileItemReader())
				.writer(itemWriter())
				.faultTolerant()
				.skipLimit(10)
				.skip(FlatFileParseException.class)
				.build();
}
在前面的示例中,FlatFileItemReader被使用。如果在任何时候,FlatFileParseException被抛出,则跳过该项并计入总数
跳过限制为 10。可能会引发声明的异常(及其子类)
在 chunk processing (读取、处理或 write) 的任何阶段。单独的计数
由 read、process 和 write 中的 skip 组成
步骤执行,但限制适用于所有跳过。一旦跳过限制为
reached,则找到的下一个异常将导致步骤失败。换句话说,第十一个
skip 会触发异常,而不是第十个异常。
前面示例的一个问题是,除了FlatFileParseException导致Job失败。在某些情况下,这可能是
正确的行为。但是,在其他情况下,可能更容易确定
异常应该会导致失败并跳过其他所有内容。
下面的 XML 示例显示了一个排除特定异常的示例:
<step id="step1">
    <tasklet>
        <chunk reader="flatFileItemReader" writer="itemWriter"
               commit-interval="10" skip-limit="10">
            <skippable-exception-classes>
                <include class="java.lang.Exception"/>
                <exclude class="java.io.FileNotFoundException"/>
            </skippable-exception-classes>
        </chunk>
    </tasklet>
</step>
下面的 Java 示例显示了一个排除特定异常的示例:
@Bean
public Step step1(JobRepository jobRepository, PlatformTransactionManager transactionManager) {
	return new StepBuilder("step1", jobRepository)
				.<String, String>chunk(10, transactionManager)
				.reader(flatFileItemReader())
				.writer(itemWriter())
				.faultTolerant()
				.skipLimit(10)
				.skip(Exception.class)
				.noSkip(FileNotFoundException.class)
				.build();
}
通过识别java.lang.Exception作为可跳过的 Exception 类,配置
表示所有Exceptions是可跳过的。然而,通过“排除”java.io.FileNotFoundException,则配置会细化
exception 类设置为 allExceptions 除了 FileNotFoundException.任何被排除的
如果遇到 Exception 类,则 Exception 类是致命的(即,不会跳过它们)。
对于遇到的任何异常,可跳过性由最近的超类决定 在 Class 层次结构中。任何未分类的异常都被视为 “致命” 异常。
的顺序<include/>和<exclude/>元素无关紧要。
的顺序skip和noSkip方法调用无关紧要。
配置重试逻辑
在大多数情况下,您希望异常导致 skip 或Step失败。然而
并非所有异常都是确定性的。如果FlatFileParseException遇到
读取时,它总是针对该记录抛出。重置ItemReader没有帮助。
但是,对于其他异常(例如DeadlockLoserDataAccessException哪
表示当前进程已尝试更新另一个进程的记录
保持锁定状态),请等待并重试可能会导致成功。
在 XML 中,应按如下方式配置 retry:
<step id="step1">
   <tasklet>
      <chunk reader="itemReader" writer="itemWriter"
             commit-interval="2" retry-limit="3">
         <retryable-exception-classes>
            <include class="org.springframework.dao.DeadlockLoserDataAccessException"/>
         </retryable-exception-classes>
      </chunk>
   </tasklet>
</step>
在 Java 中,应按如下方式配置 retry:
@Bean
public Step step1(JobRepository jobRepository, PlatformTransactionManager transactionManager) {
	return new StepBuilder("step1", jobRepository)
				.<String, String>chunk(2, transactionManager)
				.reader(itemReader())
				.writer(itemWriter())
				.faultTolerant()
				.retryLimit(3)
				.retry(DeadlockLoserDataAccessException.class)
				.build();
}
这Step允许对单个项的重试次数进行限制,并且
“可重试”的异常列表。您可以在 retry 中找到有关重试工作原理的更多详细信息。
控制回滚
默认情况下,无论重试还是跳过,从ItemWriter导致由Step回滚。如果 skip 配置为
前面描述的,从ItemReader不会导致回滚。
但是,在许多情况下,从ItemWriter应该
不会导致回滚,因为尚未执行任何作来使事务无效。
因此,您可以配置Step以及不应
cause rollback.
在 XML 中,您可以按如下方式控制回滚:
<step id="step1">
   <tasklet>
      <chunk reader="itemReader" writer="itemWriter" commit-interval="2"/>
      <no-rollback-exception-classes>
         <include class="org.springframework.batch.item.validator.ValidationException"/>
      </no-rollback-exception-classes>
   </tasklet>
</step>
在 Java 中,您可以按如下方式控制回滚:
@Bean
public Step step1(JobRepository jobRepository, PlatformTransactionManager transactionManager) {
	return new StepBuilder("step1", jobRepository)
				.<String, String>chunk(2, transactionManager)
				.reader(itemReader())
				.writer(itemWriter())
				.faultTolerant()
				.noRollback(ValidationException.class)
				.build();
}
事务性读取器
基本合约ItemReader是 this is forward only。步骤缓冲区
Reader 输入,以便在回滚的情况下不需要重新读取 Item
来自读者。但是,在某些情况下,reader 是建立的
事务资源(如 JMS 队列)的顶部。在这种情况下,由于队列是
绑定到回滚的事务,则从
队列重新打开。因此,您可以将步骤配置为不缓冲
项目。
以下示例说明如何创建不缓冲 XML 中的项目的读取器:
<step id="step1">
    <tasklet>
        <chunk reader="itemReader" writer="itemWriter" commit-interval="2"
               is-reader-transactional-queue="true"/>
    </tasklet>
</step>
以下示例演示如何在 Java 中创建不缓冲项目的读取器:
@Bean
public Step step1(JobRepository jobRepository, PlatformTransactionManager transactionManager) {
	return new StepBuilder("step1", jobRepository)
				.<String, String>chunk(2, transactionManager)
				.reader(itemReader())
				.writer(itemWriter())
				.readerIsTransactionalQueue()
				.build();
}
交易属性
您可以使用 transaction 属性来控制isolation,propagation和timeout设置。您可以在
Spring
核心文档。
以下示例将isolation,propagation和timeout交易
XML 中的属性:
<step id="step1">
    <tasklet>
        <chunk reader="itemReader" writer="itemWriter" commit-interval="2"/>
        <transaction-attributes isolation="DEFAULT"
                                propagation="REQUIRED"
                                timeout="30"/>
    </tasklet>
</step>以下示例将isolation,propagation和timeout交易
Java 中的属性:
@Bean
public Step step1(JobRepository jobRepository, PlatformTransactionManager transactionManager) {
	DefaultTransactionAttribute attribute = new DefaultTransactionAttribute();
	attribute.setPropagationBehavior(Propagation.REQUIRED.value());
	attribute.setIsolationLevel(Isolation.DEFAULT.value());
	attribute.setTimeout(30);

	return new StepBuilder("step1", jobRepository)
				.<String, String>chunk(2, transactionManager)
				.reader(itemReader())
				.writer(itemWriter())
				.transactionAttribute(attribute)
				.build();
}
注册ItemStream替换为Step
步骤必须注意ItemStreamcallbacks 在其
生命周期。(有关ItemStream接口,请参阅 ItemStream )。如果某个步骤失败并且可能会失败,这一点至关重要
需要重新启动,因为ItemStreaminterface 是 Step 获取
它需要的有关执行之间持久状态的信息。
如果ItemReader,ItemProcessor或ItemWriter本身实现了ItemStream接口,这些将自动注册。任何其他流都需要
单独注册。这通常是间接依赖项(例如
委托被注入到 Reader 和 Writer 中。您可以在step通过stream元素。
以下示例演示如何注册stream在step在 XML 中:
<step id="step1">
    <tasklet>
        <chunk reader="itemReader" writer="compositeWriter" commit-interval="2">
            <streams>
                <stream ref="fileItemWriter1"/>
                <stream ref="fileItemWriter2"/>
            </streams>
        </chunk>
    </tasklet>
</step>

<beans:bean id="compositeWriter"
            class="org.springframework.batch.item.support.CompositeItemWriter">
    <beans:property name="delegates">
        <beans:list>
            <beans:ref bean="fileItemWriter1" />
            <beans:ref bean="fileItemWriter2" />
        </beans:list>
    </beans:property>
</beans:bean>以下示例演示如何注册stream在step在 Java 中:
@Bean
public Step step1(JobRepository jobRepository, PlatformTransactionManager transactionManager) {
	return new StepBuilder("step1", jobRepository)
				.<String, String>chunk(2, transactionManager)
				.reader(itemReader())
				.writer(compositeItemWriter())
				.stream(fileItemWriter1())
				.stream(fileItemWriter2())
				.build();
}

/**
 * In Spring Batch 4, the CompositeItemWriter implements ItemStream so this isn't
 * necessary, but used for an example.
 */
@Bean
public CompositeItemWriter compositeItemWriter() {
	List<ItemWriter> writers = new ArrayList<>(2);
	writers.add(fileItemWriter1());
	writers.add(fileItemWriter2());

	CompositeItemWriter itemWriter = new CompositeItemWriter();

	itemWriter.setDelegates(writers);

	return itemWriter;
}
在前面的示例中,CompositeItemWriter不是ItemStream,但是它的
代表是。因此,两个委托编写器都必须显式注册为流
以便框架正确处理它们。这ItemReader不需要
显式注册为流,因为它是Step.步骤
现在可以重新启动,并且读取器和写入器的状态会正确地保留在
事件。
拦截Step执行
就像Job,在执行Step其中 a
用户可能需要执行某些功能。例如,要写出到平面
文件中的ItemWriter当Step具有
已完成,以便可以写入页脚。这可以通过许多Step作用域侦听器。
您可以应用任何实现StepListener(但不是那个界面
本身,因为它是空的)到listeners元素。
这listeners元素在 step、tasklet 或 chunk 声明中有效。我们
建议您在其函数适用的级别声明侦听器
或者,如果它是多功能的(例如StepExecutionListener和ItemReadListener),
在应用它的最精细级别声明它。
以下示例显示了在 XML 中的块级别应用的侦听器:
<step id="step1">
    <tasklet>
        <chunk reader="reader" writer="writer" commit-interval="10"/>
        <listeners>
            <listener ref="chunkListener"/>
        </listeners>
    </tasklet>
</step>
以下示例显示了在 Java 中应用于块级别的侦听器:
@Bean
public Step step1(JobRepository jobRepository, PlatformTransactionManager transactionManager) {
	return new StepBuilder("step1", jobRepository)
				.<String, String>chunk(10, transactionManager)
				.reader(reader())
				.writer(writer())
				.listener(chunkListener())
				.build();
}
一ItemReader,ItemWriter或ItemProcessor它本身实现了一个StepListenerinterfaces 会自动注册到Step如果使用
Namespace<step>元素或*StepFactoryBean工厂。仅此
适用于直接注入到Step.如果侦听器嵌套在
另一个组件,您需要显式注册它(如前面的注册ItemStream替换为Step).
除了StepListener接口中,提供了注解来解决
同样的担忧。普通的旧 Java 对象可以具有带有这些注释的方法,这些注释是
然后转换为相应的StepListener类型。注释
块组件的自定义实现,例如ItemReader或ItemWriter或Tasklet.注释由 XML 解析器分析<listener/>元素
以及在listener方法,因此您需要做的就是
是使用 XML 命名空间或生成器将侦听器注册到步骤。
StepExecutionListener
StepExecutionListener表示Step执行。它
允许在Step已启动,结束后,是否结束
normally 或 failed,如下例所示:
public interface StepExecutionListener extends StepListener {

    void beforeStep(StepExecution stepExecution);

    ExitStatus afterStep(StepExecution stepExecution);

}
ExitStatus的返回类型为afterStep,让听众有机会
修改在完成Step.
与此接口对应的注解是:
-
@BeforeStep -
@AfterStep
ChunkListener
“块”定义为在事务范围内处理的项目。提交
transaction 在每个提交间隔提交一个 chunk。您可以使用ChunkListener自
在 chunk 开始处理之前或 chunk 完成后执行逻辑
成功,如下面的接口定义所示:
public interface ChunkListener extends StepListener {

    void beforeChunk(ChunkContext context);
    void afterChunk(ChunkContext context);
    void afterChunkError(ChunkContext context);

}
beforeChunk 方法在事务启动之后但在读取开始之前调用
在ItemReader.相反afterChunk在 chunk 被
已提交(如果有回滚,则根本不提交)。
与此接口对应的注解是:
-
@BeforeChunk -
@AfterChunk -
@AfterChunkError
您可以应用ChunkListener当没有 chunk 声明时。这TaskletStep是
负责调用ChunkListener,因此它适用于非面向项的 tasklet
以及(它在 tasklet 之前和之后调用)。
ItemReadListener
在之前讨论跳过逻辑时,提到对
跳过的记录,以便以后可以处理它们。在读取错误的情况下,
这可以通过ItemReaderListener,如下接口
定义显示:
public interface ItemReadListener<T> extends StepListener {

    void beforeRead();
    void afterRead(T item);
    void onReadError(Exception ex);

}
这beforeRead方法在每次调用之前调用 read。ItemReader.这afterReadmethod 在每次成功调用 read 后调用,并将项目传递给
那被读了。如果在读取时出现错误,则onReadError方法。
提供遇到的异常,以便可以记录它。
与此接口对应的注解是:
-
@BeforeRead -
@AfterRead -
@OnReadError
ItemProcessListener
与ItemReadListener,则项目的处理可以被 “监听” ,因为
以下接口定义显示:
public interface ItemProcessListener<T, S> extends StepListener {

    void beforeProcess(T item);
    void afterProcess(T item, S result);
    void onProcessError(T item, Exception e);

}
这beforeProcessmethod 之前被调用process在ItemProcessor和 is
已递出要处理的项目。这afterProcessmethod 在
商品已成功处理。如果在处理过程中出现错误,onProcessError方法。遇到的异常以及
尝试处理,以便可以记录它们。
与此接口对应的注解是:
-
@BeforeProcess -
@AfterProcess -
@OnProcessError
ItemWriteListener
您可以使用ItemWriteListener,作为
接口定义如下:
public interface ItemWriteListener<S> extends StepListener {

    void beforeWrite(List<? extends S> items);
    void afterWrite(List<? extends S> items);
    void onWriteError(Exception exception, List<? extends S> items);

}
这beforeWritemethod 之前被调用write在ItemWriter并递给
写入的项目列表。这afterWritemethod 在项
已成功写入,但在提交与 chunk 的处理关联的事务之前。
如果在写入时出现错误,则onWriteError方法。
遇到的异常和尝试写入的项为
提供,以便可以记录它们。
与此接口对应的注解是:
-
@BeforeWrite -
@AfterWrite -
@OnWriteError
SkipListener
ItemReadListener,ItemProcessListener和ItemWriteListener都提供机制
收到错误通知,但没有通知你记录实际上已被
跳。onWriteError,即使重试某个项,也会调用
成功的。因此,有一个单独的接口用于跟踪跳过的项目,如
以下接口定义显示:
public interface SkipListener<T,S> extends StepListener {

    void onSkipInRead(Throwable t);
    void onSkipInProcess(T item, Throwable t);
    void onSkipInWrite(S item, Throwable t);

}
onSkipInRead每当读取时跳过项时调用。需要注意的是
回滚可能会导致同一项目多次注册为 skipped。onSkipInWrite在写入时跳过项时调用。因为该项目具有
已成功读取(且未跳过),它还将项目本身作为
论点。
与此接口对应的注解是:
-
@OnSkipInRead -
@OnSkipInWrite -
@OnSkipInProcess
TaskletStep
面向数据块的处理并不是在Step.如果Step必须包含存储过程调用?你可以
将调用实现为ItemReader并在该过程完成后返回 null。
但是,这样做有点不自然,因为需要无作ItemWriter.
Spring Batch 提供了TaskletStep对于此方案。
这Taskletinterface 只有一个方法execute,称为
由TaskletStep直到它返回RepeatStatus.FINISHED或者投掷
表示失败的异常。每次调用Tasklet包装在事务中。Tasklet实现者可能会调用存储过程、脚本或 SQL 更新
陈述。
要创建TaskletStep在 XML 中,ref属性的<tasklet/>元素应
引用一个定义Tasklet对象。不<chunk/>元素
在<tasklet/>.下面的示例展示了一个简单的 tasklet:
<step id="step1">
    <tasklet ref="myTasklet"/>
</step>要创建TaskletStep在 Java 中,传递给tasklet构建器的方法
应实现Tasklet接口。无需调用chunk应在
构建TaskletStep.下面的示例展示了一个简单的 tasklet:
@Bean
public Step step1(JobRepository jobRepository, PlatformTransactionManager transactionManager) {
    return new StepBuilder("step1", jobRepository)
    			.tasklet(myTasklet(), transactionManager)
    			.build();
}
如果它实现了StepListener接口TaskletStep自动将 tasklet 注册为StepListener. |
TaskletAdapter
与ItemReader和ItemWriterinterfaces 中,,Taskletinterface 包含一个实现,该实现允许自身适应任何预先存在的
类:TaskletAdapter.这可能有用的一个示例是现有的 DAO,它是
用于更新一组记录上的标志。您可以使用TaskletAdapter调用此
类中,而不必为Tasklet接口。
以下示例演示如何定义TaskletAdapter在 XML 中:
<bean id="myTasklet" class="o.s.b.core.step.tasklet.MethodInvokingTaskletAdapter">
    <property name="targetObject">
        <bean class="org.mycompany.FooDao"/>
    </property>
    <property name="targetMethod" value="updateFoo" />
</bean>以下示例演示如何定义TaskletAdapter在 Java 中:
@Bean
public MethodInvokingTaskletAdapter myTasklet() {
	MethodInvokingTaskletAdapter adapter = new MethodInvokingTaskletAdapter();

	adapter.setTargetObject(fooDao());
	adapter.setTargetMethod("updateFoo");

	return adapter;
}
例Tasklet实现
许多批处理作业包含在主处理开始之前必须完成的步骤。
设置各种资源,或者在处理完成后清理这些资源
资源。对于大量处理文件的工作,通常需要
在将某些文件成功上传到另一个文件后,在本地删除这些文件
位置。以下示例(摘自 Spring
Batch samples 项目)是一个Tasklet实现中就有这样的责任:
public class FileDeletingTasklet implements Tasklet, InitializingBean {

    private Resource directory;

    public RepeatStatus execute(StepContribution contribution,
                                ChunkContext chunkContext) throws Exception {
        File dir = directory.getFile();
        Assert.state(dir.isDirectory(), "The resource must be a directory");

        File[] files = dir.listFiles();
        for (int i = 0; i < files.length; i++) {
            boolean deleted = files[i].delete();
            if (!deleted) {
                throw new UnexpectedJobExecutionException("Could not delete file " +
                                                          files[i].getPath());
            }
        }
        return RepeatStatus.FINISHED;
    }

    public void setDirectoryResource(Resource directory) {
        this.directory = directory;
    }

    public void afterPropertiesSet() throws Exception {
        Assert.state(directory != null, "Directory must be set");
    }
}
前面的taskletimplementation 会删除给定目录中的所有文件。它
需要注意的是,executemethod 仅调用一次。剩下的就是
引用tasklet从step.
以下示例演示如何引用tasklet从step在 XML 中:
<job id="taskletJob">
    <step id="deleteFilesInDir">
       <tasklet ref="fileDeletingTasklet"/>
    </step>
</job>

<beans:bean id="fileDeletingTasklet"
            class="org.springframework.batch.sample.tasklet.FileDeletingTasklet">
    <beans:property name="directoryResource">
        <beans:bean id="directory"
                    class="org.springframework.core.io.FileSystemResource">
            <beans:constructor-arg value="target/test-outputs/test-dir" />
        </beans:bean>
    </beans:property>
</beans:bean>以下示例演示如何引用tasklet从step在 Java 中:
@Bean
public Job taskletJob(JobRepository jobRepository) {
	return new JobBuilder("taskletJob", jobRepository)
				.start(deleteFilesInDir())
				.build();
}

@Bean
public Step deleteFilesInDir(JobRepository jobRepository, PlatformTransactionManager transactionManager) {
	return new StepBuilder("deleteFilesInDir", jobRepository)
				.tasklet(fileDeletingTasklet(), transactionManager)
				.build();
}

@Bean
public FileDeletingTasklet fileDeletingTasklet() {
	FileDeletingTasklet tasklet = new FileDeletingTasklet();

	tasklet.setDirectoryResource(new FileSystemResource("target/test-outputs/test-dir"));

	return tasklet;
}
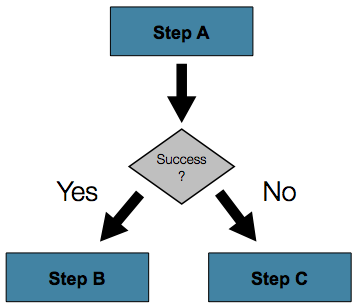
控制 Step Flow
随着能够在拥有作业中将步骤组合在一起,需要能够
来控制作业如何从一个步骤“流”到另一个步骤。失败Step不
必然意味着Job应该失败。此外,可能有多种类型
的“成功”决定了哪个Step应该执行。根据
组Steps配置后,某些步骤甚至可能根本不被处理。
顺序流
最简单的流场景是所有步骤按顺序执行的作业,因为 下图显示了:
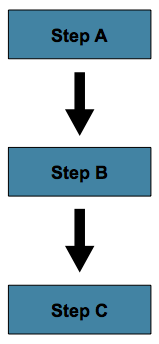
这可以通过使用next在step.
以下示例演示如何使用next属性:
<job id="job">
    <step id="stepA" parent="s1" next="stepB" />
    <step id="stepB" parent="s2" next="stepC"/>
    <step id="stepC" parent="s3" />
</job>以下示例演示如何使用next()method 中:
@Bean
public Job job(JobRepository jobRepository) {
	return new JobBuilder("job", jobRepository)
				.start(stepA())
				.next(stepB())
				.next(stepC())
				.build();
}
在上面的场景中,stepA首先运行,因为它是第一个Step上市。如果stepA正常完成,stepB运行,依此类推。但是,如果step A失败
整个Jobfails 和stepB不执行。
使用 Spring Batch XML 命名空间时,配置中列出的第一步始终是由Job.其他步骤元素的顺序不会
很重要,但第一步必须始终首先出现在 XML 中。 |
条件流
在前面的示例中,只有两种可能性:
-
这
step成功,而下一个step应该执行。 -
这
step失败,因此,job应该失败。
在许多情况下,这可能就足够了。但是,如果
失败step应该触发不同的step,而不是导致失败?这
下图显示了这样的流程:
为了处理更复杂的情况,Spring Batch XML 命名空间允许您定义转换
元素。其中一个转换是next元素。与next属性、next元素告诉Job哪Step自
执行 next。但是,与 attribute 不同的是,任意数量的next元素允许
一个给定的Step,并且在失败的情况下没有默认行为。这意味着,如果
transition 元素,则Step过渡必须为
显式定义。另请注意,单个步骤不能同时具有nextattribute 和
一个transition元素。
这next元素指定要匹配的模式和接下来要执行的步骤,因为
以下示例显示:
<job id="job">
    <step id="stepA" parent="s1">
        <next on="*" to="stepB" />
        <next on="FAILED" to="stepC" />
    </step>
    <step id="stepB" parent="s2" next="stepC" />
    <step id="stepC" parent="s3" />
</job>
Java API 提供了一组 Fluent 方法,允许您指定流和要执行的作
当步骤失败时。以下示例显示如何指定一个步骤 (stepA),然后
继续执行两个不同步骤之一 (stepB或stepC),具体取决于stepA成功:
@Bean
public Job job(JobRepository jobRepository) {
	return new JobBuilder("job", jobRepository)
				.start(stepA())
				.on("*").to(stepB())
				.from(stepA()).on("FAILED").to(stepC())
				.end()
				.build();
}
使用 XML 配置时,on属性使用简单的
pattern-matching 方案匹配ExitStatus,这是执行Step.
使用 java 配置时,on()方法使用简单的模式匹配方案来
匹配ExitStatus,这是执行Step.
模式中只允许使用两个特殊字符:
-
*匹配零个或多个字符 -
?只匹配一个字符
例如c*t比赛cat和count而c?t比赛cat但不是count.
虽然Step,如果Step执行会导致ExitStatus未被元素覆盖的
framework 会引发异常,并且Job失败。框架会自动排序
从最特异性到最不特异性的转换。这意味着,即使
被换成stepA在前面的示例中,ExitStatus之FAILED我还是会去的
自stepC.
批处理状态与退出状态
配置Job对于条件流,了解
区别BatchStatus和ExitStatus.BatchStatus是一个枚举,其中
是两者的属性JobExecution和StepExecution,并被框架用于
记录Job或Step.它可以是以下值之一:COMPLETED,STARTING,STARTED,STOPPING,STOPPED,FAILED,ABANDONED或UNKNOWN.他们中的大多数都是不言自明的:COMPLETED是步骤
或作业已成功完成,FAILED在失败时设置,依此类推。
以下示例包含next元素:
<next on="FAILED" to="stepB" />以下示例包含on元素:
...
.from(stepA()).on("FAILED").to(stepB())
...
乍一看,似乎是on引用BatchStatus的Step自
它属于它。但是,它实际上引用了ExitStatus的Step.由于
顾名思义ExitStatus表示Step在它完成执行之后。
更具体地说,在使用 XML 配置时,next元素显示在
前面的 XML 配置示例引用了ExitStatus.
使用 Java 配置时,on()方法,如上所示
Java 配置示例引用了ExitStatus.
在英语中,它说:“如果退出代码为 FAILED,则转到 stepB”。默认情况下,exit
code 始终与BatchStatus对于Step,这就是为什么前面的条目
工程。但是,如果退出代码需要不同,该怎么办?一个很好的例子来自
Samples 项目中的 Skip Sample 作业:
下面的示例演示如何在 XML 中使用不同的退出代码:
<step id="step1" parent="s1">
    <end on="FAILED" />
    <next on="COMPLETED WITH SKIPS" to="errorPrint1" />
    <next on="*" to="step2" />
</step>
以下示例演示如何在 Java 中使用不同的退出代码:
@Bean
public Job job(JobRepository jobRepository) {
	return new JobBuilder("job", jobRepository)
			.start(step1()).on("FAILED").end()
			.from(step1()).on("COMPLETED WITH SKIPS").to(errorPrint1())
			.from(step1()).on("*").to(step2())
			.end()
			.build();
}
step1有三种可能性:
-
这
Stepfailed,在这种情况下,作业应该会失败。 -
这
Step成功完成。 -
这
Step成功完成,但退出代码为COMPLETED WITH SKIPS.在 在这种情况下,应运行不同的步骤来处理错误。
上述配置有效。但是,需要根据 执行跳过记录的条件,如下例所示:
public class SkipCheckingListener implements StepExecutionListener {
    @Override
    public ExitStatus afterStep(StepExecution stepExecution) {
        String exitCode = stepExecution.getExitStatus().getExitCode();
        if (!exitCode.equals(ExitStatus.FAILED.getExitCode()) &&
            stepExecution.getSkipCount() > 0) {
            return new ExitStatus("COMPLETED WITH SKIPS");
        } else {
            return null;
        }
    }
}
前面的代码是一个StepExecutionListener首先检查以确保Step是
successful,然后检查StepExecution高于
0. 如果两个条件都满足,则新的ExitStatus退出代码为COMPLETED WITH SKIPS返回。
配置 Stop
在讨论之后BatchStatus和ExitStatus,
有人可能想知道BatchStatus和ExitStatus确定为Job.
虽然这些状态是针对Step通过执行的代码,
statuss 的Job根据配置确定。
到目前为止,讨论的所有作业配置都至少有一个 finalStep跟
无过渡。
在下面的 XML 示例中,在step执行时,将Job结束:
<step id="stepC" parent="s3"/>在下面的 Java 示例中,在step执行时,将Job结束:
@Bean
public Job job(JobRepository jobRepository) {
	return new JobBuilder("job", jobRepository)
				.start(step1())
				.build();
}
如果没有为Step,则Job定义为
遵循:
-
如果
Step结尾为ExitStatus之FAILED这BatchStatus和ExitStatus之 这Job都是FAILED. -
否则,
BatchStatus和ExitStatus的Job都是COMPLETED.
虽然这种终止批处理作业的方法对于某些批处理作业(如
可能需要简单的 Sequential Step Job,自定义 Job-Stopping 场景。为
为此,Spring Batch 提供了三个 transition 元素来停止Job(在
添加到next元素我们之前讨论过)。
这些停止元素中的每一个都会停止一个Job替换为特定的BatchStatus.是的
请务必注意,Stop 过渡元素对BatchStatus或ExitStatus任何Steps在Job.这些元素仅影响
的最终状态Job.例如,作业中的每个步骤都可能具有
状态为FAILED但要使作业的状态为COMPLETED.
在步骤处结束
配置步骤结束会指示Job以BatchStatus之COMPLETED.一个Job已完成,状态为COMPLETED无法重新启动(框架会引发
一个JobInstanceAlreadyCompleteException).
使用 XML 配置时,您可以使用end元素进行此任务。这end元素
还允许可选的exit-code属性,可用于自定义ExitStatus的Job.如果没有exit-code属性,则ExitStatus是COMPLETED默认情况下,要匹配BatchStatus.
使用 Java 配置时,endmethod 用于此任务。这end方法
还允许可选的exitStatus参数,该参数可用于自定义ExitStatus的Job.如果没有exitStatus值,则ExitStatus是COMPLETED默认情况下,要匹配BatchStatus.
请考虑以下场景:如果step2失败时,该Job以BatchStatus之COMPLETED以及一个ExitStatus之COMPLETED和step3不会运行。
否则,执行将移至step3.请注意,如果step2失败时,该Job莫
Restartable (因为状态为COMPLETED).
以下示例显示了 XML 中的场景:
<step id="step1" parent="s1" next="step2">

<step id="step2" parent="s2">
    <end on="FAILED"/>
    <next on="*" to="step3"/>
</step>

<step id="step3" parent="s3">
以下示例显示了 Java 中的场景:
@Bean
public Job job(JobRepository jobRepository) {
	return new JobBuilder("job", jobRepository)
				.start(step1())
				.next(step2())
				.on("FAILED").end()
				.from(step2()).on("*").to(step3())
				.end()
				.build();
}
步骤失败
将步骤配置为在给定点失败会指示Job以BatchStatus之FAILED.与 end 不同,一个Job不会阻止Job免于重新启动。
使用 XML 配置时,fail元素还允许可选的exit-code属性,可用于自定义ExitStatus的Job.如果没有exit-code属性,则ExitStatus是FAILED默认情况下,要匹配BatchStatus.
请考虑以下场景:如果step2失败时,该Job以BatchStatus之FAILED以及一个ExitStatus之EARLY TERMINATION和step3不
执行。否则,执行将移至step3.此外,如果step2fails 和Job重新启动,则执行将在step2.
以下示例显示了 XML 中的场景:
<step id="step1" parent="s1" next="step2">

<step id="step2" parent="s2">
    <fail on="FAILED" exit-code="EARLY TERMINATION"/>
    <next on="*" to="step3"/>
</step>

<step id="step3" parent="s3">
以下示例显示了 Java 中的场景:
@Bean
public Job job(JobRepository jobRepository) {
	return new JobBuilder("job", jobRepository)
			.start(step1())
			.next(step2()).on("FAILED").fail()
			.from(step2()).on("*").to(step3())
			.end()
			.build();
}
在给定步骤停止作业
将作业配置为在特定步骤停止会指示Job以BatchStatus之STOPPED.停止Job可以在处理中提供临时中断,
以便作员可以在重新启动Job.
使用 XML 配置时,stop元素需要restart属性,该属性指定
当Job将重新启动。
使用 Java 配置时,stopAndRestart方法需要restart属性
,该步骤指定在重新启动 Job 时应执行的步骤。
请考虑以下场景:如果step1finishs 以COMPLETE,则作业
停止。重新启动后,执行将从step2.
下面的清单显示了 XML 中的场景:
<step id="step1" parent="s1">
    <stop on="COMPLETED" restart="step2"/>
</step>

<step id="step2" parent="s2"/>
以下示例显示了 Java 中的场景:
@Bean
public Job job(JobRepository jobRepository) {
	return new JobBuilder("job", jobRepository)
			.start(step1()).on("COMPLETED").stopAndRestart(step2())
			.end()
			.build();
}
编程流决策
在某些情况下,比ExitStatus可能需要决定
下一步要执行的步骤。在这种情况下,JobExecutionDecider可用于协助
在 decision 中,如下例所示:
public class MyDecider implements JobExecutionDecider {
    public FlowExecutionStatus decide(JobExecution jobExecution, StepExecution stepExecution) {
        String status;
        if (someCondition()) {
            status = "FAILED";
        }
        else {
            status = "COMPLETED";
        }
        return new FlowExecutionStatus(status);
    }
}
在以下示例作业配置中,decision指定要用作的决策程序
以及所有过渡:
<job id="job">
    <step id="step1" parent="s1" next="decision" />

    <decision id="decision" decider="decider">
        <next on="FAILED" to="step2" />
        <next on="COMPLETED" to="step3" />
    </decision>

    <step id="step2" parent="s2" next="step3"/>
    <step id="step3" parent="s3" />
</job>

<beans:bean id="decider" class="com.MyDecider"/>在下面的示例中,实现JobExecutionDecider的传递
直接发送到nextcall 时调用:
@Bean
public Job job(JobRepository jobRepository) {
	return new JobBuilder("job", jobRepository)
			.start(step1())
			.next(decider()).on("FAILED").to(step2())
			.from(decider()).on("COMPLETED").to(step3())
			.end()
			.build();
}
拆分流
到目前为止描述的每个场景都涉及Job,在
时间以线性方式。除了这种典型的样式之外, Spring Batch 还允许
对于要配置并行流的作业。
XML 命名空间允许您使用split元素。如下例所示,
这split元素包含一个或多个flow元素,其中整个单独的流可以
被定义。一个split元素也可以包含前面讨论的任何过渡
元素,例如next属性或next,end或fail元素。
<split id="split1" next="step4">
    <flow>
        <step id="step1" parent="s1" next="step2"/>
        <step id="step2" parent="s2"/>
    </flow>
    <flow>
        <step id="step3" parent="s3"/>
    </flow>
</split>
<step id="step4" parent="s4"/>
基于 Java 的配置允许您通过提供的生成器配置拆分。由于
以下示例显示,split元素包含一个或多个flow元素,其中
可以定义整个单独的流。一个split元素也可以包含任何
前面讨论的过渡元素,例如next属性或next,end或fail元素。
@Bean
public Flow flow1() {
	return new FlowBuilder<SimpleFlow>("flow1")
			.start(step1())
			.next(step2())
			.build();
}

@Bean
public Flow flow2() {
	return new FlowBuilder<SimpleFlow>("flow2")
			.start(step3())
			.build();
}

@Bean
public Job job(Flow flow1, Flow flow2) {
	return this.jobBuilderFactory.get("job")
				.start(flow1)
				.split(new SimpleAsyncTaskExecutor())
				.add(flow2)
				.next(step4())
				.end()
				.build();
}
外部化流程定义和作业之间的依赖关系
作业中的一部分流可以外部化为单独的 bean 定义,然后 重复使用。有两种方法可以做到这一点。第一种是将流声明为 引用到其他地方定义的 one。
下面的 XML 示例演示如何将流声明为对定义的流的引用 别处:
<job id="job">
    <flow id="job1.flow1" parent="flow1" next="step3"/>
    <step id="step3" parent="s3"/>
</job>

<flow id="flow1">
    <step id="step1" parent="s1" next="step2"/>
    <step id="step2" parent="s2"/>
</flow>
下面的 Java 示例演示如何将流声明为对定义的流的引用 别处:
@Bean
public Job job(JobRepository jobRepository) {
	return new JobBuilder("job", jobRepository)
				.start(flow1())
				.next(step3())
				.end()
				.build();
}

@Bean
public Flow flow1() {
	return new FlowBuilder<SimpleFlow>("flow1")
			.start(step1())
			.next(step2())
			.build();
}
定义外部流的效果(如前面的示例所示)是将 从外部流入作业的步骤,就像它们已内联声明一样。在 这样,许多 Job 可以引用相同的模板流,并将此类模板组合成 不同的逻辑流。这也是将 个人流动。
外部化流的另一种形式是使用JobStep.一个JobStep类似于FlowStep但实际上为
指定的流。
以下示例如何JobStep在 XML 中:
<job id="jobStepJob" restartable="true">
   <step id="jobStepJob.step1">
      <job ref="job" job-launcher="jobLauncher"
          job-parameters-extractor="jobParametersExtractor"/>
   </step>
</job>

<job id="job" restartable="true">...</job>

<bean id="jobParametersExtractor" class="org.spr...DefaultJobParametersExtractor">
   <property name="keys" value="input.file"/>
</bean>以下示例显示了JobStep在 Java 中:
@Bean
public Job jobStepJob(JobRepository jobRepository) {
	return new JobBuilder("jobStepJob", jobRepository)
				.start(jobStepJobStep1(null))
				.build();
}

@Bean
public Step jobStepJobStep1(JobLauncher jobLauncher, JobRepository jobRepository) {
	return new StepBuilder("jobStepJobStep1", jobRepository)
				.job(job())
				.launcher(jobLauncher)
				.parametersExtractor(jobParametersExtractor())
				.build();
}

@Bean
public Job job(JobRepository jobRepository) {
	return new JobBuilder("job", jobRepository)
				.start(step1())
				.build();
}

@Bean
public DefaultJobParametersExtractor jobParametersExtractor() {
	DefaultJobParametersExtractor extractor = new DefaultJobParametersExtractor();

	extractor.setKeys(new String[]{"input.file"});

	return extractor;
}
作业参数提取器是一种策略,用于确定ExecutionContext为
这Step转换为JobParameters对于Job那就是 RUN。这JobStep是
当您希望使用一些更精细的选项来监控和报告
作业和步骤。用JobStep也常常是很好的回答:“我怎么做
在作业之间创建依赖关系?这是将大型系统分解为
更小的模块并控制作业流。
的后期绑定Job和Step属性
前面显示的 XML 和平面文件示例都使用 SpringResource抽象化
以获取文件。这之所以有效,是因为Resource具有getFile方法,该方法返回java.io.File.您可以使用标准 Spring 配置 XML 和平面文件资源
构建:
以下示例显示了 XML 中的后期绑定:
<bean id="flatFileItemReader"
      class="org.springframework.batch.item.file.FlatFileItemReader">
    <property name="resource"
              value="file://outputs/file.txt" />
</bean>
以下示例显示了 Java 中的后期绑定:
@Bean
public FlatFileItemReader flatFileItemReader() {
	FlatFileItemReader<Foo> reader = new FlatFileItemReaderBuilder<Foo>()
			.name("flatFileItemReader")
			.resource(new FileSystemResource("file://outputs/file.txt"))
			...
}
前面的Resource从指定的文件系统位置加载文件。注意
绝对位置必须以双斜杠 () 开头。在大多数Spring
应用程序,此解决方案已足够好,因为这些资源的名称为
在编译时已知。但是,在批处理方案中,文件名可能需要
在运行时确定为作业的参数。这可以通过//-D参数
读取系统属性。
以下示例演示如何从 XML 中的属性读取文件名:
<bean id="flatFileItemReader"
      class="org.springframework.batch.item.file.FlatFileItemReader">
    <property name="resource" value="${input.file.name}" />
</bean>
下面显示了如何从 Java 中的属性读取文件名:
@Bean
public FlatFileItemReader flatFileItemReader(@Value("${input.file.name}") String name) {
	return new FlatFileItemReaderBuilder<Foo>()
			.name("flatFileItemReader")
			.resource(new FileSystemResource(name))
			...
}
此解决方案工作所需的只是一个系统参数(例如-Dinput.file.name="file://outputs/file.txt").
虽然您可以使用PropertyPlaceholderConfigurer在这里,它不是
如果始终设置 system 属性,则为 necessary ,因为ResourceEditor春季
already 对系统属性进行筛选和执行占位符替换。 |
通常,在批处理设置中,最好在JobParameters作业中(而不是通过系统属性)并访问它们
道路。为了实现这一点, Spring Batch 允许对各种Job和Step属性。
以下示例演示如何在 XML 中参数化文件名:
<bean id="flatFileItemReader" scope="step"
      class="org.springframework.batch.item.file.FlatFileItemReader">
    <property name="resource" value="#{jobParameters['input.file.name']}" />
</bean>
以下示例演示如何在 Java 中参数化文件名:
@StepScope
@Bean
public FlatFileItemReader flatFileItemReader(@Value("#{jobParameters['input.file.name']}") String name) {
	return new FlatFileItemReaderBuilder<Foo>()
			.name("flatFileItemReader")
			.resource(new FileSystemResource(name))
			...
}
您可以访问JobExecution和StepExecution水平ExecutionContext在
同样的方式。
以下示例显示如何访问ExecutionContext在 XML 中:
<bean id="flatFileItemReader" scope="step"
      class="org.springframework.batch.item.file.FlatFileItemReader">
    <property name="resource" value="#{jobExecutionContext['input.file.name']}" />
</bean><bean id="flatFileItemReader" scope="step"
class="org.springframework.batch.item.file.FlatFileItemReader">
<property name="resource" value="#{stepExecutionContext['input.file.name']}" />
</bean>以下示例显示如何访问ExecutionContext在 Java 中:
@StepScope
@Bean
public FlatFileItemReader flatFileItemReader(@Value("#{jobExecutionContext['input.file.name']}") String name) {
	return new FlatFileItemReaderBuilder<Foo>()
			.name("flatFileItemReader")
			.resource(new FileSystemResource(name))
			...
}
@StepScope
@Bean
public FlatFileItemReader flatFileItemReader(@Value("#{stepExecutionContext['input.file.name']}") String name) {
	return new FlatFileItemReaderBuilder<Foo>()
			.name("flatFileItemReader")
			.resource(new FileSystemResource(name))
			...
}
任何使用后期绑定的 bean 都必须使用scope="step".有关更多信息,请参阅 Step Scope。
一个Stepbean 不应该是 step-scopes。如果某个步骤中需要后期绑定
定义、该步骤的组件(微线程、项读取器或写入器等)
是应该改为限定范围的 Scope。 |
| 如果你使用 Spring 3.0(或更高版本),step-scoped bean 中的表达式位于 Spring Expression Language,一种强大的通用语言,具有许多有趣的 特征。为了提供向后兼容性,如果 Spring Batch 检测到存在 旧版本的 Spring,它使用一种功能较弱的原生表达式语言,并且 的解析规则略有不同。主要区别在于 Map 键 上面的示例不需要用 Spring 2.5 引用,但引用是强制性的 在 Spring 3.0 中。 |
Step 范围
前面显示的所有后期绑定示例的 scope 为step在
bean 定义。
以下示例显示了在 XML 中绑定到步骤范围的示例:
<bean id="flatFileItemReader" scope="step"
      class="org.springframework.batch.item.file.FlatFileItemReader">
    <property name="resource" value="#{jobParameters[input.file.name]}" />
</bean>
以下示例显示了在 Java 中绑定到 step 范围的示例:
@StepScope
@Bean
public FlatFileItemReader flatFileItemReader(@Value("#{jobParameters[input.file.name]}") String name) {
	return new FlatFileItemReaderBuilder<Foo>()
			.name("flatFileItemReader")
			.resource(new FileSystemResource(name))
			...
}
使用Step需要使用后期绑定,因为 Bean 不能
实际上被实例化,直到Step启动,以便找到属性。
因为它默认不是 Spring 容器的一部分,所以必须添加范围
显式地,通过使用batch命名空间,通过显式包含 Bean 定义
对于StepScope,或使用@EnableBatchProcessing注解。仅使用以下之一
那些方法。以下示例使用batchNamespace:
<beans xmlns="http://www.springframework.org/schema/beans"
       xmlns:batch="http://www.springframework.org/schema/batch"
       xmlns:xsi="http://www.w3.org/2001/XMLSchema-instance"
       xsi:schemaLocation="...">
<batch:job .../>
...
</beans>
以下示例显式包含 bean 定义:
<bean class="org.springframework.batch.core.scope.StepScope" />工作范围
Jobscope 类似于Step配置中的 scope
but 是Jobcontext,因此只有这样一个 bean 的实例
每个正在运行的作业。此外,还支持引用的后期绑定
可从JobContext通过使用#{..}占位符。使用此功能,您可以拉取 bean
属性以及 Job 参数。
以下示例显示了在 XML 中绑定到作业范围的示例:
<bean id="..." class="..." scope="job">
    <property name="name" value="#{jobParameters[input]}" />
</bean><bean id="..." class="..." scope="job">
<property name="name" value="#{jobExecutionContext['input.name']}.txt" />
</bean>以下示例显示了在 Java 中绑定到作业范围的示例:
@JobScope
@Bean
public FlatFileItemReader flatFileItemReader(@Value("#{jobParameters[input]}") String name) {
	return new FlatFileItemReaderBuilder<Foo>()
			.name("flatFileItemReader")
			.resource(new FileSystemResource(name))
			...
}
@JobScope
@Bean
public FlatFileItemReader flatFileItemReader(@Value("#{jobExecutionContext['input.name']}") String name) {
	return new FlatFileItemReaderBuilder<Foo>()
			.name("flatFileItemReader")
			.resource(new FileSystemResource(name))
			...
}
因为它默认不是 Spring 容器的一部分,所以必须添加范围
显式地,通过使用batch命名空间,通过显式包含
JobScope,或使用@EnableBatchProcessing注释 (仅选择一种方法)。
以下示例使用batchNamespace:
<beans xmlns="http://www.springframework.org/schema/beans"
		  xmlns:batch="http://www.springframework.org/schema/batch"
		  xmlns:xsi="http://www.w3.org/2001/XMLSchema-instance"
		  xsi:schemaLocation="...">

<batch:job .../>
...
</beans>
以下示例包括一个 Bean,它显式定义了JobScope:
<bean class="org.springframework.batch.core.scope.JobScope" />| 在多线程中使用作业范围的 bean 存在一些实际限制 或分区步骤。Spring Batch 不控制在这些 用例,因此无法正确设置它们以使用此类 bean。因此 我们不建议在多线程或分区步骤中使用作业范围的 bean。 |
范围ItemStream组件
当使用 Java 配置样式定义作业或步骤范围ItemStream豆
Bean 定义方法的返回类型应至少为ItemStream.这是必需的
以便 Spring Batch 正确创建实现此接口的代理,因此
通过调用open,update和close方法。
建议将此类 bean 的 bean 定义方法返回最具体的 已知实现,如以下示例所示:
@Bean
@StepScope
public FlatFileItemReader flatFileItemReader(@Value("#{jobParameters['input.file.name']}") String name) {
	return new FlatFileItemReaderBuilder<Foo>()
			.resource(new FileSystemResource(name))
			// set other properties of the item reader
			.build();
}