Spring Batch 集成
Spring Batch 集成
Spring Batch 的许多用户可能会遇到以下要求 在 Spring Batch 的范围之外,但这可能是有效的,并且 使用 Spring Integration 简洁地实现。相反,Spring 集成用户可能会遇到 Spring Batch 需求,需要一种方法 有效地集成这两个框架。在这种情况下,几个 模式和用例出现,Spring Batch 集成 满足这些要求。
Spring Batch 和 Spring Integration 之间的界限并不总是 很清楚,但有两条建议可以 help:考虑粒度并应用常见模式。一些 本节将介绍这些常见模式。
将消息传递添加到批处理中可实现 运营,以及关键问题的分离和战略制定。 例如,一条消息可能会触发要执行的作业,然后 发送消息可以通过多种方式公开。或者,当 作业完成或失败,该事件可能会触发要发送的消息, 这些消息的使用者可能有作方面的顾虑 与应用程序本身无关。消息传递可以 也可以嵌入到作业中(例如,读取或写入 通过通道处理)。远程分区和远程分块 提供在多个 worker 之间分配工作负载的方法。
本节涵盖以下关键概念:
命名空间支持
专用 XML 命名空间支持已添加到 Spring Batch Integration 版本 1.3 中。 旨在提供更简单的配置 经验。要使用命名空间,请添加以下内容 命名空间声明添加到 Spring XML 应用程序上下文中 文件:
<beans xmlns="http://www.springframework.org/schema/beans"
  xmlns:xsi="http://www.w3.org/2001/XMLSchema-instance"
  xmlns:batch-int="http://www.springframework.org/schema/batch-integration"
  xsi:schemaLocation="
    http://www.springframework.org/schema/batch-integration
    https://www.springframework.org/schema/batch-integration/spring-batch-integration.xsd">

    ...

</beans>
以下示例显示了一个为 Spring 配置的 Spring XML 应用程序上下文文件 批量集成:
<beans xmlns="http://www.springframework.org/schema/beans"
  xmlns:xsi="http://www.w3.org/2001/XMLSchema-instance"
  xmlns:int="http://www.springframework.org/schema/integration"
  xmlns:batch="http://www.springframework.org/schema/batch"
  xmlns:batch-int="http://www.springframework.org/schema/batch-integration"
  xsi:schemaLocation="
    http://www.springframework.org/schema/batch-integration
    https://www.springframework.org/schema/batch-integration/spring-batch-integration.xsd
    http://www.springframework.org/schema/batch
    https://www.springframework.org/schema/batch/spring-batch.xsd
    http://www.springframework.org/schema/beans
    https://www.springframework.org/schema/beans/spring-beans.xsd
    http://www.springframework.org/schema/integration
    https://www.springframework.org/schema/integration/spring-integration.xsd">

    ...

</beans>
将版本号附加到引用的 XSD 文件也是 允许。但是,由于无版本声明始终使用 latest 架构,我们通常不建议附加版本 number 设置为 XSD 名称。添加版本号 可能会在更新 Spring Batch 时产生问题 集成依赖项,因为它们可能需要更新的版本 的 XML 架构。
通过消息启动 Batch 作业
使用核心 Spring Batch API 启动批处理作业时,您可以 基本上有两个选项:
-
在命令行中,使用
CommandLineJobRunner -
以编程方式,使用
JobOperator.start()或JobLauncher.run()
例如,您可能希望使用CommandLineJobRunner当通过
使用 shell 脚本。或者,您可以使用JobOperator直接(例如,使用
Spring Batch 作为 Web 应用程序的一部分)。但是,那又如何呢
更复杂的用例?也许您需要轮询远程 (S)FTP
server 检索 Batch Job 或应用程序的数据
必须同时支持多个不同的数据源。为
例如,您不仅可以从 Web 接收数据文件,还可以从
FTP 和其他来源。也许输入文件的其他转换是
在调用 Spring Batch 之前需要。
因此,执行批处理作业会更强大
通过使用 Spring Integration 及其众多适配器。例如
您可以使用 File Inbound Channel Adapter 来
监视文件系统中的目录,并以
一旦输入文件到达。此外,您还可以创建 Spring
使用多个不同适配器的集成流
从多个来源摄取批处理作业的数据
同时仅使用配置。实现所有这些
Spring Integration 的场景很容易,因为它允许
解耦的、事件驱动的JobLauncher.
Spring Batch 集成提供了JobLaunchingMessageHandler类
用于启动批处理作业。的JobLaunchingMessageHandler由
Spring Integration 消息,其有效负载为JobLaunchRequest.这个类是Job启动并围绕JobParameters他们是
启动 Batch 作业所必需的。
下图显示了典型的 Spring 集成 启动 Batch 作业所需的消息流。EIP (Enterprise Integration Patterns) 网站提供了消息传送图标及其描述的完整概述。
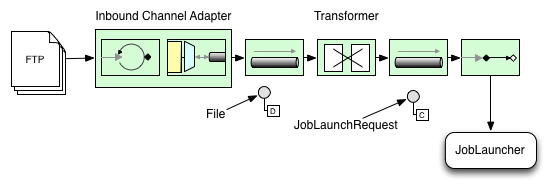
将文件转换为 JobLaunchRequest
以下示例将文件转换为JobLaunchRequest:
package io.spring.sbi;
public class FileMessageToJobRequest {
private Job job;
private String fileParameterName;
public void setFileParameterName(String fileParameterName) {
this.fileParameterName = fileParameterName;
}
public void setJob(Job job) {
this.job = job;
}
@Transformer
public JobLaunchRequest toRequest(Message<File> message) {
JobParametersBuilder jobParametersBuilder =
new JobParametersBuilder();
jobParametersBuilder.addString(fileParameterName,
message.getPayload().getAbsolutePath());
return new JobLaunchRequest(job, jobParametersBuilder.toJobParameters());
}
}
The JobExecution Response
When a batch job is being executed, a
JobExecution instance is returned. You can use this
instance to determine the status of an execution. If
a JobExecution is able to be created
successfully, it is always returned, regardless of whether
or not the actual execution is successful.
The exact behavior on how the JobExecution
instance is returned depends on the provided
TaskExecutor. If a
synchronous (single-threaded)
TaskExecutor implementation is used, the
JobExecution response is returned only
after the job completes. When using an
asynchronous
TaskExecutor, the
JobExecution instance is returned
immediately. You can then take the id of
JobExecution instance
(with JobExecution.getJobId()) and query the
JobRepository for the job’s updated status
using the JobExplorer. For more
information, see
Querying the Repository.
Spring Batch Integration Configuration
Consider a case where someone needs to create a file inbound-channel-adapter to listen
for CSV files in the provided directory, hand them off to a transformer
(FileMessageToJobRequest), launch the job through the job launching gateway, and
log the output of the JobExecution with the logging-channel-adapter.
The following example shows how that common case can be configured in XML:
.XML Configuration
<int:channel id="inboundFileChannel"/>
<int:channel id="outboundJobRequestChannel"/>
<int:channel id="jobLaunchReplyChannel"/>
<int-file:inbound-channel-adapter id="filePoller"
channel="inboundFileChannel"
directory="file:/tmp/myfiles/"
filename-pattern="*.csv">
<int:poller fixed-rate="1000"/>
</int-file:inbound-channel-adapter>
<int:transformer input-channel="inboundFileChannel"
output-channel="outboundJobRequestChannel">
<bean class="io.spring.sbi.FileMessageToJobRequest">
<property name="job" ref="personJob"/>
<property name="fileParameterName" value="input.file.name"/>
</bean>
</int:transformer>
<batch-int:job-launching-gateway request-channel="outboundJobRequestChannel"
reply-channel="jobLaunchReplyChannel"/>
<int:logging-channel-adapter channel="jobLaunchReplyChannel"/>
The following example shows how that common case can be configured in Java:
Java Configuration
@Bean
public FileMessageToJobRequest fileMessageToJobRequest() {
FileMessageToJobRequest fileMessageToJobRequest = new FileMessageToJobRequest();
fileMessageToJobRequest.setFileParameterName("input.file.name");
fileMessageToJobRequest.setJob(personJob());
return fileMessageToJobRequest;
}
@Bean
public JobLaunchingGateway jobLaunchingGateway() {
TaskExecutorJobLauncher jobLauncher = new TaskExecutorJobLauncher();
jobLauncher.setJobRepository(jobRepository);
jobLauncher.setTaskExecutor(new SyncTaskExecutor());
JobLaunchingGateway jobLaunchingGateway = new JobLaunchingGateway(jobLauncher);
return jobLaunchingGateway;
}
@Bean
public IntegrationFlow integrationFlow(JobLaunchingGateway jobLaunchingGateway) {
return IntegrationFlow.from(Files.inboundAdapter(new File("/tmp/myfiles")).
filter(new SimplePatternFileListFilter("*.csv")),
c -> c.poller(Pollers.fixedRate(1000).maxMessagesPerPoll(1))).
transform(fileMessageToJobRequest()).
handle(jobLaunchingGateway).
log(LoggingHandler.Level.WARN, "headers.id + ': ' + payload").
get();
}
Example ItemReader Configuration
Now that we are polling for files and launching jobs, we need to configure our Spring
Batch ItemReader (for example) to use the files found at the location defined by the job
parameter called "input.file.name", as the following bean configuration shows:
The following XML example shows the necessary bean configuration:
XML Configuration
<bean id="itemReader" class="org.springframework.batch.item.file.FlatFileItemReader"
scope="step">
<property name="resource" value="file://#{jobParameters['input.file.name']}"/>
...
</bean>
The following Java example shows the necessary bean configuration:
Java Configuration
@Bean
@StepScope
public ItemReader sampleReader(@Value("#{jobParameters[input.file.name]}") String resource) {
...
FlatFileItemReader flatFileItemReader = new FlatFileItemReader();
flatFileItemReader.setResource(new FileSystemResource(resource));
...
return flatFileItemReader;
}
The main points of interest in the preceding example are injecting the value of
#{jobParameters['input.file.name']}
as the Resource property value and setting the ItemReader bean
to have step scope. Setting the bean to have step scope takes advantage of
the late binding support, which allows access to the
jobParameters variable.
Available Attributes of the Job-Launching Gateway
The job-launching gateway has the following attributes that you can set to control a job:
-
id: Identifies the underlying Spring bean definition, which is an instance of either:
-
EventDrivenConsumer
-
PollingConsumer
(The exact implementation depends on whether the component’s input channel is a
SubscribableChannel or a PollableChannel.)
-
auto-startup: Boolean flag to indicate that the endpoint should start automatically on
startup. The default is true.
-
request-channel: The input MessageChannel of this endpoint.
-
reply-channel: MessageChannel to which the resulting JobExecution payload is sent.
-
reply-timeout: Lets you specify how long (in milliseconds) this gateway waits for the reply message
to be sent successfully to the reply channel before throwing
an exception. This attribute applies only when the channel
might block (for example, when using a bounded queue channel
that is currently full). Also, keep in mind that, when sending to a
DirectChannel, the invocation occurs
in the sender’s thread. Therefore, the failing of the send
operation may be caused by other components further downstream.
The reply-timeout attribute maps to the
sendTimeout property of the underlying
MessagingTemplate instance. If not specified, the attribute
defaults to -1,
meaning that, by default, the Gateway waits indefinitely.
-
job-launcher: Optional. Accepts a
custom
JobLauncher
bean reference.
If not specified, the adapter
re-uses the instance that is registered under the id of
jobLauncher. If no default instance
exists, an exception is thrown.
-
order: Specifies the order of invocation when this endpoint is connected as a subscriber
to a SubscribableChannel.
Sub-elements
When this Gateway is receiving messages from a
PollableChannel, you must either provide
a global default Poller or provide a Poller sub-element to the
Job Launching Gateway.
The following example shows how to provide a poller in XML:
XML Configuration
<batch-int:job-launching-gateway request-channel="queueChannel"
reply-channel="replyChannel" job-launcher="jobLauncher">
<int:poller fixed-rate="1000">
</batch-int:job-launching-gateway>
The following example shows how to provide a poller in Java:
Java Configuration
@Bean
@ServiceActivator(inputChannel = "queueChannel", poller = @Poller(fixedRate="1000"))
public JobLaunchingGateway sampleJobLaunchingGateway() {
JobLaunchingGateway jobLaunchingGateway = new JobLaunchingGateway(jobLauncher());
jobLaunchingGateway.setOutputChannel(replyChannel());
return jobLaunchingGateway;
}
Providing Feedback with Informational Messages
As Spring Batch jobs can run for long times, providing progress
information is often critical. For example, stakeholders may want
to be notified if some or all parts of a batch job have failed.
Spring Batch provides support for this information being gathered
through:
-
Active polling
-
Event-driven listeners
When starting a Spring Batch job asynchronously (for example, by using the Job Launching
Gateway), a JobExecution instance is returned. Thus, you can use JobExecution.getJobId()
to continuously poll for status updates by retrieving updated instances of the
JobExecution from the JobRepository by using the JobExplorer. However, this is
considered sub-optimal, and an event-driven approach is preferred.
Therefore, Spring Batch provides listeners, including the three most commonly used
listeners:
-
StepListener
-
ChunkListener
-
JobExecutionListener
In the example shown in the following image, a Spring Batch job has been configured with a
StepExecutionListener. Thus, Spring Integration receives and processes any step before
or after events. For example, you can inspect the received StepExecution by using a
Router. Based on the results of that inspection, various things can occur (such as
routing a message to a mail outbound channel adapter), so that an email notification can
be sent out based on some condition.
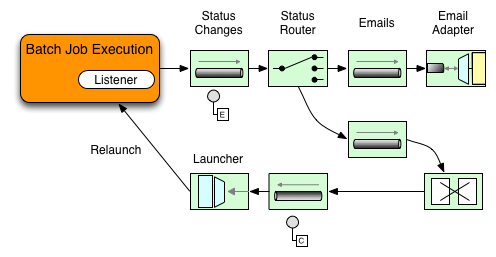 Figure 2. Handling Informational Messages
The following two-part example shows how a listener is configured to send a
message to a Gateway for a StepExecution events and log its output to a
logging-channel-adapter.
First, create the notification integration beans.
The following example shows the how to create the notification integration beans in XML:
XML Configuration
<int:channel id="stepExecutionsChannel"/>
<int:gateway id="notificationExecutionsListener"
service-interface="org.springframework.batch.core.StepExecutionListener"
default-request-channel="stepExecutionsChannel"/>
<int:logging-channel-adapter channel="stepExecutionsChannel"/>
The following example shows the how to create the notification integration beans in Java:
Java Configuration
@Bean
@ServiceActivator(inputChannel = "stepExecutionsChannel")
public LoggingHandler loggingHandler() {
LoggingHandler adapter = new LoggingHandler(LoggingHandler.Level.WARN);
adapter.setLoggerName("TEST_LOGGER");
adapter.setLogExpressionString("headers.id + ': ' + payload");
return adapter;
}
@MessagingGateway(name = "notificationExecutionsListener", defaultRequestChannel = "stepExecutionsChannel")
public interface NotificationExecutionListener extends StepExecutionListener {}
You need to add the @IntegrationComponentScan annotation to your configuration.
Second, modify your job to add a step-level listener.
The following example shows the how to add a step-level listener in XML:
XML Configuration
<job id="importPayments">
<step id="step1">
<tasklet ../>
<chunk ../>
<listeners>
<listener ref="notificationExecutionsListener"/>
</listeners>
</tasklet>
...
</step>
</job>
The following example shows the how to add a step-level listener in Java:
Java Configuration
public Job importPaymentsJob(JobRepository jobRepository) {
return new JobBuilder("importPayments", jobRepository)
.start(stepBuilderFactory.get("step1")
.chunk(200)
.listener(notificationExecutionsListener())
...
)
}
Asynchronous Processors
Asynchronous Processors help you scale the processing of items. In the asynchronous
processor use case, an AsyncItemProcessor serves as a dispatcher, executing the logic of
the ItemProcessor for an item on a new thread. Once the item completes, the Future is
passed to the AsynchItemWriter to be written.
Therefore, you can increase performance by using asynchronous item processing, basically
letting you implement fork-join scenarios. The AsyncItemWriter gathers the results and
writes back the chunk as soon as all the results become available.
The following example shows how to configuration the AsyncItemProcessor in XML:
XML Configuration
<bean id="processor"
class="org.springframework.batch.integration.async.AsyncItemProcessor">
<property name="delegate">
<bean class="your.ItemProcessor"/>
</property>
<property name="taskExecutor">
<bean class="org.springframework.core.task.SimpleAsyncTaskExecutor"/>
</property>
</bean>
The following example shows how to configuration the AsyncItemProcessor in XML:
Java Configuration
@Bean
public AsyncItemProcessor processor(ItemProcessor itemProcessor, TaskExecutor taskExecutor) {
AsyncItemProcessor asyncItemProcessor = new AsyncItemProcessor();
asyncItemProcessor.setTaskExecutor(taskExecutor);
asyncItemProcessor.setDelegate(itemProcessor);
return asyncItemProcessor;
}
The delegate property refers to your ItemProcessor bean, and the taskExecutor
property refers to the TaskExecutor of your choice.
The following example shows how to configure the AsyncItemWriter in XML:
XML Configuration
<bean id="itemWriter"
class="org.springframework.batch.integration.async.AsyncItemWriter">
<property name="delegate">
<bean id="itemWriter" class="your.ItemWriter"/>
</property>
</bean>
The following example shows how to configure the AsyncItemWriter in Java:
Java Configuration
@Bean
public AsyncItemWriter writer(ItemWriter itemWriter) {
AsyncItemWriter asyncItemWriter = new AsyncItemWriter();
asyncItemWriter.setDelegate(itemWriter);
return asyncItemWriter;
}
Again, the delegate property is
actually a reference to your ItemWriter bean.
Externalizing Batch Process Execution
The integration approaches discussed so far suggest use cases
where Spring Integration wraps Spring Batch like an outer shell.
However, Spring Batch can also use Spring Integration internally.
By using this approach, Spring Batch users can delegate the
processing of items or even chunks to outside processes. This
lets you offload complex processing. Spring Batch Integration
provides dedicated support for:
-
Remote Chunking
-
Remote Partitioning
Remote Chunking
The following image shows one way that remote chunking works when you use Spring Batch
together with Spring Integration:
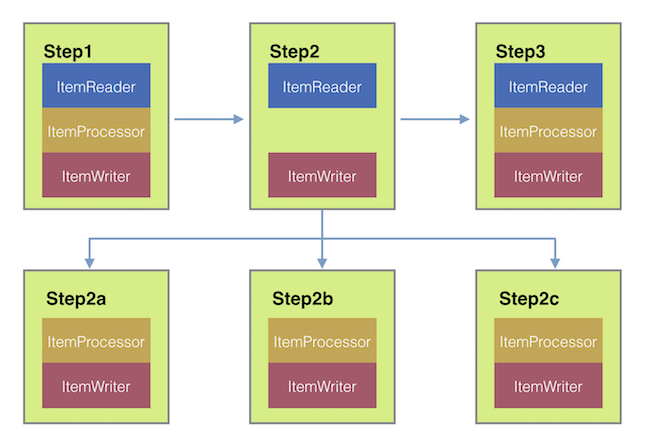 Figure 3. Remote Chunking
Taking things one step further, you can also externalize the
chunk processing by using the
ChunkMessageChannelItemWriter
(provided by Spring Batch Integration), which sends items out
and collects the result. Once sent, Spring Batch continues the
process of reading and grouping items, without waiting for the results.
Rather, it is the responsibility of the ChunkMessageChannelItemWriter
to gather the results and integrate them back into the Spring Batch process.
With Spring Integration, you have full
control over the concurrency of your processes (for instance, by
using a QueueChannel instead of a
DirectChannel). Furthermore, by relying on
Spring Integration’s rich collection of channel adapters (such as
JMS and AMQP), you can distribute chunks of a batch job to
external systems for processing.
A job with a step to be remotely chunked might have a configuration similar to the
following in XML:
XML Configuration
<job id="personJob">
<step id="step1">
<tasklet>
<chunk reader="itemReader" writer="itemWriter" commit-interval="200"/>
</tasklet>
...
</step>
</job>
A job with a step to be remotely chunked might have a configuration similar to the
following in Java:
Java Configuration
public Job chunkJob(JobRepository jobRepository) {
return new JobBuilder("personJob", jobRepository)
.start(stepBuilderFactory.get("step1")
.<Person, Person>chunk(200)
.reader(itemReader())
.writer(itemWriter())
.build())
.build();
}
The ItemReader reference points to the bean you want to use for reading data on the
manager. The ItemWriter reference points to a special ItemWriter (called
ChunkMessageChannelItemWriter), as described earlier. The processor (if any) is left off
the manager configuration, as it is configured on the worker. You should check any
additional component properties, such as throttle limits and so on, when implementing
your use case.
The following XML configuration provides a basic manager setup:
XML Configuration
<bean id="connectionFactory" class="org.apache.activemq.ActiveMQConnectionFactory">
<property name="brokerURL" value="tcp://localhost:61616"/>
</bean>
<int-jms:outbound-channel-adapter id="jmsRequests" destination-name="requests"/>
<bean id="messagingTemplate"
class="org.springframework.integration.core.MessagingTemplate">
<property name="defaultChannel" ref="requests"/>
<property name="receiveTimeout" value="2000"/>
</bean>
<bean id="itemWriter"
class="org.springframework.batch.integration.chunk.ChunkMessageChannelItemWriter"
scope="step">
<property name="messagingOperations" ref="messagingTemplate"/>
<property name="replyChannel" ref="replies"/>
</bean>
<int:channel id="replies">
<int:queue/>
</int:channel>
<int-jms:message-driven-channel-adapter id="jmsReplies"
destination-name="replies"
channel="replies"/>
The following Java configuration provides a basic manager setup:
Java Configuration
@Bean
public org.apache.activemq.ActiveMQConnectionFactory connectionFactory() {
ActiveMQConnectionFactory factory = new ActiveMQConnectionFactory();
factory.setBrokerURL("tcp://localhost:61616");
return factory;
}
/*
* Configure outbound flow (requests going to workers)
*/
@Bean
public DirectChannel requests() {
return new DirectChannel();
}
@Bean
public IntegrationFlow outboundFlow(ActiveMQConnectionFactory connectionFactory) {
return IntegrationFlow
.from(requests())
.handle(Jms.outboundAdapter(connectionFactory).destination("requests"))
.get();
}
/*
* Configure inbound flow (replies coming from workers)
*/
@Bean
public QueueChannel replies() {
return new QueueChannel();
}
@Bean
public IntegrationFlow inboundFlow(ActiveMQConnectionFactory connectionFactory) {
return IntegrationFlow
.from(Jms.messageDrivenChannelAdapter(connectionFactory).destination("replies"))
.channel(replies())
.get();
}
/*
* Configure the ChunkMessageChannelItemWriter
*/
@Bean
public ItemWriter<Integer> itemWriter() {
MessagingTemplate messagingTemplate = new MessagingTemplate();
messagingTemplate.setDefaultChannel(requests());
messagingTemplate.setReceiveTimeout(2000);
ChunkMessageChannelItemWriter<Integer> chunkMessageChannelItemWriter
= new ChunkMessageChannelItemWriter<>();
chunkMessageChannelItemWriter.setMessagingOperations(messagingTemplate);
chunkMessageChannelItemWriter.setReplyChannel(replies());
return chunkMessageChannelItemWriter;
}
The preceding configuration provides us with a number of beans. We
configure our messaging middleware by using ActiveMQ and the
inbound and outbound JMS adapters provided by Spring Integration. As
shown, our itemWriter bean, which is
referenced by our job step, uses the
ChunkMessageChannelItemWriter to write chunks over the
configured middleware.
Now we can move on to the worker configuration, as the following example shows:
The following example shows the worker configuration in XML:
XML Configuration
<bean id="connectionFactory" class="org.apache.activemq.ActiveMQConnectionFactory">
<property name="brokerURL" value="tcp://localhost:61616"/>
</bean>
<int:channel id="requests"/>
<int:channel id="replies"/>
<int-jms:message-driven-channel-adapter id="incomingRequests"
destination-name="requests"
channel="requests"/>
<int-jms:outbound-channel-adapter id="outgoingReplies"
destination-name="replies"
channel="replies">
</int-jms:outbound-channel-adapter>
<int:service-activator id="serviceActivator"
input-channel="requests"
output-channel="replies"
ref="chunkProcessorChunkHandler"
method="handleChunk"/>
<bean id="chunkProcessorChunkHandler"
class="org.springframework.batch.integration.chunk.ChunkProcessorChunkHandler">
<property name="chunkProcessor">
<bean class="org.springframework.batch.core.step.item.SimpleChunkProcessor">
<property name="itemWriter">
<bean class="io.spring.sbi.PersonItemWriter"/>
</property>
<property name="itemProcessor">
<bean class="io.spring.sbi.PersonItemProcessor"/>
</property>
</bean>
</property>
</bean>
The following example shows the worker configuration in Java:
Java Configuration
@Bean
public org.apache.activemq.ActiveMQConnectionFactory connectionFactory() {
ActiveMQConnectionFactory factory = new ActiveMQConnectionFactory();
factory.setBrokerURL("tcp://localhost:61616");
return factory;
}
/*
* Configure inbound flow (requests coming from the manager)
*/
@Bean
public DirectChannel requests() {
return new DirectChannel();
}
@Bean
public IntegrationFlow inboundFlow(ActiveMQConnectionFactory connectionFactory) {
return IntegrationFlow
.from(Jms.messageDrivenChannelAdapter(connectionFactory).destination("requests"))
.channel(requests())
.get();
}
/*
* Configure outbound flow (replies going to the manager)
*/
@Bean
public DirectChannel replies() {
return new DirectChannel();
}
@Bean
public IntegrationFlow outboundFlow(ActiveMQConnectionFactory connectionFactory) {
return IntegrationFlow
.from(replies())
.handle(Jms.outboundAdapter(connectionFactory).destination("replies"))
.get();
}
/*
* Configure the ChunkProcessorChunkHandler
*/
@Bean
@ServiceActivator(inputChannel = "requests", outputChannel = "replies")
public ChunkProcessorChunkHandler<Integer> chunkProcessorChunkHandler() {
ChunkProcessor<Integer> chunkProcessor
= new SimpleChunkProcessor<>(itemProcessor(), itemWriter());
ChunkProcessorChunkHandler<Integer> chunkProcessorChunkHandler
= new ChunkProcessorChunkHandler<>();
chunkProcessorChunkHandler.setChunkProcessor(chunkProcessor);
return chunkProcessorChunkHandler;
}
Most of these configuration items should look familiar from the
manager configuration. Workers do not need access to
the Spring Batch JobRepository nor
to the actual job configuration file. The main bean of interest
is the chunkProcessorChunkHandler. The
chunkProcessor property of ChunkProcessorChunkHandler takes a
configured SimpleChunkProcessor, which is where you would provide a reference to your
ItemWriter (and, optionally, your
ItemProcessor) that will run on the worker
when it receives chunks from the manager.
For more information, see the section of the “Scalability” chapter on
Remote Chunking.
Starting from version 4.1, Spring Batch Integration introduces the @EnableBatchIntegration
annotation that can be used to simplify a remote chunking setup. This annotation provides
two beans that you can autowire in your application context:
-
RemoteChunkingManagerStepBuilderFactory: Configures the manager step
-
RemoteChunkingWorkerBuilder: Configures the remote worker integration flow
These APIs take care of configuring a number of components, as the following diagram shows:
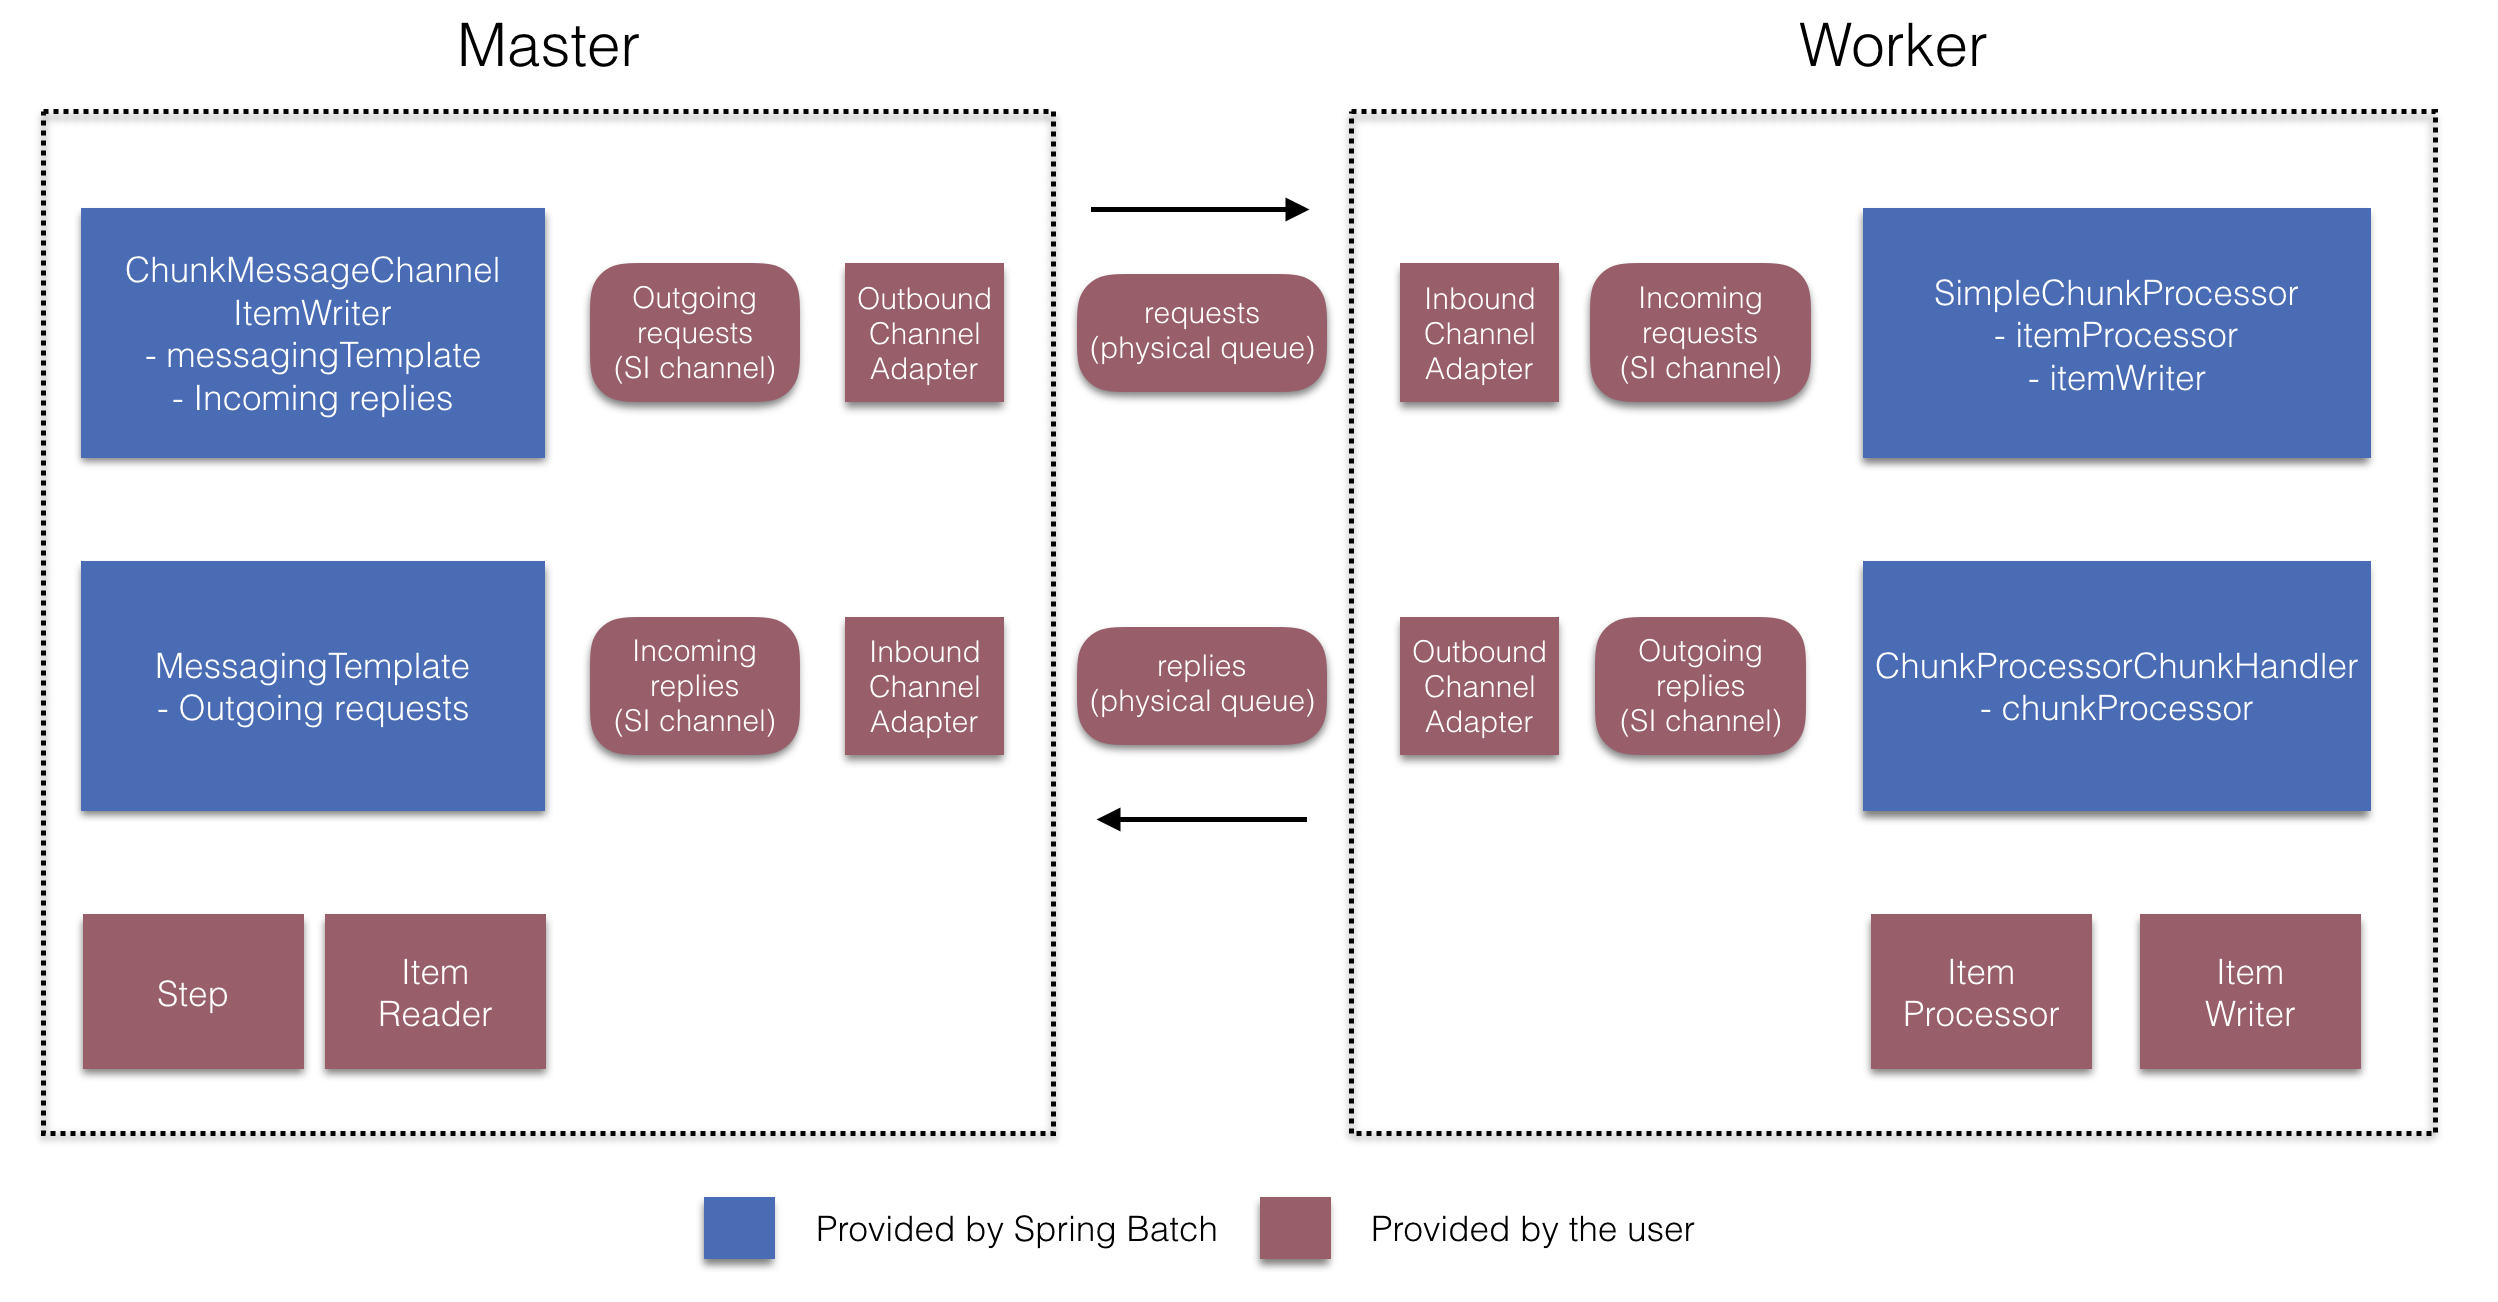 Figure 4. Remote Chunking Configuration
On the manager side, the RemoteChunkingManagerStepBuilderFactory lets you
configure a manager step by declaring:
-
The item reader to read items and send them to workers
-
The output channel ("Outgoing requests") to send requests to workers
-
The input channel ("Incoming replies") to receive replies from workers
You need not explicitly configure ChunkMessageChannelItemWriter and the MessagingTemplate.
(You can still explicitly configure them if find a reason to do so).
On the worker side, the RemoteChunkingWorkerBuilder lets you configure a worker to:
-
Listen to requests sent by the manager on the input channel (“Incoming requests”)
-
Call the handleChunk method of ChunkProcessorChunkHandler for each request
with the configured ItemProcessor and ItemWriter
-
Send replies on the output channel (“Outgoing replies”) to the manager
You need not explicitly configure the SimpleChunkProcessor
and the ChunkProcessorChunkHandler. (You can still explicitly configure them if you find
a reason to do so).
The following example shows how to use these APIs:
@EnableBatchIntegration
@EnableBatchProcessing
public class RemoteChunkingJobConfiguration {
@Configuration
public static class ManagerConfiguration {
@Autowired
private RemoteChunkingManagerStepBuilderFactory managerStepBuilderFactory;
@Bean
public TaskletStep managerStep() {
return this.managerStepBuilderFactory.get("managerStep")
.chunk(100)
.reader(itemReader())
.outputChannel(requests()) // requests sent to workers
.inputChannel(replies()) // replies received from workers
.build();
}
// Middleware beans setup omitted
}
@Configuration
public static class WorkerConfiguration {
@Autowired
private RemoteChunkingWorkerBuilder workerBuilder;
@Bean
public IntegrationFlow workerFlow() {
return this.workerBuilder
.itemProcessor(itemProcessor())
.itemWriter(itemWriter())
.inputChannel(requests()) // requests received from the manager
.outputChannel(replies()) // replies sent to the manager
.build();
}
// Middleware beans setup omitted
}
}
You can find a complete example of a remote chunking job
here.
Remote Partitioning
The following image shows a typical remote partitioning situation:
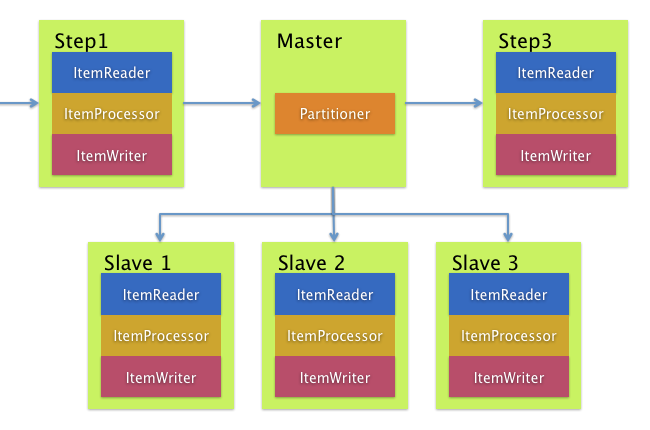 Figure 5. Remote Partitioning
Remote Partitioning, on the other hand, is useful when it
is not the processing of items but rather the associated I/O that
causes the bottleneck. With remote partitioning, you can send work
to workers that execute complete Spring Batch
steps. Thus, each worker has its own ItemReader, ItemProcessor, and
ItemWriter. For this purpose, Spring Batch
Integration provides the MessageChannelPartitionHandler.
This implementation of the PartitionHandler
interface uses MessageChannel instances to
send instructions to remote workers and receive their responses.
This provides a nice abstraction from the transports (such as JMS
and AMQP) being used to communicate with the remote workers.
The section of the “Scalability” chapter that addresses
remote partitioning provides an overview of the concepts and
components needed to configure remote partitioning and shows an
example of using the default
TaskExecutorPartitionHandler to partition
in separate local threads of execution. For remote partitioning
to multiple JVMs, two additional components are required:
-
A remoting fabric or grid environment
-
A PartitionHandler implementation that supports the desired
remoting fabric or grid environment
Similar to remote chunking, you can use JMS as the “remoting fabric”. In that case, use
a MessageChannelPartitionHandler instance as the PartitionHandler implementation,
as described earlier.
The following example assumes an existing partitioned job and focuses on the
MessageChannelPartitionHandler and JMS configuration in XML:
XML Configuration
<bean id="partitionHandler"
class="org.springframework.batch.integration.partition.MessageChannelPartitionHandler">
<property name="stepName" value="step1"/>
<property name="gridSize" value="3"/>
<property name="replyChannel" ref="outbound-replies"/>
<property name="messagingOperations">
<bean class="org.springframework.integration.core.MessagingTemplate">
<property name="defaultChannel" ref="outbound-requests"/>
<property name="receiveTimeout" value="100000"/>
</bean>
</property>
</bean>
<int:channel id="outbound-requests"/>
<int-jms:outbound-channel-adapter destination="requestsQueue"
channel="outbound-requests"/>
<int:channel id="inbound-requests"/>
<int-jms:message-driven-channel-adapter destination="requestsQueue"
channel="inbound-requests"/>
<bean id="stepExecutionRequestHandler"
class="org.springframework.batch.integration.partition.StepExecutionRequestHandler">
<property name="jobExplorer" ref="jobExplorer"/>
<property name="stepLocator" ref="stepLocator"/>
</bean>
<int:service-activator ref="stepExecutionRequestHandler" input-channel="inbound-requests"
output-channel="outbound-staging"/>
<int:channel id="outbound-staging"/>
<int-jms:outbound-channel-adapter destination="stagingQueue"
channel="outbound-staging"/>
<int:channel id="inbound-staging"/>
<int-jms:message-driven-channel-adapter destination="stagingQueue"
channel="inbound-staging"/>
<int:aggregator ref="partitionHandler" input-channel="inbound-staging"
output-channel="outbound-replies"/>
<int:channel id="outbound-replies">
<int:queue/>
</int:channel>
<bean id="stepLocator"
class="org.springframework.batch.integration.partition.BeanFactoryStepLocator" />
The following example assumes an existing partitioned job and focuses on the
MessageChannelPartitionHandler and JMS configuration in Java:
Java Configuration
/*
* Configuration of the manager side
*/
@Bean
public PartitionHandler partitionHandler() {
MessageChannelPartitionHandler partitionHandler = new MessageChannelPartitionHandler();
partitionHandler.setStepName("step1");
partitionHandler.setGridSize(3);
partitionHandler.setReplyChannel(outboundReplies());
MessagingTemplate template = new MessagingTemplate();
template.setDefaultChannel(outboundRequests());
template.setReceiveTimeout(100000);
partitionHandler.setMessagingOperations(template);
return partitionHandler;
}
@Bean
public QueueChannel outboundReplies() {
return new QueueChannel();
}
@Bean
public DirectChannel outboundRequests() {
return new DirectChannel();
}
@Bean
public IntegrationFlow outboundJmsRequests() {
return IntegrationFlow.from("outboundRequests")
.handle(Jms.outboundGateway(connectionFactory())
.requestDestination("requestsQueue"))
.get();
}
@Bean
@ServiceActivator(inputChannel = "inboundStaging")
public AggregatorFactoryBean partitioningMessageHandler() throws Exception {
AggregatorFactoryBean aggregatorFactoryBean = new AggregatorFactoryBean();
aggregatorFactoryBean.setProcessorBean(partitionHandler());
aggregatorFactoryBean.setOutputChannel(outboundReplies());
// configure other propeties of the aggregatorFactoryBean
return aggregatorFactoryBean;
}
@Bean
public DirectChannel inboundStaging() {
return new DirectChannel();
}
@Bean
public IntegrationFlow inboundJmsStaging() {
return IntegrationFlow
.from(Jms.messageDrivenChannelAdapter(connectionFactory())
.configureListenerContainer(c -> c.subscriptionDurable(false))
.destination("stagingQueue"))
.channel(inboundStaging())
.get();
}
/*
* Configuration of the worker side
*/
@Bean
public StepExecutionRequestHandler stepExecutionRequestHandler() {
StepExecutionRequestHandler stepExecutionRequestHandler = new StepExecutionRequestHandler();
stepExecutionRequestHandler.setJobExplorer(jobExplorer);
stepExecutionRequestHandler.setStepLocator(stepLocator());
return stepExecutionRequestHandler;
}
@Bean
@ServiceActivator(inputChannel = "inboundRequests", outputChannel = "outboundStaging")
public StepExecutionRequestHandler serviceActivator() throws Exception {
return stepExecutionRequestHandler();
}
@Bean
public DirectChannel inboundRequests() {
return new DirectChannel();
}
public IntegrationFlow inboundJmsRequests() {
return IntegrationFlow
.from(Jms.messageDrivenChannelAdapter(connectionFactory())
.configureListenerContainer(c -> c.subscriptionDurable(false))
.destination("requestsQueue"))
.channel(inboundRequests())
.get();
}
@Bean
public DirectChannel outboundStaging() {
return new DirectChannel();
}
@Bean
public IntegrationFlow outboundJmsStaging() {
return IntegrationFlow.from("outboundStaging")
.handle(Jms.outboundGateway(connectionFactory())
.requestDestination("stagingQueue"))
.get();
}
You must also ensure that the partition handler attribute maps to the partitionHandler
bean.
The following example maps the partition handler attribute to the partitionHandler in
XML:
XML Configuration
<job id="personJob">
<step id="step1.manager">
<partition partitioner="partitioner" handler="partitionHandler"/>
...
</step>
</job>
The following example maps the partition handler attribute to the partitionHandler in
Java:
Java Configuration
public Job personJob(JobRepository jobRepository) {
return new JobBuilder("personJob", jobRepository)
.start(stepBuilderFactory.get("step1.manager")
.partitioner("step1.worker", partitioner())
.partitionHandler(partitionHandler())
.build())
.build();
}
You can find a complete example of a remote partitioning job
here.
You can use the @EnableBatchIntegration annotation to simplify a remote
partitioning setup. This annotation provides two beans that are useful for remote partitioning:
-
RemotePartitioningManagerStepBuilderFactory: Configures the manager step
-
RemotePartitioningWorkerStepBuilderFactory: Configures the worker step
These APIs take care of configuring a number of components, as the following diagrams show:
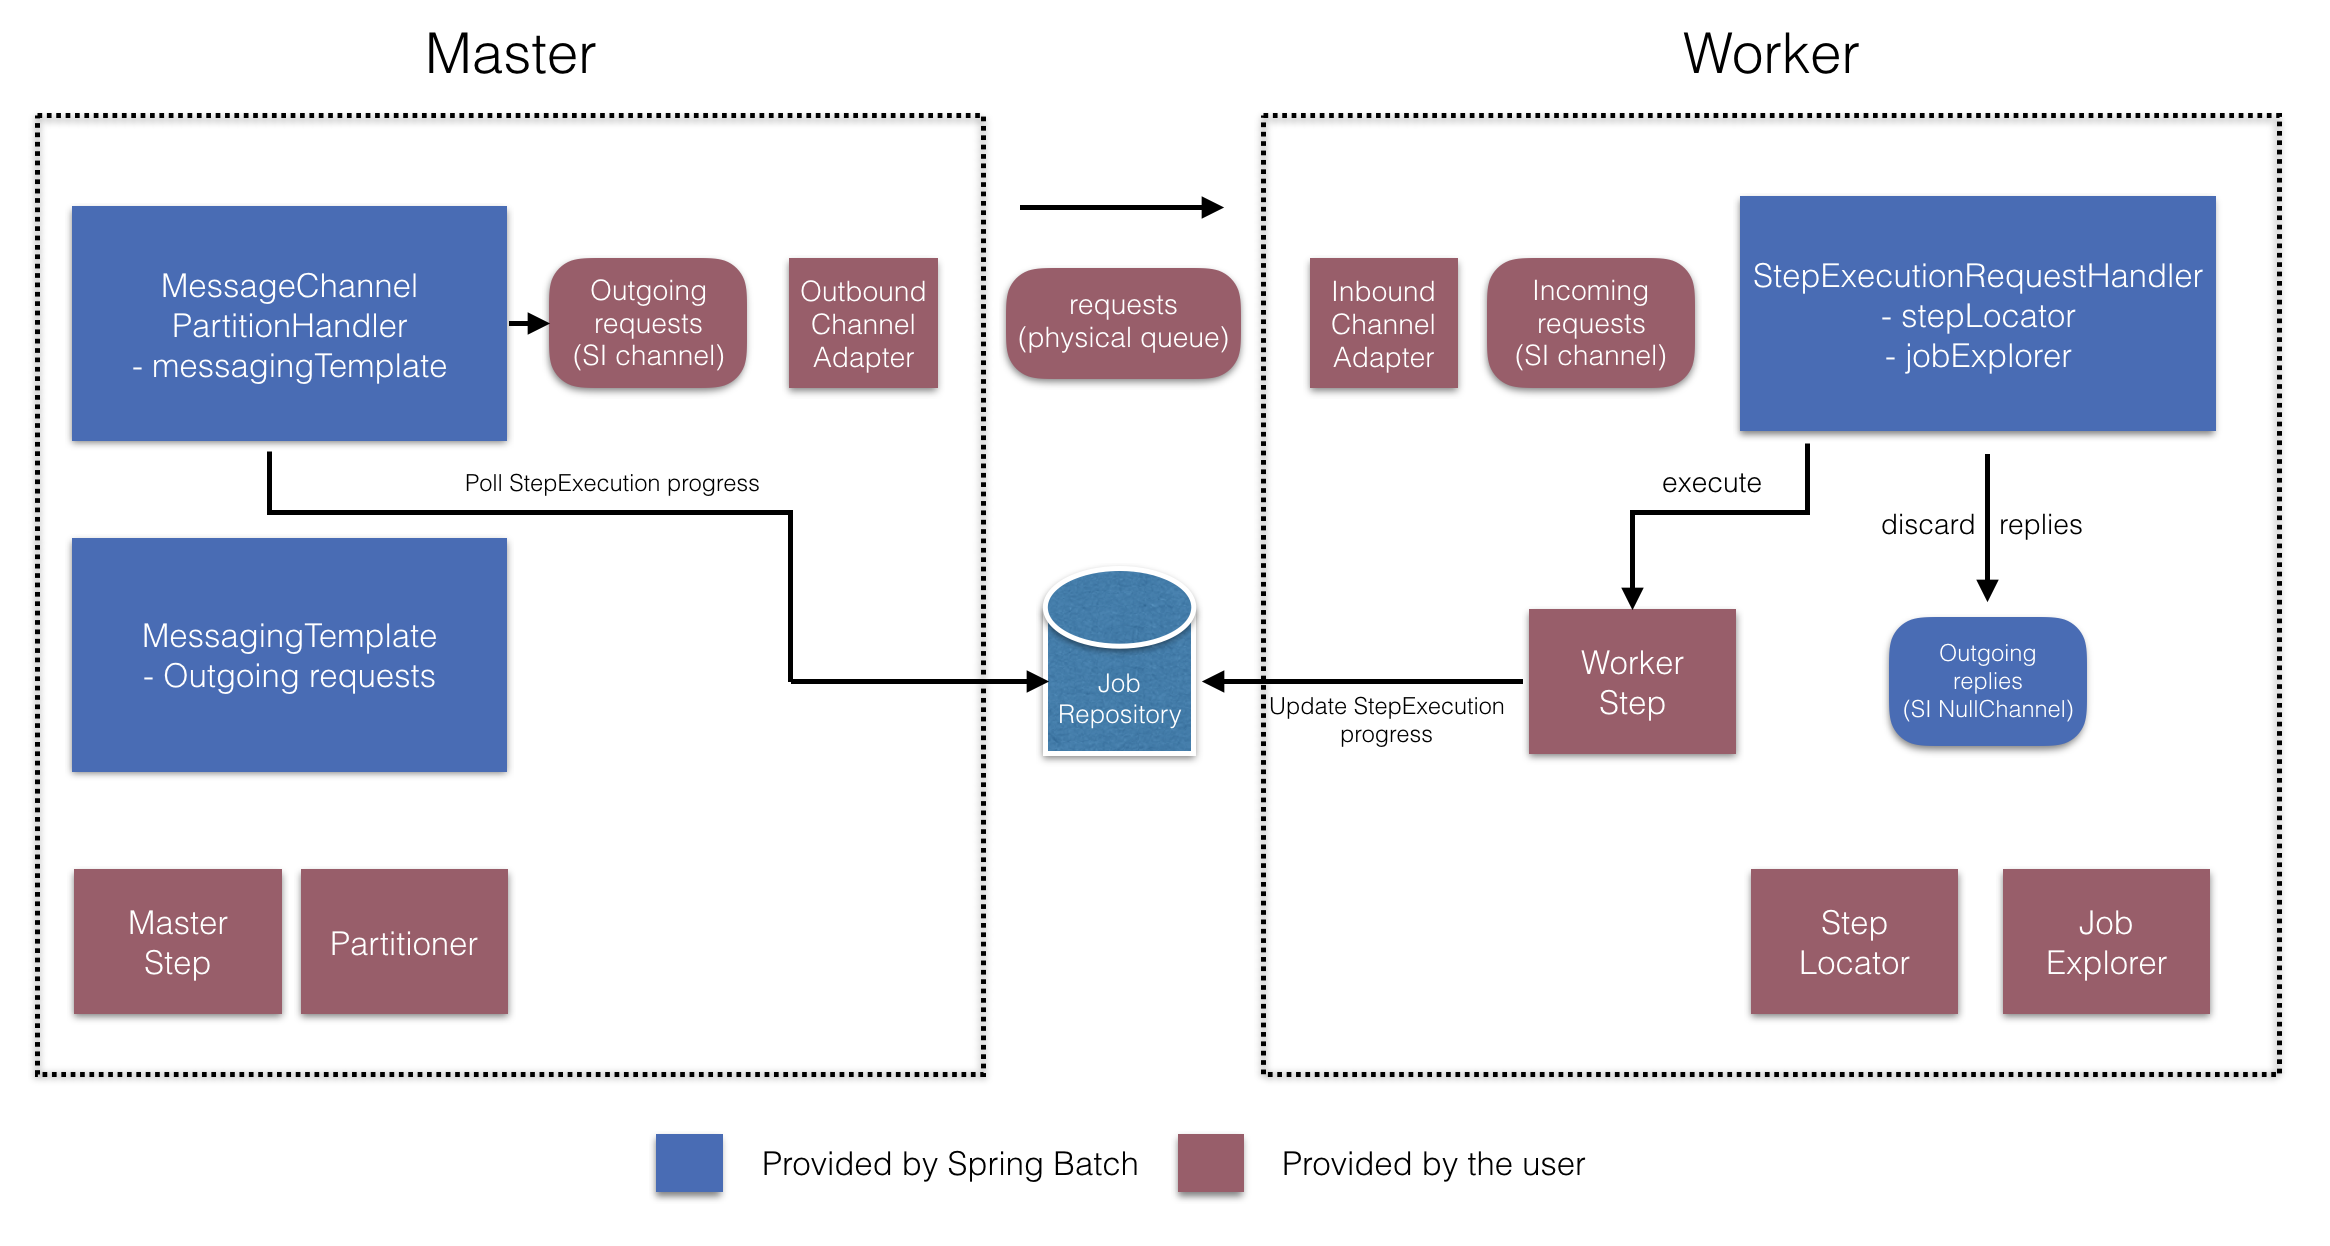 Figure 6. Remote Partitioning Configuration (with job repository polling)
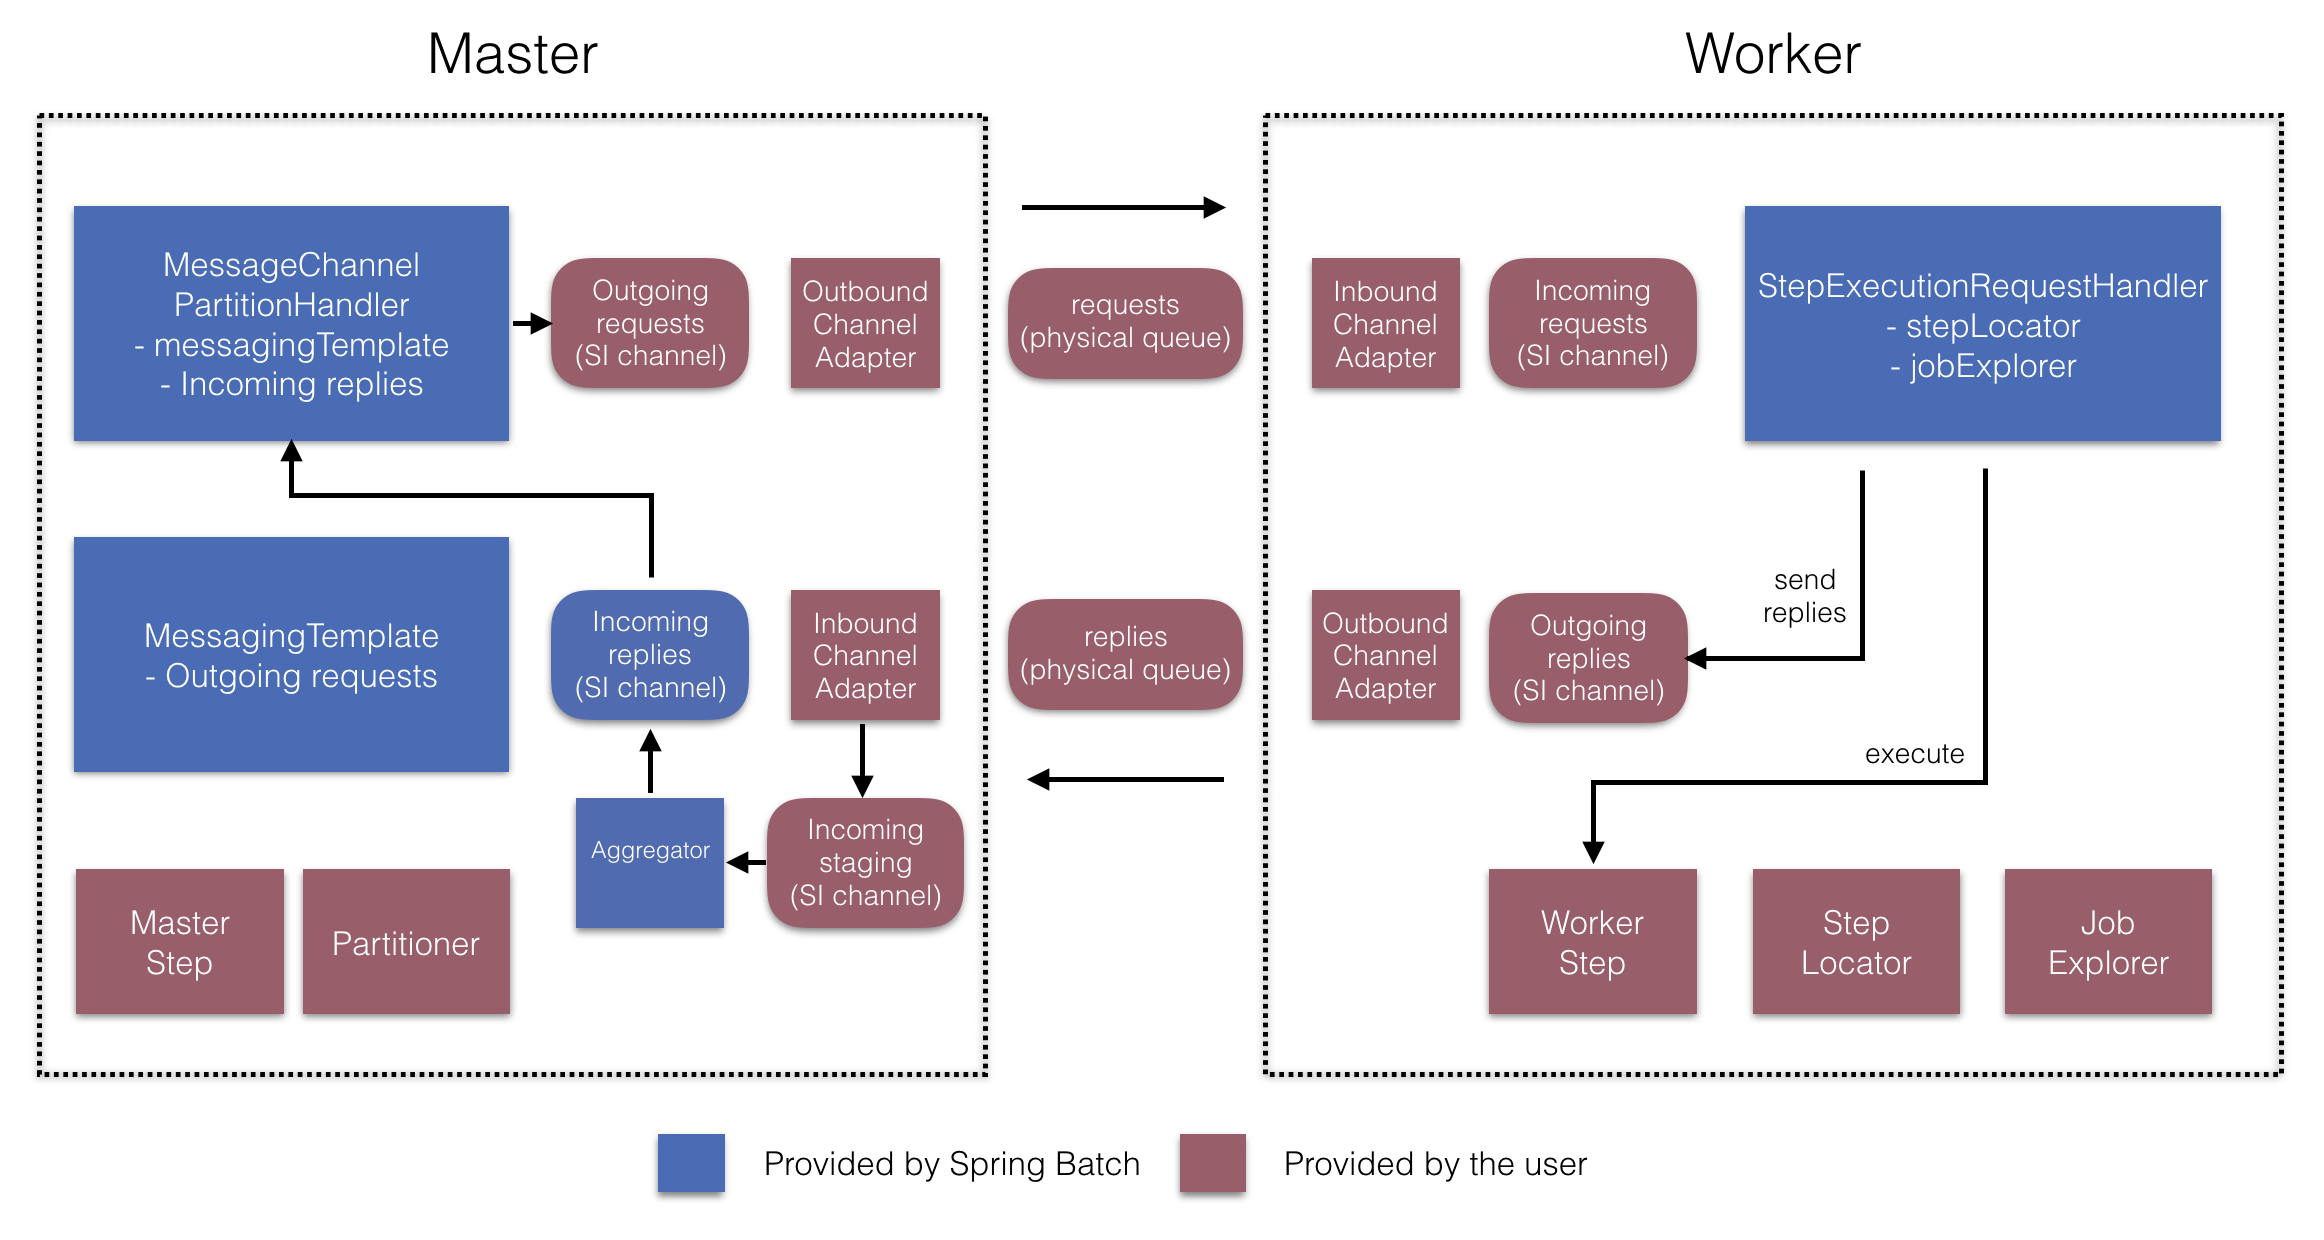 Figure 7. Remote Partitioning Configuration (with replies aggregation)
On the manager side, the RemotePartitioningManagerStepBuilderFactory lets you
configure a manager step by declaring:
-
The Partitioner used to partition data
-
The output channel (“Outgoing requests”) on which to send requests to workers
-
The input channel (“Incoming replies”) on which to receive replies from workers (when configuring replies aggregation)
-
The poll interval and timeout parameters (when configuring job repository polling)
You need not explicitly configure The MessageChannelPartitionHandler and the MessagingTemplate.
(You can still explicitly configured them if you find a reason to do so).
On the worker side, the RemotePartitioningWorkerStepBuilderFactory lets you configure a worker to:
-
Listen to requests sent by the manager on the input channel (“Incoming requests”)
-
Call the handle method of StepExecutionRequestHandler for each request
-
Send replies on the output channel (“Outgoing replies”) to the manager
You need not explicitly configure the StepExecutionRequestHandler.
(You can explicitly configure it if you find a reason to do so).
The following example shows how to use these APIs:
@Configuration
@EnableBatchProcessing
@EnableBatchIntegration
public class RemotePartitioningJobConfiguration {
@Configuration
public static class ManagerConfiguration {
@Autowired
private RemotePartitioningManagerStepBuilderFactory managerStepBuilderFactory;
@Bean
public Step managerStep() {
return this.managerStepBuilderFactory
.get("managerStep")
.partitioner("workerStep", partitioner())
.gridSize(10)
.outputChannel(outgoingRequestsToWorkers())
.inputChannel(incomingRepliesFromWorkers())
.build();
}
// Middleware beans setup omitted
}
@Configuration
public static class WorkerConfiguration {
@Autowired
private RemotePartitioningWorkerStepBuilderFactory workerStepBuilderFactory;
@Bean
public Step workerStep() {
return this.workerStepBuilderFactory
.get("workerStep")
.inputChannel(incomingRequestsFromManager())
.outputChannel(outgoingRepliesToManager())
.chunk(100)
.reader(itemReader())
.processor(itemProcessor())
.writer(itemWriter())
.build();
}
// Middleware beans setup omitted
}
}