II. 参考资料
4. 共享组件
本章探讨了在客户端和服务器端 Spring-WS 开发之间共享的组件。这些接口和类代表了 Spring-WS 的构建块,因此即使你不直接使用它们,你也需要了解它们的作用。
4.1. Web 服务消息
本节描述了 Spring-WS 使用的消息和消息工厂。
4.1.1.WebServiceMessage
Spring Web 服务的核心接口之一是WebServiceMessage.此接口表示与协议无关的 XML 消息。该接口包含一些方法,这些方法以javax.xml.transform.Source或javax.xml.transform.Result.Source和Result是标记接口,表示 XML 输入和输出的抽象。具体实现包装各种 XML 表示形式,如下表所示:
| Source 或 Result 实现 | 包装的 XML 表示 |
|---|---|
|
|
|
|
|
|
|
|
|
|
|
|
除了读取和写入有效负载之外,Web 服务消息还可以将自身写入输出流。
4.1.2.SoapMessage
SoapMessage是WebServiceMessage.它包含特定于 SOAP 的方法,例如获取 SOAP 标头、SOAP 错误等。通常,您的代码不应依赖于SoapMessage,因为 SOAP 正文的内容(消息的有效负载)可以通过使用getPayloadSource()和getPayloadResult()在WebServiceMessage.仅当需要执行特定于 SOAP 的作(例如添加标头、获取附件等)时,才需要强制转换WebServiceMessage自SoapMessage.
4.1.3. 消息工厂
具体消息实现由WebServiceMessageFactory.此工厂可以创建空消息或从 input 流中读取消息。有两种具体的实现WebServiceMessageFactory.一个基于 SAAJ,即用于 Java 的带附件的 SOAP API。另一个基于 Axis 2 的 AXIOM(AXis 对象模型)。
SaajSoapMessageFactory
这SaajSoapMessageFactory使用带有附件的 SOAP API for Java (SAAJ) 创建SoapMessage实现。SAAJ 是 J2EE 1.4 的一部分,因此大多数现代应用程序服务器都应该支持它。以下是常见应用程序服务器提供的 SAAJ 版本的概述:
| 应用服务器 | SAAJ 版本 |
|---|---|
BEA WebLogic 8 |
1.1 |
BEA WebLogic 9 |
1.1/1.21 |
IBM WebSphere 6 |
1.2 |
SUN 琉璃鱼 1 |
1.3 |
1Weblogic 9 在 SAAJ 1.2 实现中有一个已知的错误:它实现了所有 1.2 接口,但抛出了一个 |
|
此外,Java SE 6 还包括 SAAJ 1.3。您可以将SaajSoapMessageFactory如下:
<bean id="messageFactory" class="org.springframework.ws.soap.saaj.SaajSoapMessageFactory" />SAAJ 基于 DOM,即文档对象模型。这意味着所有 SOAP 消息都存储在内存中。对于较大的 SOAP 消息,这可能不是性能。在这种情况下,AxiomSoapMessageFactory可能更适用。 |
AxiomSoapMessageFactory
这AxiomSoapMessageFactory使用 AXis 2 对象模型 (AXIOM) 创建SoapMessage实现。AXIOM 基于 StAX,即 XML 的流式 API。StAX 提供了一种基于拉取的机制来读取 XML 消息,这对于较大的消息可能更有效。
要提高AxiomSoapMessageFactory中,您可以设置payloadCaching属性设置为 false(默认值为 true)。这样做会导致直接从套接字流中读取 SOAP 主体的内容。启用此设置后,负载只能读取一次。这意味着您必须确保消息的任何预处理(日志记录或其他工作)都不会消耗它。
您可以使用AxiomSoapMessageFactory如下:
<bean id="messageFactory" class="org.springframework.ws.soap.axiom.AxiomSoapMessageFactory">
    <property name="payloadCaching" value="true"/>
</bean>
除了有效负载缓存之外,AXIOM 还支持完整的流式消息,如StreamingWebServiceMessage.这意味着您可以直接在响应消息上设置有效负载,而不是将其写入 DOM 树或缓冲区。
当处理程序方法返回 JAXB2 支持的对象时,使用 AXIOM 的完全流式处理。它会自动将此封送对象设置为响应消息,并在响应发出时将其写入传出套接字流。
有关完全流式处理的更多信息,请参阅StreamingWebServiceMessage和StreamingPayload.
SOAP 1.1 或 1.2
这SaajSoapMessageFactory和AxiomSoapMessageFactory有一个soapVersion属性,您可以在其中注入SoapVersion不断。默认情况下,版本为 1.1,但您可以将其设置为 1.2:
<beans xmlns="http://www.springframework.org/schema/beans"
       xmlns:util="http://www.springframework.org/schema/util"
       xmlns:xsi="http://www.w3.org/2001/XMLSchema-instance"
       xsi:schemaLocation="http://www.springframework.org/schema/beans
       http://www.springframework.org/schema/beans/spring-beans-2.0.xsd
       http://www.springframework.org/schema/util
       http://www.springframework.org/schema/util/spring-util-2.0.xsd">

    <bean id="messageFactory" class="org.springframework.ws.soap.saaj.SaajSoapMessageFactory">
        <property name="soapVersion">
            <util:constant static-field="org.springframework.ws.soap.SoapVersion.SOAP_12"/>
        </property>
    </bean>

</beans>在前面的示例中,我们定义了一个SaajSoapMessageFactory,它只接受 SOAP 1.2 消息。
|
尽管两个版本的 SOAP 在格式上非常相似,但 1.2 版本与 1.1 不向后兼容,因为它使用不同的 XML 命名空间。SOAP 1.1 和 1.2 之间的其他主要区别包括错误的不同结构以及 对于 SOAP 版本号(或一般的 WS-* 规范版本号)需要注意的一件重要事情是,规范的最新版本通常不是最流行的版本。对于 SOAP,这意味着(目前)最好使用的版本是 1.1。1.2 版本将来可能会变得更流行,但 1.1 是目前最安全的选择。 |
4.1.4.MessageContext
通常,消息成对出现:请求和响应。在客户端创建一个请求,该请求通过某种传输方式发送到服务器端,在那里生成响应。此响应将发送回客户端,并在客户端中读取。
在 Spring Web 服务中,这样的对话包含在MessageContext,它具有用于获取请求和响应消息的属性。在客户端,消息上下文由WebServiceTemplate.在服务器端,消息上下文从特定于传输的 input 流中读取。例如,在 HTTP 中,它是从HttpServletRequest,响应将写回HttpServletResponse.
4.2.TransportContext
SOAP 协议的一个关键属性是它试图与传输无关。这就是为什么,例如, Spring-WS 不支持通过 HTTP 请求 URL 而是通过消息内容将消息映射到端点的原因。
但是,有时需要在客户端或服务器端访问底层传输。为此,Spring Web 服务具有TransportContext.传输上下文允许访问底层WebServiceConnection,通常为HttpServletConnection在服务器端或HttpUrlConnection或CommonsHttpConnection在客户端。例如,您可以在服务器端终端节点或拦截器中获取当前请求的 IP 地址:
TransportContext context = TransportContextHolder.getTransportContext();
HttpServletConnection connection = (HttpServletConnection )context.getConnection();
HttpServletRequest request = connection.getHttpServletRequest();
String ipAddress = request.getRemoteAddr();
4.3. 使用 XPath 处理 XML
处理 XML 的最佳方法之一是使用 XPath。引用 [effective-xml],第 35 项:
XPath 是第四代声明性语言,它允许您指定要处理的节点,而无需指定处理器应该如何导航到这些节点。XPath 的数据模型设计得非常好,可以准确地支持几乎所有开发人员都希望从 XML 中获得的内容。例如,它合并所有相邻文本(包括 CDATA 部分中的文本),允许计算跳过注释和处理指令的值,并包含来自子元素和后代元素的文本,并要求解析所有外部实体引用。在实践中,XPath 表达式往往对 Importing 文档中的意外但可能无关紧要的更改更加健壮。
Spring Web 服务有两种方法可以在应用程序中使用 XPath:更快的XPathExpression或更灵活的XPathTemplate.
4.3.1.XPathExpression
这XPathExpression是对已编译的 XPath 表达式(如 Java 5javax.xml.xpath.XPathExpressioninterface 或 JaxenXPath类。要在应用程序上下文中构造表达式,可以使用XPathExpressionFactoryBean.下面的示例使用此工厂 Bean:
<beans xmlns="http://www.springframework.org/schema/beans"
       xmlns:xsi="http://www.w3.org/2001/XMLSchema-instance"
       xsi:schemaLocation="http://www.springframework.org/schema/beans
          http://www.springframework.org/schema/beans/spring-beans-2.0.xsd">

    <bean id="nameExpression" class="org.springframework.xml.xpath.XPathExpressionFactoryBean">
        <property name="expression" value="/Contacts/Contact/Name"/>
    </bean>

    <bean id="myEndpoint" class="sample.MyXPathClass">
        <constructor-arg ref="nameExpression"/>
    </bean>

</beans>前面的表达式不使用命名空间,但我们可以使用namespaces工厂 Bean 的属性。该表达式可以在代码中使用,如下所示:
package sample;

public class MyXPathClass {

    private final XPathExpression nameExpression;

    public MyXPathClass(XPathExpression nameExpression) {
        this.nameExpression = nameExpression;
    }

    public void doXPath(Document document) {
        String name = nameExpression.evaluateAsString(document.getDocumentElement());
        System.out.println("Name: " + name);
    }

}
要获得更灵活的方法,您可以使用NodeMapper,这与RowMapper在 Spring 的 JDBC 支持中。以下示例演示如何使用它:
package sample;

public class MyXPathClass  {

   private final XPathExpression contactExpression;

   public MyXPathClass(XPathExpression contactExpression) {
      this.contactExpression = contactExpression;
   }

   public void doXPath(Document document) {
      List contacts = contactExpression.evaluate(document,
        new NodeMapper() {
           public Object mapNode(Node node, int nodeNum) throws DOMException {
              Element contactElement = (Element) node;
              Element nameElement = (Element) contactElement.getElementsByTagName("Name").item(0);
              Element phoneElement = (Element) contactElement.getElementsByTagName("Phone").item(0);
              return new Contact(nameElement.getTextContent(), phoneElement.getTextContent());
           }
        });
      PlainText Section qName; // do something with the list of Contact objects
   }
}
类似于 Spring JDBC 的RowMapper中,每个结果节点都使用匿名内部类进行映射。在本例中,我们创建一个Contactobject,我们稍后会使用它。
4.3.2.XPathTemplate
这XPathExpression允许您仅计算单个预编译的表达式。一个更灵活但更慢的替代方案是XpathTemplate.这个类遵循整个 Spring 中使用的通用模板模式(JdbcTemplate,JmsTemplate等)。下面的清单显示了一个示例:
package sample;

public class MyXPathClass {

    private XPathOperations template = new Jaxp13XPathTemplate();

    public void doXPath(Source source) {
        String name = template.evaluateAsString("/Contacts/Contact/Name", request);
        // do something with name
    }

}
4.4. 消息记录和跟踪
在开发或调试 Web 服务时,在 (SOAP) 消息到达时或发送之前查看其内容可能非常有用。Spring Web 服务通过标准的 Commons Logging 接口提供此功能。
| 确保使用 Commons Logging 版本 1.1 或更高版本。早期版本存在类加载问题,并且不与 Log4J TRACE 级别集成。 |
要记录所有服务器端消息,请将org.springframework.ws.server.MessageTracinglogger 级别设置为DEBUG或TRACE.在DEBUG级别,则仅记录 payload 根元素。在TRACE级别,则会记录整个消息内容。如果您只想记录已发送的消息,请使用org.springframework.ws.server.MessageTracing.sent记录。同样,您可以使用org.springframework.ws.server.MessageTracing.received以仅记录收到的消息。
在客户端,存在类似的 Logger:org.springframework.ws.client.MessageTracing.sent和org.springframework.ws.client.MessageTracing.received.
以下示例log4j.properties配置文件在客户端记录已发送消息的完整内容,并且仅记录客户端接收消息的 payload 根元素。在服务器端,将记录已发送和已接收消息的有效负载根:
log4j.rootCategory=INFO, stdout
log4j.logger.org.springframework.ws.client.MessageTracing.sent=TRACE
log4j.logger.org.springframework.ws.client.MessageTracing.received=DEBUG

log4j.logger.org.springframework.ws.server.MessageTracing=DEBUG

log4j.appender.stdout=org.apache.log4j.ConsoleAppender
log4j.appender.stdout.layout=org.apache.log4j.PatternLayout
log4j.appender.stdout.layout.ConversionPattern=%p [%c{3}] %m%n
使用此配置时,典型输出为:
TRACE [client.MessageTracing.sent] Sent request [<SOAP-ENV:Envelope xmlns:SOAP-ENV="...
DEBUG [server.MessageTracing.received] Received request [SaajSoapMessage {http://example.com}request] ...
DEBUG [server.MessageTracing.sent] Sent response [SaajSoapMessage {http://example.com}response] ...
DEBUG [client.MessageTracing.received] Received response [SaajSoapMessage {http://example.com}response] ...
5. 使用 Spring-WS 创建 Web 服务
Spring-WS 的服务器端支持是围绕MessageDispatcher通过可配置的终端节点映射、响应生成和终端节点拦截将传入消息分派到终端节点。端点通常使用@Endpointannotation 并具有一个或多个处理方法。这些方法通过检查消息的各个部分(通常是有效负载)来处理传入的 XML 请求消息,并创建某种响应。您可以使用另一个注释来注释该方法,通常@PayloadRoot,以指示它可以处理的消息类型。
Spring-WS 的 XML 处理非常灵活。端点可以从 Spring-WS 支持的大量 XML 处理库中进行选择,包括:
-
DOM 系列:W3C DOM、JDOM、dom4j 和 XOM
-
SAX 或 StAX:实现更快的性能
-
XPath:从消息中提取信息
-
编组技术(JAXB、Castor、XMLBeans、JiBX 或 XStream):将 XML 转换为对象,反之亦然
5.1. 使用MessageDispatcher
Spring-WS 的服务器端是围绕一个中心类设计的,该类将传入的 XML 消息分派到端点。Spring-WS 的MessageDispatcher非常灵活,允许你使用任何类型的类作为端点,只要它可以在 Spring IoC 容器中进行配置即可。在某种程度上,消息调度程序类似于 Spring 的DispatcherServlet这
Spring Web MVC 中使用的 “Front Controller”。
以下序列图显示了MessageDispatcher:
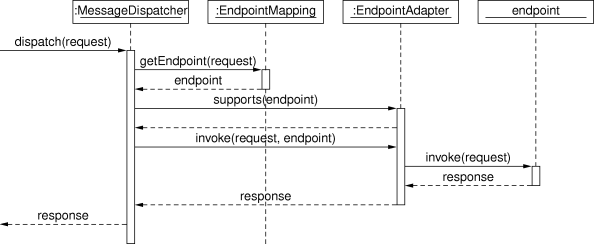
当MessageDispatcher设置为使用,并且收到针对该特定调度程序的请求,MessageDispatcher开始处理请求。以下过程描述了如何MessageDispatcher处理请求:
-
配置的
EndpointMapping(s)将搜索适当的端点。如果找到终端节点,则调用与终端节点关联的调用链(预处理器、后处理器和终端节点)以创建响应。 -
为终端节点找到合适的适配器。这
MessageDispatcher委托此适配器来调用端点。 -
如果返回响应,则会在发送过程中发送响应。如果未返回响应(这可能是由于前处理器或后处理器拦截了请求,例如,出于安全原因),则不会发送任何响应。
在处理请求期间引发的异常将由应用程序上下文中声明的任何端点异常解析程序选取。使用这些异常解析程序可以定义自定义行为(例如返回 SOAP 错误),以防引发此类异常。
这MessageDispatcher具有多个用于设置端点适配器、映射、异常解析程序的属性。但是,不需要设置这些属性,因为 Dispatcher 会自动检测在应用程序上下文中注册的所有类型。仅当需要覆盖检测时,才应设置这些属性。
消息调度程序在消息上下文上运行,而不是在特定于传输的输入流和输出流上运行。因此,特定于传输的请求需要读取到MessageContext.对于 HTTP,这是通过WebServiceMessageReceiverHandlerAdapter(这是一个 Spring WebHandlerInterceptor),这样MessageDispatcher可以按照标准DispatcherServlet.但是,有一种更方便的方法可以做到这一点,如MessageDispatcherServlet.
5.2. 传输
Spring Web 服务支持多种传输协议。最常见的是 HTTP 传输,为此提供了自定义 Servlet,但您也可以通过 JMS 甚至电子邮件发送消息。
5.2.1.MessageDispatcherServlet
这MessageDispatcherServlet是标准Servlet方便地从标准 Spring Web 扩展DispatcherServlet并包装一个MessageDispatcher.因此,它将这些属性合二为一。作为MessageDispatcher,它遵循与上一节中描述的相同的请求处理流程。作为 Servlet,MessageDispatcherServlet在web.xml的 Web 应用程序。请求MessageDispatcherServlet要处理必须由同一web.xml文件。这是标准的 Java EE servlet 配置。以下示例显示了这样一个MessageDispatcherServlet声明和映射:
<web-app>

    <servlet>
        <servlet-name>spring-ws</servlet-name>
        <servlet-class>org.springframework.ws.transport.http.MessageDispatcherServlet</servlet-class>
        <load-on-startup>1</load-on-startup>
    </servlet>

    <servlet-mapping>
        <servlet-name>spring-ws</servlet-name>
        <url-pattern>/*</url-pattern>
    </servlet-mapping>

</web-app>在前面的示例中,所有请求都由spring-ws MessageDispatcherServlet.这只是设置 Spring Web Services 的第一步,因为还需要配置 Spring-WS 框架使用的各种组件 bean。此配置由标准 Spring XML 组成<bean/>定义。因为MessageDispatcherServlet是标准 SpringDispatcherServlet它
-servlet.xml在WEB-INF目录中,并在 Spring 容器中创建在那里定义的 bean。在前面的示例中,它查找 '/WEB-INF/spring-ws-servlet.xml'。此文件包含所有 Spring Web Services bean,例如端点、编组器等。
作为web.xml,如果您在 Servlet 3+ 环境中运行,则可以以编程方式配置 Spring-WS。为此,Spring-WS 提供了许多抽象基类,这些基类扩展了WebApplicationInitializer接口。如果您还使用@Configuration类,您应该扩展AbstractAnnotationConfigMessageDispatcherServletInitializer:
public class MyServletInitializer
    extends AbstractAnnotationConfigMessageDispatcherServletInitializer {

    @Override
    protected Class<?>[] getRootConfigClasses() {
        return new Class[]{MyRootConfig.class};
    }

    @Override
    protected Class<?>[] getServletConfigClasses() {
        return new Class[]{MyEndpointConfig.class};
    }

}
在前面的示例中,我们告诉 Spring 端点 bean 定义可以在MyEndpointConfig类(即@Configuration类)。其他 bean 定义(通常是 services、repositories 等)可以在MyRootConfig类。默认情况下,AbstractAnnotationConfigMessageDispatcherServletInitializer将 Servlet 映射到两种模式:/services和*.wsdl,但您可以通过覆盖getServletMappings()方法。有关MessageDispatcherServlet,请参阅 JavadocAbstractMessageDispatcherServletInitializer和AbstractAnnotationConfigMessageDispatcherServletInitializer.
自动 WSDL 公开
这MessageDispatcherServlet自动检测任何WsdlDefinitionbean 的 bean 定义。所有WsdlDefinition检测到的 bean 也会通过WsdlDefinitionHandlerAdapter.这是通过定义一些 bean 向客户端公开 WSDL 的一种便捷方法。
通过一个例子,请考虑以下内容<static-wsdl>定义,在 Spring-WS 配置文件(/WEB-INF/[servlet-name]-servlet.xml).请注意id属性,因为它在公开 WSDL 时使用。
<sws:static-wsdl id="orders" location="orders.wsdl"/>或者,它可以是一个@Bean方法中的@Configuration类:
@Bean
public SimpleWsdl11Definition orders() {
	return new SimpleWsdl11Definition(new ClassPathResource("orders.wsdl"));
}
您可以访问在orders.wsdl文件在 Classpath 上通过GET请求到以下形式的 URL(根据需要替换 Host、Port 和 Servlet 上下文路径):
http://localhost:8080/spring-ws/orders.wsdl都WsdlDefinitionbean 定义由MessageDispatcherServlet在其 Bean 名称下,后缀为 '.wsdl'。因此,如果 bean 名称为echo,则 host name 为server,而 Servlet 上下文(war 名称)为spring-ws中,可以在http://server/spring-ws/echo.wsdl. |
另一个不错的功能MessageDispatcherServlet(或者更准确地说,WsdlDefinitionHandlerAdapter) 的值,则它可以将location它公开的所有 WSDL 中,以反映传入请求的 URL。
请注意,此location默认情况下,转换功能处于关闭状态。要打开此功能,您需要为MessageDispatcherServlet:
<web-app>

  <servlet>
    <servlet-name>spring-ws</servlet-name>
    <servlet-class>org.springframework.ws.transport.http.MessageDispatcherServlet</servlet-class>
    <init-param>
      <param-name>transformWsdlLocations</param-name>
      <param-value>true</param-value>
    </init-param>
  </servlet>

  <servlet-mapping>
    <servlet-name>spring-ws</servlet-name>
    <url-pattern>/*</url-pattern>
  </servlet-mapping>

</web-app>如果您使用AbstractAnnotationConfigMessageDispatcherServletInitializer启用转换就像覆盖isTransformWsdlLocations()method 返回true.
请查阅WsdlDefinitionHandlerAdapter类以了解有关整个转换过程的更多信息。
作为手动编写 WSDL 并使用<static-wsdl>,Spring Web 服务还可以从 XSD 模式生成 WSDL。这是发布 WSDL 中所示的方法。下一个应用程序上下文代码段展示了如何创建这样的动态 WSDL 文件:
<sws:dynamic-wsdl id="orders"
    portTypeName="Orders"
    locationUri="http://localhost:8080/ordersService/">
  <sws:xsd location="Orders.xsd"/>
</sws:dynamic-wsdl>
或者,您可以使用 Java@Bean方法:
@Bean
public DefaultWsdl11Definition orders() {
    DefaultWsdl11Definition definition = new DefaultWsdl11Definition();
    definition.setPortTypeName("Orders");
    definition.setLocationUri("http://localhost:8080/ordersService/");
    definition.setSchema(new SimpleXsdSchema(new ClassPathResource("echo.xsd")));

    return definition;
}
这<dynamic-wsdl>元素依赖于DefaultWsdl11Definition类。此定义类在org.springframework.ws.wsdl.wsdl11.providerpackage 和ProviderBasedWsdl4jDefinition类来生成 WSDL。请参阅这些类的类级 Javadoc,了解如何在必要时扩展此机制。
这DefaultWsdl11Definition(因此,<dynamic-wsdl>标记中)使用约定从 XSD 架构构建 WSDL。它迭代所有element元素,并创建一个messagefor all elements 的接下来,它创建一个 WSDLoperation对于以 defined request 或 response 后缀结尾的所有消息。默认请求后缀为Request.默认响应后缀为Response,但可以通过设置requestSuffix和responseSuffixattributes 开启<dynamic-wsdl />分别。它还构建了一个portType,binding和service基于作。
例如,如果Orders.xsdschema 定义GetOrdersRequest和GetOrdersResponse元素<dynamic-wsdl>创建一个GetOrdersRequest和GetOrdersResponsemessage 和GetOrders作,该作被放入Orders端口类型。
要使用多个模式,无论是通过包含还是导入,您都可以将 Commons XMLSchema 放在类路径上。如果 Commons XMLSchema 位于类路径上,则<dynamic-wsdl>元素遵循所有 XSD 导入,并将它们作为单个 XSD 包含在 WSDL 中并内联。这大大简化了架构的部署,同时仍允许单独编辑它们。
| 尽管在运行时从 XSD 创建 WSDL 很方便,但这种方法有几个缺点。首先,尽管我们试图在版本之间保持 WSDL 生成过程的一致性,但它仍然有可能发生变化(略有变化)。其次,生成速度有点慢,但是,一旦生成,WSDL 就会被缓存以供以后参考。 |
因此,您应该使用<dynamic-wsdl>仅在项目的开发阶段。我们建议使用浏览器下载生成的 WSDL,将其存储在项目中,并使用<static-wsdl>.这是真正确保 WSDL 不会随时间变化的唯一方法。
5.2.2. 在DispatcherServlet
作为MessageDispatcherServlet,您可以将MessageDispatcher在标准的 Spring-Web MVC 中DispatcherServlet.默认情况下,DispatcherServletcan delegate only to (只能委托给Controllers,但我们可以指示它委托给MessageDispatcher通过添加WebServiceMessageReceiverHandlerAdapter添加到 servlet 的 Web 应用程序上下文中:
<beans>

    <bean class="org.springframework.ws.transport.http.WebServiceMessageReceiverHandlerAdapter"/>

    <bean class="org.springframework.web.servlet.handler.SimpleUrlHandlerMapping">
        <property name="defaultHandler" ref="messageDispatcher"/>
    </bean

    <bean id="messageDispatcher" class="org.springframework.ws.soap.server.SoapMessageDispatcher"/>

    ...

    <bean class="org.springframework.web.servlet.mvc.method.annotation.RequestMappingHandlerAdapter"/>

</beans>请注意,通过显式添加WebServiceMessageReceiverHandlerAdapter,则调度程序 Servlet 不会加载默认适配器,并且无法处理标准 Spring-MVC@Controllers.因此,我们添加了RequestMappingHandlerAdapter在结尾。
以类似的方式,您可以将WsdlDefinitionHandlerAdapter要确保DispatcherServlet可以处理WsdlDefinition接口:
<beans>

    <bean class="org.springframework.ws.transport.http.WebServiceMessageReceiverHandlerAdapter"/>

    <bean class="org.springframework.ws.transport.http.WsdlDefinitionHandlerAdapter"/>

    <bean class="org.springframework.web.servlet.handler.SimpleUrlHandlerMapping">
        <property name="mappings">
           <props>
             <prop key="*.wsdl">myServiceDefinition</prop>
           </props>
        </property>
        <property name="defaultHandler" ref="messageDispatcher"/>
    </bean>

    <bean id="messageDispatcher" class="org.springframework.ws.soap.server.SoapMessageDispatcher"/>

    <bean id="myServiceDefinition" class="org.springframework.ws.wsdl.wsdl11.SimpleWsdl11Definition">
       <prop name="wsdl" value="/WEB-INF/myServiceDefintion.wsdl"/>
    </bean>

    ...

</beans>
5.2.3. JMS 传输
Spring Web 服务通过 Spring 框架中提供的 JMS 功能支持服务器端 JMS 处理。Spring Web 服务提供了WebServiceMessageListener以插入MessageListenerContainer.此消息侦听器需要一个WebServiceMessageFactory和MessageDispatcher进行作。下面的配置示例显示了这一点:
<beans>

    <bean id="connectionFactory" class="org.apache.activemq.ActiveMQConnectionFactory">
        <property name="brokerURL" value="vm://localhost?broker.persistent=false"/>
    </bean>

    <bean id="messageFactory" class="org.springframework.ws.soap.saaj.SaajSoapMessageFactory"/>

    <bean class="org.springframework.jms.listener.DefaultMessageListenerContainer">
        <property name="connectionFactory" ref="connectionFactory"/>
        <property name="destinationName" value="RequestQueue"/>
        <property name="messageListener">
            <bean class="org.springframework.ws.transport.jms.WebServiceMessageListener">
                <property name="messageFactory" ref="messageFactory"/>
                <property name="messageReceiver" ref="messageDispatcher"/>
            </bean>
        </property>
    </bean>

    <bean id="messageDispatcher" class="org.springframework.ws.soap.server.SoapMessageDispatcher">
        <property name="endpointMappings">
            <bean
              class="org.springframework.ws.server.endpoint.mapping.PayloadRootAnnotationMethodEndpointMapping">
                <property name="defaultEndpoint">
                    <bean class="com.example.MyEndpoint"/>
                </property>
            </bean>
        </property>
    </bean>
</beans>
5.2.4. 电子邮件传输
除了 HTTP 和 JMS 之外, Spring Web 服务还提供服务器端电子邮件处理。此功能通过MailMessageReceiver类。此类监视 POP3 或 IMAP 文件夹,将电子邮件转换为WebServiceMessage,并使用 SMTP 发送任何响应。您可以通过storeUri,它指示要监控请求的邮件文件夹(通常是 POP3 或 IMAP 文件夹),以及transportUri,它指示用于发送响应的服务器(通常是 SMTP 服务器)。
您可以配置MailMessageReceiver使用可插拔策略监控传入消息:MonitoringStrategy.默认情况下,使用轮询策略,其中每 5 分钟轮询一次传入文件夹以获取新邮件。您可以通过设置pollingInterval策略上的属性。默认情况下,所有MonitoringStrategyimplementations 删除已处理的消息。您可以通过设置deleteMessages财产。
作为效率相当低的轮询方法的替代方法,有一种使用 IMAP IDLE 的监视策略。IDLE 命令是 IMAP 电子邮件协议的可选扩展,它允许邮件服务器将新的邮件更新发送到MailMessageReceiver异步。如果使用支持 IDLE 命令的 IMAP 服务器,则可以将ImapIdleMonitoringStrategy到monitoringStrategy财产。除了支持服务器之外,您还需要使用 JavaMail 版本 1.4.1 或更高版本。
以下配置显示了如何使用服务器端电子邮件支持,覆盖默认轮询间隔以每 30 秒(30.000 毫秒)检查一次:
<beans>
<bean id="messageFactory" class="org.springframework.ws.soap.saaj.SaajSoapMessageFactory"/>
<bean id="messagingReceiver" class="org.springframework.ws.transport.mail.MailMessageReceiver">
<property name="messageFactory" ref="messageFactory"/>
<property name="from" value="Spring-WS SOAP Server <[email protected]>"/>
<property name="storeUri" value="imap://server:[email protected]/INBOX"/>
<property name="transportUri" value="smtp://smtp.example.com"/>
<property name="messageReceiver" ref="messageDispatcher"/>
<property name="monitoringStrategy">
<bean class="org.springframework.ws.transport.mail.monitor.PollingMonitoringStrategy">
<property name="pollingInterval" value="30000"/>
</bean>
</property>
</bean>
<bean id="messageDispatcher" class="org.springframework.ws.soap.server.SoapMessageDispatcher">
<property name="endpointMappings">
<bean
class="org.springframework.ws.server.endpoint.mapping.PayloadRootAnnotationMethodEndpointMapping">
<property name="defaultEndpoint">
<bean class="com.example.MyEndpoint"/>
</property>
</bean>
</property>
</bean>
</beans>5.2.5. 嵌入式 HTTP 服务器传输
Spring Web 服务提供了一种基于 Sun 的 JRE 1.6 HTTP 服务器的传输。嵌入式 HTTP Server 是一个易于配置的独立服务器。它为传统的 servlet 容器提供了一种更轻量级的替代方案。
使用嵌入式 HTTP 服务器时,不需要外部部署描述符 (web.xml).您只需定义服务器的实例并将其配置为处理传入请求。核心 Spring 框架中的 remoting 模块包含一个用于 HTTP 服务器的便捷工厂 Bean:SimpleHttpServerFactoryBean.最重要的属性是contexts,它将上下文路径映射到相应的HttpHandler实例。
Spring Web 服务提供了HttpHandler接口:WsdlDefinitionHttpHandler和WebServiceMessageReceiverHttpHandler.前者将传入的 GET 请求映射到WsdlDefinition.后者负责处理 Web 服务消息的 POST 请求,因此需要一个WebServiceMessageFactory(通常为SaajSoapMessageFactory) 和WebServiceMessageReceiver(通常SoapMessageDispatcher) 完成其任务。
为了与 servlet 世界进行比较,contextsproperty 在web.xml和WebServiceMessageReceiverHttpHandler等价于MessageDispatcherServlet.
以下代码段显示了 HTTP 服务器传输的配置示例:
<beans>

    <bean id="messageFactory" class="org.springframework.ws.soap.saaj.SaajSoapMessageFactory"/>

    <bean id="messageReceiver" class="org.springframework.ws.soap.server.SoapMessageDispatcher">
        <property name="endpointMappings" ref="endpointMapping"/>
    </bean>

    <bean id="endpointMapping" class="org.springframework.ws.server.endpoint.mapping.PayloadRootAnnotationMethodEndpointMapping">
        <property name="defaultEndpoint" ref="stockEndpoint"/>
    </bean>

    <bean id="httpServer" class="org.springframework.remoting.support.SimpleHttpServerFactoryBean">
        <property name="contexts">
            <map>
                <entry key="/StockService.wsdl" value-ref="wsdlHandler"/>
                <entry key="/StockService" value-ref="soapHandler"/>
            </map>
        </property>
    </bean>

    <bean id="soapHandler" class="org.springframework.ws.transport.http.WebServiceMessageReceiverHttpHandler">
        <property name="messageFactory" ref="messageFactory"/>
        <property name="messageReceiver" ref="messageReceiver"/>
    </bean>

    <bean id="wsdlHandler" class="org.springframework.ws.transport.http.WsdlDefinitionHttpHandler">
        <property name="definition" ref="wsdlDefinition"/>
    </bean>
</beans>有关SimpleHttpServerFactoryBean,请参阅 Javadoc。
5.2.6. XMPP 传输
Spring Web Services 2.0 引入了对 XMPP(也称为 Jabber)的支持。该支持基于 Smack 库。
Spring Web 服务对 XMPP 的支持与其他传输非常相似:有一个XmppMessageSender对于WebServiceTemplate以及XmppMessageReceiver与MessageDispatcher.
以下示例显示如何设置服务器端 XMPP 组件:
<beans>

    <bean id="messageFactory" class="org.springframework.ws.soap.saaj.SaajSoapMessageFactory"/>

    <bean id="connection" class="org.springframework.ws.transport.xmpp.support.XmppConnectionFactoryBean">
        <property name="host" value="jabber.org"/>
        <property name="username" value="username"/>
        <property name="password" value="password"/>
    </bean>

    <bean id="messagingReceiver" class="org.springframework.ws.transport.xmpp.XmppMessageReceiver">
        <property name="messageFactory" ref="messageFactory"/>
        <property name="connection" ref="connection"/>
        <property name="messageReceiver" ref="messageDispatcher"/>
    </bean>

    <bean id="messageDispatcher" class="org.springframework.ws.soap.server.SoapMessageDispatcher">
        <property name="endpointMappings">
            <bean
              class="org.springframework.ws.server.endpoint.mapping.PayloadRootAnnotationMethodEndpointMapping">
                <property name="defaultEndpoint">
                    <bean class="com.example.MyEndpoint"/>
                </property>
            </bean>
        </property>
    </bean>

</beans>5.3. 终端节点
端点是 Spring-WS 服务器端支持的核心概念。终端节点提供对应用程序行为的访问,该行为通常由业务服务接口定义。终端节点解释 XML 请求消息,并使用该输入(通常)调用业务服务上的方法。该服务调用的结果表示为响应消息。Spring-WS 具有各种各样的端点,并使用各种方式来处理 XML 消息和创建响应。
您可以通过使用@Endpoint注解。在该类中,通过使用各种参数类型(比如 DOM 元素、JAXB2 对象等),定义一个或多个处理传入 XML 请求的方法。您可以使用另一个注释(通常@PayloadRoot).
请考虑以下示例终端节点:
package samples;
@Endpoint (1)
public class AnnotationOrderEndpoint {
private final OrderService orderService;
@Autowired (2)
public AnnotationOrderEndpoint(OrderService orderService) {
this.orderService = orderService;
}
@PayloadRoot(localPart = "order", namespace = "http://samples") (5)
public void order(@RequestPayload Element orderElement) { (3)
Order order = createOrder(orderElement);
orderService.createOrder(order);
}
@PayloadRoot(localPart = "orderRequest", namespace = "http://samples") (5)
@ResponsePayload
public Order getOrder(@RequestPayload OrderRequest orderRequest, SoapHeader header) { (4)
checkSoapHeaderForSomething(header);
return orderService.getOrder(orderRequest.getId());
}
...
}
| 1 | 该类使用@Endpoint,将其标记为 Spring-WS 端点。 |
| 2 | 构造函数标有@Autowired这样,OrderService业务服务注入到此终端节点中。 |
| 3 | 这ordermethod 采用Element(注释为@RequestPayload) 作为参数。这意味着消息的有效负载作为 DOM 元素在此方法上传递。该方法具有voidreturn 类型,表示未发送响应消息。
有关终端节点方法的更多信息,请参阅@Endpoint处理方法. |
| 4 | 这getOrdermethod 采用OrderRequest(也注释有@RequestPayload) 作为参数。此参数是 JAXB2 支持的对象(它带有@XmlRootElement).这意味着消息的有效负载将作为未编组的对象传递给此方法。这SoapHeadertype 也作为参数给出。在调用时,此参数包含请求消息的 SOAP 标头。该方法还用@ResponsePayload,表示返回值(Order) 用作响应消息的有效负载。
有关终端节点方法的更多信息,请参阅@Endpoint处理方法. |
| 5 | 此终端节点的两种处理方法都标有@PayloadRoot,指示该方法可以处理哪种类型的请求消息:该getOrder方法的请求中,使用orderRequestlocal name 和http://samplesnamespace URI 的 URI 中。对于具有order俗名。
有关@PayloadRoot,请参阅 终端节点映射。 |
要启用对@Endpoint和相关的 Spring-WS 注释,你需要将以下内容添加到你的 Spring 应用程序上下文中:
<beans xmlns="http://www.springframework.org/schema/beans"
  xmlns:xsi="http://www.w3.org/2001/XMLSchema-instance"
  xmlns:sws="http://www.springframework.org/schema/web-services"
  xsi:schemaLocation="http://www.springframework.org/schema/beans
      http://www.springframework.org/schema/beans/spring-beans.xsd
    http://www.springframework.org/schema/web-services
      http://www.springframework.org/schema/web-services/web-services.xsd">

  *<sws:annotation-driven />

</beans>或者,如果您使用@Configuration类而不是 Spring XML,而是可以用@EnableWs:
@EnableWs
@Configuration
public class EchoConfig {

    // @Bean definitions go here

}
要自定义@EnableWsconfiguration 中,您可以实现WsConfigurer或者,更好的是,扩展WsConfigurerAdapter:
@Configuration
@EnableWs
@ComponentScan(basePackageClasses = { MyConfiguration.class })
public class MyConfiguration extends WsConfigurerAdapter {

  @Override
  public void addInterceptors(List<EndpointInterceptor> interceptors) {
    interceptors.add(new MyInterceptor());
  }

  @Override
  public void addArgumentResolvers(List<MethodArgumentResolver> argumentResolvers) {
    argumentResolvers.add(new MyArgumentResolver());
  }

  // More overridden methods ...
}
在接下来的几节中,将对@Endpoint给出了编程模型。
| 与任何其他 Spring Bean 一样,端点的 Scopes 默认为 singleton。也就是说,每个容器创建一个 bean 定义的实例。作为单例意味着多个线程可以同时使用它,因此端点必须是线程安全的。如果要使用不同的范围,例如 prototype,请参阅 Spring 参考文档。 |
Note that all abstract base classes provided in Spring-WS are thread safe, unless otherwise indicated in the class-level Javadoc.
5.3.1.@Endpoint处理方法
要使终端节点实际处理传入的 XML 消息,它需要具有一个或多个处理方法。处理方法可以采用广泛的参数和返回类型。但是,它们通常有一个包含消息有效负载的参数,并且它们返回响应消息的有效负载(如果有)。本节介绍支持哪些参数和返回类型。
为了指示方法可以处理哪种类型的消息,该方法通常使用@PayloadRoot或@SoapAction注解。您可以在 终端节点映射 中了解有关这些注释的更多信息。
以下示例显示了一种处理方法:
@PayloadRoot(localPart = "order", namespace = "http://samples")
public void order(@RequestPayload Element orderElement) {
  Order order = createOrder(orderElement);
  orderService.createOrder(order);
}
这ordermethod 采用Element(注释为@RequestPayload) 作为参数。这意味着消息的有效负载作为 DOM 元素在此方法上传递。该方法具有voidreturn 类型,表示未发送响应消息。
处理方法参数
处理方法通常具有一个或多个参数,这些参数引用传入 XML 消息的各个部分。最常见的是,处理方法有一个映射到消息有效负载的参数,但它也可以映射到请求消息的其他部分,例如 SOAP 标头。本节介绍您可以在处理方法签名中使用的参数。
要将参数映射到请求消息的有效负载,您需要使用@RequestPayload注解。这个 Comments 告诉 Spring-WS 该参数需要绑定到请求有效负载。
下表描述了支持的参数类型。它显示了支持的类型,是否应使用参数进行注释@RequestPayload和任何其他注释。
| 名称 | 支持的参数类型 | @RequestPayload必填? |
其他说明 |
|---|---|---|---|
TrAX 系列 |
|
是的 |
默认启用。 |
W3C DOM |
|
是的 |
默认启用 |
DOM4J |
|
是的 |
当 dom4j 位于 Classpath 上时启用。 |
JDOM 系列 |
|
是的 |
当 JDOM 位于 Classpath 上时启用。 |
XOM 系列 |
|
是的 |
当 XOM 位于类路径上时启用。 |
斯塔克斯 |
|
是的 |
当 StAX 位于 Classpath 上时启用。 |
XPath |
Any boolean、double、 |
不 |
默认启用,请参阅名为 |
消息上下文 |
|
不 |
默认启用。 |
肥皂 |
|
不 |
默认启用。 |
JAXB2 系列 |
任何带有 |
是的 |
当 JAXB2 位于 Classpath 上时启用。 |
OXM 公司 |
Spring OXM 支持的任何类型 |
是的 |
启用时 |
接下来的几个示例显示了可能的方法签名。使用请求消息的有效负载作为 DOM 调用以下方法org.w3c.dom.Element:
public void handle(@RequestPayload Element element)
调用以下方法,并将请求消息的有效负载作为javax.xml.transform.dom.DOMSource.这header参数绑定到请求消息的 SOAP 标头。
public void handle(@RequestPayload DOMSource domSource, SoapHeader header)
调用以下方法,并将请求消息的有效负载解组到MyJaxb2Object(注释为@XmlRootElement).消息的有效负载也以 DOM 的形式提供Element.整个消息上下文作为第三个参数传递。
public void handle(@RequestPayload MyJaxb2Object requestObject, @RequestPayload Element element, Message messageContext)
正如你所看到的,在定义如何处理方法签名时,有很多可能性。您甚至可以扩展此机制以支持您自己的参数类型。请参阅 JavadocDefaultMethodEndpointAdapter和MethodArgumentResolver以查看作方法。
@XPathParam
一个参数类型需要一些额外的解释:@XPathParam.此处的思路是,使用 XPath 表达式对一个或多个方法参数进行注释,并且每个此类带注释的参数都绑定到表达式的计算。以下示例显示了如何执行此作:
package samples;
@Endpoint
public class AnnotationOrderEndpoint {
private final OrderService orderService;
public AnnotationOrderEndpoint(OrderService orderService) {
this.orderService = orderService;
}
@PayloadRoot(localPart = "orderRequest", namespace = "http://samples")
@Namespace(prefix = "s", uri="http://samples")
public Order getOrder(@XPathParam("/s:orderRequest/@id") int orderId) {
Order order = orderService.getOrder(orderId);
// create Source from order and return it
}
}
由于我们使用sprefix 的 API 中,我们必须将其绑定到 XPath 表达式中的http://samplesNamespace。这是通过@Namespace注解。或者,我们可以将此注释放在类型级别上,以便对所有处理程序方法甚至包级别使用相同的命名空间映射(在package-info.java) 将其用于多个终端节点。
通过使用@XPathParam中,您可以绑定到 XPath 支持的所有数据类型:
-
boolean或Boolean -
double或Double -
String -
Node -
NodeList
除了此列表之外,您还可以使用可从String由 Spring 转换服务。
处理方法返回类型
要发送响应消息,处理需要指定返回类型。如果不需要响应消息,该方法可以将voidreturn 类型。最常见的是,return 类型用于创建响应消息的有效负载。但是,您也可以映射到响应消息的其他部分。本节介绍您可以在处理方法签名中使用的返回类型。
要将返回值映射到响应消息的有效负载,您需要使用@ResponsePayload注解。这个 Comments 告诉 Spring-WS 返回值需要绑定到响应有效负载。
下表描述了支持的返回类型。它显示了支持的类型,是否应使用参数进行注释@ResponsePayload和任何其他注释。
| 名称 | 支持的返回类型 | @ResponsePayload必填? |
其他说明 |
|---|---|---|---|
无响应 |
|
不 |
默认启用。 |
TrAX 系列 |
|
是的 |
默认启用。 |
W3C DOM |
|
是的 |
默认启用 |
DOM4J |
|
是的 |
当 dom4j 位于 Classpath 上时启用。 |
JDOM 系列 |
|
是的 |
当 JDOM 位于 Classpath 上时启用。 |
XOM 系列 |
|
是的 |
当 XOM 位于类路径上时启用。 |
JAXB2 系列 |
任何带有 |
是的 |
当 JAXB2 位于 Classpath 上时启用。 |
OXM 公司 |
Spring OXM 支持的任何类型 |
是的 |
启用时 |
在定义处理方法签名时,有很多可能性。甚至可以扩展此机制以支持您自己的参数类型。请参阅 的类级 JavadocDefaultMethodEndpointAdapter和MethodReturnValueHandler以查看作方法。
5.4. 端点映射
终端节点映射负责将传入消息映射到相应的终端节点。默认情况下,某些终端节点映射处于启用状态,例如,PayloadRootAnnotationMethodEndpointMapping或SoapActionAnnotationMethodEndpointMapping.但是,我们首先需要研究EndpointMapping.
一EndpointMapping提供EndpointInvocationChain,其中包含与传入请求匹配的终端节点,还可能包含应用于请求和响应的终端节点拦截器列表。当请求传入时,MessageDispatcher将其交给 Endpoint Map,让它检查请求并提出适当的EndpointInvocationChain.然后MessageDispatcher调用 endpoint 和链中的任何拦截器。
可配置的端点映射的概念可以选择性地包含拦截器(反过来,拦截器可以纵请求和/或响应)非常强大。许多支持功能可以内置到自定义中EndpointMapping实现。例如,自定义终端节点映射不仅可以根据消息的内容选择终端节点,还可以根据特定的 SOAP 标头(或者实际上是多个 SOAP 标头)来选择终端节点。
大多数终端节点映射继承自AbstractEndpointMapping,它提供了一个 'interceptors' 属性,这是要使用的拦截器列表。EndpointInterceptors在拦截请求 — 该EndpointInterceptor接口.此外,还有defaultEndpoint,这是此终端节点映射未产生匹配终端节点时使用的默认终端节点。
如 端点 中所述,@Endpointstyle 允许您在一个终端节点类中处理多个请求。这是MethodEndpointMapping.此映射确定要为传入请求消息调用的方法。
有两个终端节点映射可以将请求定向到方法:PayloadRootAnnotationMethodEndpointMapping和SoapActionAnnotationMethodEndpointMapping您可以使用<sws:annotation-driven/>在您的应用程序上下文中。
这PayloadRootAnnotationMethodEndpointMapping使用@PayloadRoot注解,使用localPart和namespace元素,以使用特定的限定名称标记方法。每当消息带有 payload 根元素的此限定名称时,都会调用该方法。有关示例,请参阅上文。
或者,SoapActionAnnotationMethodEndpointMapping使用@SoapAction注解来标记具有特定 SOAP Action 的方法。每当有消息进入时 thisSOAPActionheader,则调用该方法。
5.4.1. WS 寻址
WS-Addressing 指定传输中立的路由机制。它基于To和ActionSOAP 标头,分别指示 SOAP 消息的目标和意图。此外,WS-Addressing 还允许您定义一个返回地址(用于普通消息和错误)和一个唯一的消息标识符,该标识符可用于关联。有关 WS-Addressing 的更多信息,请参阅 https://en.wikipedia.org/wiki/WS-Addressing。下面的示例演示 WS-Addressing 消息:
<SOAP-ENV:Envelope xmlns:SOAP-ENV="http://www.w3.org/2003/05/soap-envelope"
    xmlns:wsa="http://www.w3.org/2005/08/addressing">
  <SOAP-ENV::Header>
    <wsa:MessageID>urn:uuid:21363e0d-2645-4eb7-8afd-2f5ee1bb25cf</wsa:MessageID>
    <wsa:ReplyTo>
      <wsa:Address>http://example.com/business/client1</wsa:Address>
    </wsa:ReplyTo>
    <wsa:To S:mustUnderstand="true">http://example/com/fabrikam</wsa:To>
    <wsa:Action>http://example.com/fabrikam/mail/Delete</wsa:Action>
  </SOAP-ENV:Header>
  <SOAP-ENV:Body>
    <f:Delete xmlns:f="http://example.com/fabrikam">
      <f:maxCount>42</f:maxCount>
    </f:Delete>
  </SOAP-ENV:Body>
</SOAP-ENV:Envelope>在前面的示例中,目标设置为http://example/com/fabrikam,而作设置为http://example.com/fabrikam/mail/Delete.此外,还有一个消息标识符和一个回复地址。默认情况下,此地址是 “匿名” 地址,指示应使用与请求相同的通道(即 HTTP 响应)发送响应,但它也可以是另一个地址,如本例所示。
在 Spring Web 服务中,WS-Addressing 被实现为端点映射。通过使用此映射,您可以将 WS-Addressing作与端点相关联,类似于SoapActionAnnotationMethodEndpointMapping前面描述过。
用AnnotationActionEndpointMapping
这AnnotationActionEndpointMapping类似于SoapActionAnnotationMethodEndpointMapping但使用 WS-Addressing 标头而不是 SOAP Action 传输标头。
要使用AnnotationActionEndpointMapping中,使用@Action注解,类似于@PayloadRoot和@SoapAction中描述的注释@Endpoint处理方法和 Endpoint mappings。以下示例显示了如何执行此作:
package samples;
@Endpoint
public class AnnotationOrderEndpoint {
private final OrderService orderService;
public AnnotationOrderEndpoint(OrderService orderService) {
this.orderService = orderService;
}
@Action("http://samples/RequestOrder")
public Order getOrder(OrderRequest orderRequest) {
return orderService.getOrder(orderRequest.getId());
}
@Action("http://samples/CreateOrder")
public void order(Order order) {
orderService.createOrder(order);
}
}
前面的映射路由具有 WS-Addressing 的请求Action之http://samples/RequestOrder到getOrder方法。请求http://samples/CreateOrder路由到order方法。。
默认情况下,AnnotationActionEndpointMapping支持 WS-Addressing 的 1.0(2006 年 5 月)和 2004 年 8 月版本。这两个版本最受欢迎,并且可以与 Axis 1 和 2、JAX-WS、XFire、Windows Communication Foundation (WCF) 和 Windows Services Enhancements (WSE) 3.0 互作。如有必要,可以将特定版本的规范注入到versions财产。
除了@Action注解中,您可以使用@Address注解。如果设置,则该值将与Toheader 属性。
最后,还有messageSenders属性,这是向非匿名的越界地址发送响应消息所必需的。您可以设置MessageSender实现,就像你在WebServiceTemplate.请参阅 URI 和传输。
5.4.2. 拦截请求 —EndpointInterceptor接口
端点映射机制具有端点拦截器的概念。当您希望将特定功能应用于某些请求时(例如,处理与安全相关的 SOAP 标头或记录请求和响应消息),这些 API 可能非常有用。
端点拦截器通常使用<sws:interceptors>元素。在此元素中,您可以定义应用于该应用程序上下文中定义的所有端点的端点拦截器 bean。或者,您可以使用<sws:payloadRoot>或<sws:soapAction>元素来指定侦听器应为哪个有效负载根名称或 SOAP作应用。以下示例显示了如何执行此作:
<sws:interceptors>
  <bean class="samples.MyGlobalInterceptor"/>
  <sws:payloadRoot namespaceUri="http://www.example.com">
    <bean class="samples.MyPayloadRootInterceptor"/>
  </sws:payloadRoot>
  <sws:soapAction value="http://www.example.com/SoapAction">
    <bean class="samples.MySoapActionInterceptor1"/>
    <ref bean="mySoapActionInterceptor2"/>
  </sws:soapAction>
</sws:interceptors>

<bean id="mySoapActionInterceptor2" class="samples.MySoapActionInterceptor2"/>
在前面的示例中,我们定义了一个“全局”拦截器 (MyGlobalInterceptor) 拦截所有请求和响应。我们还定义了一个拦截器,它仅适用于具有http://www.example.com作为有效负载根命名空间。我们本可以定义一个localPart属性以及namespaceUri以进一步限制 Interceptor 适用的消息。最后,我们定义了两个拦截器,当消息具有http://www.example.com/SoapActionSOAP作。请注意,第二个拦截器实际上是对<interceptors>元素。您可以在<interceptors>元素。
当您使用@Configuration类,您可以从WsConfigurerAdapter要添加侦听器:
@Configuration
@EnableWs
public class MyWsConfiguration extends WsConfigurerAdapter {

  @Override
  public void addInterceptors(List<EndpointInterceptor> interceptors) {
    interceptors.add(new MyPayloadRootInterceptor());
  }

}
拦截器必须实现EndpointInterceptor接口中org.springframework.ws.server包。此接口定义了三种方法,一种可用于在处理实际端点之前处理请求消息,一种可用于处理普通响应消息,另一种可用于处理错误消息。后两个在处理 endpoint 后调用。这三种方法应该提供足够的灵活性来执行各种预处理和后处理。
这handleRequest(..)method 返回一个布尔值。您可以使用此方法中断或继续处理调用链。当此方法返回true,则端点处理链将继续。当它返回false这MessageDispatcher将此解释为拦截器本身已经处理了事情,并且不再继续处理其他拦截器和调用链中的实际端点。这handleResponse(..)和handleFault(..)方法也具有布尔返回值。当这些方法返回false,则不会将响应发送回客户端。
有许多标准EndpointInterceptor可以在 Web 服务中使用的实现。此外,还有XwsSecurityInterceptor,在XwsSecurityInterceptor.
PayloadLoggingInterceptor和SoapEnvelopeLoggingInterceptor
在开发 Web 服务时,记录传入和传出的 XML 消息可能很有用。Spring WS 通过PayloadLoggingInterceptor和SoapEnvelopeLoggingInterceptor类。前者仅将消息的有效负载记录到 Commons Logging Log 中。后者记录整个 SOAP 信封,包括 SOAP 标头。以下示例显示了如何定义PayloadLoggingInterceptor在终端节点映射中:
  <sws:interceptors>
    <bean class="org.springframework.ws.server.endpoint.interceptor.PayloadLoggingInterceptor"/>
</sws:interceptors>这两个拦截器都有两个属性,logRequest和logResponse,该 URL 可以设置为false以禁用请求或响应消息的日志记录。
您可以使用WsConfigurerAdapter方法,如前所述,用于PayloadLoggingInterceptor也。
PayloadValidatingInterceptor
使用契约优先开发样式的好处之一是,我们可以使用架构来验证传入和传出的 XML 消息。Spring-WS 通过PayloadValidatingInterceptor.此侦听器需要对一个或多个 W3C XML 或 RELAX NG 模式的引用,并且可以设置为验证请求和/或响应。
| 请注意,请求验证听起来是个好主意,但它会使生成的 Web 服务非常严格。通常,请求是否验证并不重要,只有当终端节点能够获得足够的信息来完成请求时,才重要。验证响应是一个好主意,因为终端节点应遵循其架构。记住 Postel 定律: “在你做的事情上要保守;在你接受别人的东西上要自由。 |
以下示例使用PayloadValidatingInterceptor.在此示例中,我们使用/WEB-INF/orders.xsd验证响应,但不验证请求。请注意,PayloadValidatingInterceptor还可以通过设置schemas财产。
<bean id="validatingInterceptor"
        class="org.springframework.ws.soap.server.endpoint.interceptor.PayloadValidatingInterceptor">
    <property name="schema" value="/WEB-INF/orders.xsd"/>
    <property name="validateRequest" value="false"/>
    <property name="validateResponse" value="true"/>
</bean>当然,您可以使用WsConfigurerAdapter方法,如前所述,用于PayloadValidatingInterceptor也。
用PayloadTransformingInterceptor
为了将有效负载转换为另一种 XML 格式, Spring Web 服务提供了PayloadTransformingInterceptor.此端点侦听器基于 XSLT 样式表,在支持 Web 服务的多个版本时特别有用,因为您可以将较旧的消息格式转换为较新的格式。以下示例使用PayloadTransformingInterceptor:
<bean id="transformingInterceptor"
        class="org.springframework.ws.server.endpoint.interceptor.PayloadTransformingInterceptor">
    <property name="requestXslt" value="/WEB-INF/oldRequests.xslt"/>
    <property name="responseXslt" value="/WEB-INF/oldResponses.xslt"/>
</bean>在前面的示例中,我们使用/WEB-INF/oldRequests.xslt和响应消息/WEB-INF/oldResponses.xslt.请注意,由于端点拦截器是在端点映射级别注册的,因此您可以创建适用于“旧式”消息的端点映射,并将拦截器添加到该映射中。因此,转换仅适用于这些 “old style” 消息。
您可以使用WsConfigurerAdapter方法,如前所述,用于PayloadTransformingInterceptor也。
5.5. 处理异常
Spring-WS 提供了EndpointExceptionResolvers以减轻在与请求匹配的终端节点处理消息时发生意外异常的痛苦。端点异常解析程序有点类似于可以在 Web 应用程序描述符中定义的异常映射web.xml.但是,它们提供了一种更灵活的方法来处理异常。它们提供有关引发异常时调用的终端节点的信息。此外,处理异常的编程方式为如何适当响应提供了更多选项。您可以按照任何您想要的方式处理异常,而不是通过提供异常和堆栈跟踪来公开应用程序的内部结构,例如,通过返回具有特定错误代码和字符串的 SOAP 错误。
端点异常解析程序由MessageDispatcher,因此不需要显式配置。
除了实现EndpointExceptionResolver接口,这只是实现resolveException(MessageContext, endpoint, Exception)方法,您也可以使用提供的实现之一。最简单的实现是SimpleSoapExceptionResolver,这将创建 SOAP 1.1 Server 或 SOAP 1.2 Receiver 错误,并使用异常消息作为错误字符串。这SimpleSoapExceptionResolver是默认值,但可以通过显式添加另一个 Resolver 来覆盖它。
5.5.1.SoapFaultMappingExceptionResolver
这SoapFaultMappingExceptionResolver是一种更复杂的实现。此解析程序允许您获取可能引发的任何异常的类名,并将其映射到 SOAP Fault:
<beans>
    <bean id="exceptionResolver"
        class="org.springframework.ws.soap.server.endpoint.SoapFaultMappingExceptionResolver">
        <property name="defaultFault" value="SERVER"/>
        <property name="exceptionMappings">
            <value>
                org.springframework.oxm.ValidationFailureException=CLIENT,Invalid request
            </value>
        </property>
    </bean>
</beans>键值和默认端点使用faultCode,faultString,locale,其中只需要故障代码。如果未设置错误字符串,则默认为异常消息。如果未设置语言,则默认为 English。前面的配置映射了ValidationFailureException到错误字符串为Invalid request如下:
<SOAP-ENV:Envelope xmlns:SOAP-ENV="http://schemas.xmlsoap.org/soap/envelope/">
    <SOAP-ENV:Body>
       <SOAP-ENV:Fault>
           <faultcode>SOAP-ENV:Client</faultcode>
           <faultstring>Invalid request</faultstring>
       </SOAP-ENV:Fault>
    </SOAP-ENV:Body>
</SOAP-ENV:Envelope>
如果发生任何其他异常,则返回 default 错误:服务器端错误,异常消息作为错误字符串。
5.5.2. 使用SoapFaultAnnotationExceptionResolver
您还可以使用@SoapFault注释,以指示在引发该异常时应返回的 SOAP 错误。要选取这些注释,您需要添加SoapFaultAnnotationExceptionResolver添加到您的应用程序上下文中。注释的元素包括错误代码枚举、错误字符串或原因以及语言。以下示例显示了此类异常:
package samples;
@SoapFault(faultCode = FaultCode.SERVER)
public class MyBusinessException extends Exception {
public MyClientException(String message) {
super(message);
}
}
每当MyBusinessException与构造函数字符串一起引发"Oops!"在终端节点调用期间,它会导致以下响应:
<SOAP-ENV:Envelope xmlns:SOAP-ENV="http://schemas.xmlsoap.org/soap/envelope/">
    <SOAP-ENV:Body>
       <SOAP-ENV:Fault>
           <faultcode>SOAP-ENV:Server</faultcode>
           <faultstring>Oops!</faultstring>
       </SOAP-ENV:Fault>
    </SOAP-ENV:Body>
</SOAP-ENV:Envelope>
5.6. 服务器端测试
在测试 Web 服务端点时,有两种可能的方法:
-
编写单元测试,在其中提供 (模拟) 参数供终端节点使用。
这种方法的优点是它很容易完成(特别是对于用
@Endpoint).缺点是,您并没有真正测试通过网络发送的 XML 消息的确切内容。 -
编写集成测试,用于测试消息的内容。
第一种方法可以通过 EasyMock、JMock 等模拟框架轻松完成。下一节重点介绍如何使用 Spring Web Services 2.0 中引入的测试功能编写集成测试。
5.6.1. 编写服务器端集成测试
Spring Web Services 2.0 引入了对创建端点集成测试的支持。在此上下文中,终端节点是处理 (SOAP) 消息的类(请参阅终端节点)。
集成测试支持位于org.springframework.ws.test.server包。该包中的核心类是MockWebServiceClient.基本思想是,此客户端创建请求消息,然后将其发送到在标准MessageDispatcherServlet应用程序上下文(请参阅MessageDispatcherServlet).这些终端节点处理消息并创建响应。然后,客户端会收到此响应,并根据注册的期望对其进行验证。
典型用法MockWebServiceClient是:。
-
创建一个
MockWebServiceClient实例MockWebServiceClient.createClient(ApplicationContext)或MockWebServiceClient.createClient(WebServiceMessageReceiver, WebServiceMessageFactory). -
通过调用 Send request messages
sendRequest(RequestCreator),可能通过使用默认的RequestCreator中提供的实现RequestCreators(可以静态导入)。 -
通过调用
andExpect(ResponseMatcher),可能通过使用默认的ResponseMatcher中提供的实现ResponseMatchers(可以静态导入)。可以通过链接来设置多个期望andExpect(ResponseMatcher)调用。
请注意,MockWebServiceClient(和相关类)提供了一个 “Fluent” API,因此您通常可以在 IDE 中使用代码完成功能来指导您完成设置模拟服务器的过程。 |
| 还要注意,你可以在单元测试中依赖 Spring Web Services 中提供的标准日志记录功能。有时,检查请求或响应消息以找出特定测试失败的原因可能很有用。有关更多信息,请参见消息日志记录和跟踪。 |
例如,请考虑以下 Web 服务终端节点类:
@Endpoint (1)
public class CustomerEndpoint {
@ResponsePayload (2)
public CustomerCountResponse getCustomerCount( (2)
@RequestPayload CustomerCountRequest request) { (2)
CustomerCountResponse response = new CustomerCountResponse();
response.setCustomerCount(10);
return response;
}
}
| 1 | 这CustomerEndpointin 注释@Endpoint.请参阅 终端节点。 |
| 2 | 这getCustomerCount()method 采用CustomerCountRequest作为其参数,并返回一个CustomerCountResponse.这两个类都是编组处理程序支持的对象。例如,他们可以有一个@XmlRootElement注解。 |
以下示例显示了CustomerEndpoint:
@RunWith(SpringJUnit4ClassRunner.class) (2)
@ContextConfiguration("spring-ws-servlet.xml") (2)
public class CustomerEndpointIntegrationTest {
@Autowired
private ApplicationContext applicationContext; (3)
private MockWebServiceClient mockClient;
@Before
public void createClient() {
mockClient = MockWebServiceClient.createClient(applicationContext); (4)
}
@Test
public void customerEndpoint() throws Exception {
Source requestPayload = new StringSource(
"<customerCountRequest xmlns='http://springframework.org/spring-ws'>" +
"<customerName>John Doe</customerName>" +
"</customerCountRequest>");
Source responsePayload = new StringSource(
"<customerCountResponse xmlns='http://springframework.org/spring-ws'>" +
"<customerCount>10</customerCount>" +
"</customerCountResponse>");
mockClient.sendRequest(withPayload(requestPayload)). (5)
andExpect(payload(responsePayload)); (5)
}
}
| 1 | 这CustomerEndpointIntegrationTest导入MockWebServiceClient和静态导入RequestCreators和ResponseMatchers. |
| 2 | 此测试使用 Spring Framework 中提供的标准测试工具。这不是必需的,但通常是设置测试的最简单方法。 |
| 3 | 应用程序上下文是一个标准的 Spring-WS 应用程序上下文(参见MessageDispatcherServlet),读取自spring-ws-servlet.xml.在这种情况下,应用程序上下文包含CustomerEndpoint(或者可能是<context:component-scan />)。 |
| 4 | 在@Before方法中,我们会创建一个MockWebServiceClient通过使用createClientFactory 方法。 |
| 5 | 我们通过调用sendRequest()替换为withPayload() RequestCreator由静态导入的RequestCreators(参见用RequestCreator和RequestCreators).我们还通过调用 这部分测试可能看起来有点令人困惑,但 IDE 的代码完成功能有很大帮助。键入后 |
5.6.2. 使用RequestCreator和RequestCreators
最初,MockWebServiceClient需要创建请求消息供终端节点消费。客户端使用RequestCreatorstrategy 接口:
public interface RequestCreator {

  WebServiceMessage createRequest(WebServiceMessageFactory messageFactory)
    throws IOException;

}
您可以编写此接口的自己的实现,使用消息工厂创建请求消息,但当然不必这样做。这RequestCreatorsclass 提供了一种创建RequestCreator基于withPayload()方法。您通常静态导入RequestCreators.
5.6.3. 使用ResponseMatcher和ResponseMatchers
当终端节点处理请求消息并收到响应时,MockWebServiceClient可以验证此响应消息是否满足特定预期。客户端使用ResponseMatcherstrategy 接口:
public interface ResponseMatcher {

    void match(WebServiceMessage request,
               WebServiceMessage response)
      throws IOException, AssertionError;

}
同样,您可以编写此接口的 implemented ,抛出AssertionError实例,但您肯定不必这样做,因为ResponseMatchers类提供标准ResponseMatcherimplementations 供您在测试中使用。您通常静态导入此类。
这ResponseMatchersclass 提供以下响应匹配器:
ResponseMatchers方法 |
描述 |
|---|---|
|
需要给定的响应有效负载。 |
|
期望响应有效负载针对给定的 XSD 架构进行验证。 |
|
期望给定的 XPath 表达式存在、不存在或计算为给定值。 |
|
期望响应消息中存在给定的 SOAP 标头。 |
|
期望响应消息不包含 SOAP 错误。 |
|
期望响应消息包含特定的 SOAP 错误。 |
您可以通过链接andExpect()调用:
mockClient.sendRequest(...).
 andExpect(payload(expectedResponsePayload)).
 andExpect(validPayload(schemaResource));
有关提供的响应匹配程序的更多信息ResponseMatchers,请参阅 Javadoc。
6. 在客户端上使用 Spring Web 服务
Spring-WS 提供了一个客户端 Web 服务 API,它允许对 Web 服务进行一致的、XML 驱动的访问。它还满足了封送处理程序和解组处理程序的使用,以便您的服务层代码可以专门处理 Java 对象。
这org.springframework.ws.client.corepackage 提供了使用客户端访问 API 的核心功能。它包含简化 Web 服务使用的模板类,与核心 Spring 非常相似JdbcTemplate适用于 JDBC。Spring 模板类的通用设计原则是提供辅助方法来执行常见作,并且对于更复杂的用法,委托给用户实现的回调接口。Web 服务模板遵循相同的设计。这些类提供了各种便捷的方法
-
发送和接收 XML 消息
-
在发送之前将对象编组到 XML
-
允许多种运输选择
6.1. 使用客户端 API
本节介绍如何使用客户端 API。有关如何使用服务器端 API,请参阅使用 Spring-WS 创建 Web 服务。
6.1.1.WebServiceTemplate
这WebServiceTemplate是 Spring-WS 中客户端 Web 服务访问的核心类。它包含用于发送Source对象和接收响应消息Source或Result.此外,它可以在通过传输发送对象之前将对象封送到 XML,并再次将任何响应 XML 解组到对象中。
URI 和传输
这WebServiceTemplateclass 使用 URI 作为消息目标。您可以设置defaultUri属性,或者在调用模板上的方法时显式提供 URI。URI 解析为WebServiceMessageSender,它负责跨传输层发送 XML 消息。您可以使用messageSender或messageSenders的属性WebServiceTemplate类。
HTTP 传输
有两种WebServiceMessageSender用于通过 HTTP 发送消息的接口。默认实现是HttpUrlConnectionMessageSender,它使用 Java 本身提供的工具。另一种方法是HttpComponentsMessageSender,它使用 Apache HttpComponents HttpClient。如果您需要更高级且易于使用的功能(例如身份验证、HTTP 连接池等),请使用后者。
要使用 HTTP 传输,请将defaultUri改为类似http://example.com/services或提供uri参数。
以下示例演示如何对 HTTP 传输使用默认配置:
<beans>

    <bean id="messageFactory" class="org.springframework.ws.soap.saaj.SaajSoapMessageFactory"/>

    <bean id="webServiceTemplate" class="org.springframework.ws.client.core.WebServiceTemplate">
        <constructor-arg ref="messageFactory"/>
        <property name="defaultUri" value="http://example.com/WebService"/>
    </bean>

</beans>
以下示例显示了如何覆盖默认配置以及如何使用 Apache HttpClient 通过 HTTP 身份验证进行身份验证:
<bean id="webServiceTemplate" class="org.springframework.ws.client.core.WebServiceTemplate">
    <constructor-arg ref="messageFactory"/>
    <property name="messageSender">
        <bean class="org.springframework.ws.transport.http.HttpComponentsMessageSender">
            <property name="credentials">
                <bean class="org.apache.http.auth.UsernamePasswordCredentials">
                    <constructor-arg value="john:secret"/>
                </bean>
            </property>
        </bean>
    </property>
    <property name="defaultUri" value="http://example.com/WebService"/>
</bean>
JMS 传输
为了通过 JMS 发送消息, Spring Web 服务提供了JmsMessageSender.此类使用 Spring 框架的功能将WebServiceMessage导入到 JMS 中Message,将其发送到Queue或Topic,并接收响应(如果有)。
要使用JmsMessageSender,您需要设置defaultUri或uri参数添加到 JMS URI 中,该 JMS URI 至少由jms:前缀和目标名称。JMS URI 的一些示例包括:jms:SomeQueue,jms:SomeTopic?priority=3&deliveryMode=NON_PERSISTENT和jms:RequestQueue?replyToName=ResponseName.有关此 URI 语法的更多信息,请参阅Javadoc 的JmsMessageSender.
默认情况下,JmsMessageSender发送 JMSBytesMessage,但您可以覆盖此 API 以使用TextMessages通过使用messageType参数 - 例如jms:Queue?messageType=TEXT_MESSAGE.请注意,BytesMessages是首选类型,因为TextMessages不支持 attachments 和 character encoding 可靠。
以下示例显示了如何将 JMS 传输与 ActiveMQ 连接工厂结合使用:
<beans>

    <bean id="messageFactory" class="org.springframework.ws.soap.saaj.SaajSoapMessageFactory"/>

    <bean id="connectionFactory" class="org.apache.activemq.ActiveMQConnectionFactory">
        <property name="brokerURL" value="vm://localhost?broker.persistent=false"/>
    </bean>

    <bean id="webServiceTemplate" class="org.springframework.ws.client.core.WebServiceTemplate">
        <constructor-arg ref="messageFactory"/>
        <property name="messageSender">
            <bean class="org.springframework.ws.transport.jms.JmsMessageSender">
                <property name="connectionFactory" ref="connectionFactory"/>
            </bean>
        </property>
        <property name="defaultUri" value="jms:RequestQueue?deliveryMode=NON_PERSISTENT"/>
    </bean>

</beans>
电子邮件传输
Spring Web 服务还提供了一种电子邮件传输,你可以使用它通过 SMTP 发送 Web 服务消息,并通过 POP3 或 IMAP 检索它们。客户端电子邮件功能包含在MailMessageSender类。此类从请求创建电子邮件WebServiceMessage并通过 SMTP 发送。然后,它等待响应消息到达传入的 POP3 或 IMAP 服务器。
要使用MailMessageSender中,将defaultUri或uri参数设置为mailtoURI — 例如mailto:[email protected]或mailto:server@localhost?subject=SOAP%20Test.确保消息发件人已正确配置了transportUri,它指示用于发送请求的服务器(通常是 SMTP 服务器),以及storeUri,它指示要轮询响应的服务器(通常是 POP3 或 IMAP 服务器)。
以下示例显示如何使用电子邮件传输:
<beans>
<bean id="messageFactory" class="org.springframework.ws.soap.saaj.SaajSoapMessageFactory"/>
<bean id="webServiceTemplate" class="org.springframework.ws.client.core.WebServiceTemplate">
<constructor-arg ref="messageFactory"/>
<property name="messageSender">
<bean class="org.springframework.ws.transport.mail.MailMessageSender">
<property name="from" value="Spring-WS SOAP Client <[email protected]>"/>
<property name="transportUri" value="smtp://client:[email protected]"/>
<property name="storeUri" value="imap://client:[email protected]/INBOX"/>
</bean>
</property>
<property name="defaultUri" value="mailto:[email protected]?subject=SOAP%20Test"/>
</bean>
</beans>XMPP 传输
Spring Web Services 2.0 引入了 XMPP (Jabber) 传输,您可以使用它通过 XMPP 发送和接收 Web 服务消息。客户端 XMPP 功能包含在XmppMessageSender类。此类从请求创建 XMPP 消息WebServiceMessage并通过 XMPP 发送它。然后,它会侦听响应消息的到达。
要使用XmppMessageSender中,将defaultUri或uri参数设置为xmppURI — 例如xmpp:[email protected].发件人还需要一个XMPPConnection工作,这可以通过使用org.springframework.ws.transport.xmpp.support.XmppConnectionFactoryBean.
以下示例演示如何使用 XMPP 传输:
<beans>

    <bean id="messageFactory" class="org.springframework.ws.soap.saaj.SaajSoapMessageFactory"/>

    <bean id="connection" class="org.springframework.ws.transport.xmpp.support.XmppConnectionFactoryBean">
        <property name="host" value="jabber.org"/>
        <property name="username" value="username"/>
        <property name="password" value="password"/>
    </bean>

    <bean id="webServiceTemplate" class="org.springframework.ws.client.core.WebServiceTemplate">
        <constructor-arg ref="messageFactory"/>
        <property name="messageSender">
            <bean class="org.springframework.ws.transport.xmpp.XmppMessageSender">
                <property name="connection" ref="connection"/>
            </bean>
        </property>
        <property name="defaultUri" value="xmpp:[email protected]"/>
    </bean>

</beans>6.1.2. 发送和接收WebServiceMessage
这WebServiceTemplate包含许多发送和接收 Web 服务消息的便捷方法。有一些方法可以接受并返回Source而那些返回Result.此外,还有一些方法可以将对象封送和取消封送到 XML。以下示例向 Web 服务发送一条简单的 XML 消息:
public class WebServiceClient {
private static final String MESSAGE =
"<message xmlns=\"http://tempuri.org\">Hello, Web Service World</message>";
private final WebServiceTemplate webServiceTemplate = new WebServiceTemplate();
public void setDefaultUri(String defaultUri) {
webServiceTemplate.setDefaultUri(defaultUri);
}
// send to the configured default URI
public void simpleSendAndReceive() {
StreamSource source = new StreamSource(new StringReader(MESSAGE));
StreamResult result = new StreamResult(System.out);
webServiceTemplate.sendSourceAndReceiveToResult(source, result);
}
// send to an explicit URI
public void customSendAndReceive() {
StreamSource source = new StreamSource(new StringReader(MESSAGE));
StreamResult result = new StreamResult(System.out);
webServiceTemplate.sendSourceAndReceiveToResult("http://localhost:8080/AnotherWebService",
source, result);
}
}
<beans xmlns="http://www.springframework.org/schema/beans">

    <bean id="webServiceClient" class="WebServiceClient">
        <property name="defaultUri" value="http://localhost:8080/WebService"/>
    </bean>

</beans>前面的示例使用WebServiceTemplate向位于http://localhost:8080/WebService(对于simpleSendAndReceive()方法),并将结果写入控制台。这WebServiceTemplate注入了默认 URI,使用该 URI 是因为 Java 代码中未明确提供 URI。
请注意,WebServiceTemplateclass 一旦配置完毕,就是线程安全的(假设它的所有依赖项也是线程安全的,Spring-WS 附带的所有依赖项都是这种情况),因此多个对象可以使用相同的共享WebServiceTemplate实例。这WebServiceTemplate公开一个零参数构造函数,并且messageFactory和messageSender可用于构造实例的 bean 属性(通过使用 Spring 容器或纯 Java 代码)。或者,考虑从 Spring-WS 的WebServiceGatewaySupportconvenience 基类,它公开了方便的 bean 属性以实现轻松配置。(您不必扩展此基类。它仅作为便利类提供。
6.1.3. 发送和接收 POJO — 编组和解组
为了便于发送普通 Java 对象,WebServiceTemplate具有多个send(..)采用Object作为消息数据内容的参数。方法marshalSendAndReceive(..)在WebServiceTemplate类将请求对象到 XML 的转换委托给Marshaller以及将响应 XML 转换为对象到Unmarshaller.(有关编组和解组器的更多信息,请参阅 Spring Framework 参考文档。通过使用封送处理程序,您的应用程序代码可以专注于正在发送或接收的业务对象,而不必关心如何将其表示为 XML 的详细信息。要使用编组功能,您必须使用marshaller和unmarshaller的属性WebServiceTemplate类。
6.1.4. 使用WebServiceMessageCallback
为了适应对消息的 SOAP 标头和其他设置,WebServiceMessageCallbackinterface 允许您在创建消息之后但在发送消息之前访问消息。下面的示例演示如何在通过封送对象创建的消息上设置 SOAP作标头:
public void marshalWithSoapActionHeader(MyObject o) {

    webServiceTemplate.marshalSendAndReceive(o, new WebServiceMessageCallback() {

        public void doWithMessage(WebServiceMessage message) {
            ((SoapMessage)message).setSoapAction("http://tempuri.org/Action");
        }
    });
}
请注意,您还可以使用org.springframework.ws.soap.client.core.SoapActionCallback设置 SOAP作标头。 |
WS 寻址
除了服务器端的 WS-Addressing 支持之外, Spring Web 服务在客户端也支持这个规范。
要在客户端上设置 WS-Addressing 标头,可以使用org.springframework.ws.soap.addressing.client.ActionCallback.该回调将需要的 action header 作为参数。它还具有用于指定 WS-Addressing 版本的构造函数和To页眉。如果未指定,则Toheader 默认为正在建立的连接的 URL。
以下示例将Actionheader 设置为http://samples/RequestOrder:
webServiceTemplate.marshalSendAndReceive(o, new ActionCallback("http://samples/RequestOrder"));
6.1.5. 使用WebServiceMessageExtractor
这WebServiceMessageExtractorinterface 是一个低级回调接口,您可以完全控制提取Object从接收的WebServiceMessage.这WebServiceTemplate调用extractData(..)方法在提供的WebServiceMessageExtractor而与服务资源的底层连接仍处于打开状态。以下示例显示了WebServiceMessageExtractor实际作:
public void marshalWithSoapActionHeader(final Source s) {
    final Transformer transformer = transformerFactory.newTransformer();
    webServiceTemplate.sendAndReceive(new WebServiceMessageCallback() {
        public void doWithMessage(WebServiceMessage message) {
            transformer.transform(s, message.getPayloadResult());
        },
        new WebServiceMessageExtractor() {
            public Object extractData(WebServiceMessage message) throws IOException {
                // do your own transforms with message.getPayloadResult()
                //     or message.getPayloadSource()
            }
          }
        });
}
6.2. 客户端测试
在测试 Web 服务客户端(即使用WebServiceTemplate访问 Web 服务),则有两种可能的方法:
-
编写单元测试,模拟
WebServiceTemplate类WebServiceOperationsinterface 或 complete client 类。这种方法的优点是很容易完成。缺点是,您没有真正测试通过网络发送的 XML 消息的确切内容,尤其是在模拟整个客户端类时。
-
编写集成测试,这些测试会测试消息的内容。
第一种方法可以通过模拟框架(如 EasyMock、JMock 等)轻松完成。下一节重点介绍如何使用 Spring Web Services 2.0 中引入的测试功能编写集成测试。
6.2.1. 编写客户端集成测试
Spring Web Services 2.0 引入了对创建 Web Service Client 端集成测试的支持。在此上下文中,客户端是使用WebServiceTemplate以访问 Web 服务。
集成测试支持位于org.springframework.ws.test.client包。该包中的核心类是MockWebServiceServer.基本思想是 Web 服务模板连接到这个模拟服务器并向其发送请求消息,然后模拟服务器根据注册的期望验证该消息。如果满足预期,则模拟服务器会准备一条响应消息,该消息将发送回模板。
典型用法MockWebServiceServer是:。
-
创建一个
MockWebServiceServer实例MockWebServiceServer.createServer(WebServiceTemplate),MockWebServiceServer.createServer(WebServiceGatewaySupport)或MockWebServiceServer.createServer(ApplicationContext). -
通过调用 Set request expectations
expect(RequestMatcher),可能通过使用默认的RequestMatcher中提供的实现RequestMatchers(可以静态导入)。可以通过链接来设置多个期望andExpect(RequestMatcher)调用。 -
通过调用
andRespond(ResponseCreator),可能通过使用默认的ResponseCreator中提供的实现ResponseCreators(可以静态导入)。 -
使用
WebServiceTemplate像往常一样,要么直接或通过客户端代码。 -
叫
MockWebServiceServer.verify()以确保满足所有期望。
请注意,MockWebServiceServer(和相关类)提供了一个 “Fluent” API,因此您通常可以在 IDE 中使用代码完成功能来指导您完成设置模拟服务器的过程。 |
| 还要注意,你可以在单元测试中依赖 Spring Web Services 中提供的标准日志记录功能。有时,检查请求或响应消息以找出特定测试失败的原因可能很有用。有关更多信息,请参见消息日志记录和跟踪。 |
例如,请考虑以下 Web 服务客户端类:
public class CustomerClient extends WebServiceGatewaySupport { (1)
public int getCustomerCount() {
CustomerCountRequest request = new CustomerCountRequest(); (2)
request.setCustomerName("John Doe");
CustomerCountResponse response =
(CustomerCountResponse) getWebServiceTemplate().marshalSendAndReceive(request); (3)
return response.getCustomerCount();
}
}
| 1 | 这CustomerClient延伸WebServiceGatewaySupport,它为其提供了一个webServiceTemplate财产。 |
| 2 | CustomerCountRequest是封送处理程序支持的对象。例如,它可以有一个@XmlRootElement注解。 |
| 3 | 这CustomerClient使用WebServiceTemplate提供方WebServiceGatewaySupport将请求对象封送到 SOAP 消息中,并将其发送到 Web 服务。响应对象被解组为CustomerCountResponse. |
以下示例显示了CustomerClient:
@RunWith(SpringJUnit4ClassRunner.class) (2)
@ContextConfiguration("integration-test.xml") (2)
public class CustomerClientIntegrationTest {
@Autowired
private CustomerClient client; (3)
private MockWebServiceServer mockServer; (4)
@Before
public void createServer() throws Exception {
mockServer = MockWebServiceServer.createServer(client);
}
@Test
public void customerClient() throws Exception {
Source requestPayload = new StringSource(
"<customerCountRequest xmlns='http://springframework.org/spring-ws'>" +
"<customerName>John Doe</customerName>" +
"</customerCountRequest>");
Source responsePayload = new StringSource(
"<customerCountResponse xmlns='http://springframework.org/spring-ws'>" +
"<customerCount>10</customerCount>" +
"</customerCountResponse>");
mockServer.expect(payload(requestPayload)).andRespond(withPayload(responsePayload));(5)
int result = client.getCustomerCount(); (6)
assertEquals(10, result); (6)
mockServer.verify(); (7)
}
}
| 1 | 这CustomerClientIntegrationTest导入MockWebServiceServer和静态导入RequestMatchers和ResponseCreators. |
| 2 | 此测试使用 Spring Framework 中提供的标准测试工具。这不是必需的,但通常是设置测试的最简单方法。 |
| 3 | 这CustomerClient在integration-test.xml并使用@Autowired. |
| 4 | 在@Before方法中,我们会创建一个MockWebServiceServer通过使用createServerFactory 方法。 |
| 5 | 我们通过调用expect()替换为payload() RequestMatcher由静态导入的RequestMatchers(参见用RequestMatcher和RequestMatchers).我们还通过调用 这部分测试可能看起来有点令人困惑,但 IDE 的代码完成功能有很大帮助。键入后 |
| 6 | 我们调用getCustomerCount()在CustomerClient,因此使用WebServiceTemplate.模板现在已经设置为“测试模式”,因此此方法调用不会建立真正的 (HTTP) 连接。我们还根据方法调用的结果进行一些 JUnit 断言。 |
| 7 | 我们调用verify()在MockWebServiceServer,验证是否实际收到了预期的消息。 |
6.2.2. 使用RequestMatcher和RequestMatchers
为了验证请求消息是否满足特定预期,MockWebServiceServer使用RequestMatcherstrategy 界面。该接口定义的合约如下:
public interface RequestMatcher {

  void match(URI uri,
             WebServiceMessage request)
    throws IOException,
           AssertionError;
}
你可以编写自己的这个接口的实现,抛出AssertionError消息不符合您的期望时出现异常,但您当然不必这样做。这RequestMatchers类提供标准RequestMatcherimplementations 供您在测试中使用。您通常静态导入此类。
这RequestMatchersclass 提供以下请求匹配器:
RequestMatchers方法 |
描述 |
|---|---|
|
需要任何类型的请求。 |
|
需要给定的请求有效负载。 |
|
期望请求有效负载针对给定的 XSD 架构进行验证。 |
|
期望给定的 XPath 表达式存在、不存在或计算为给定值。 |
|
期望给定的 SOAP 标头存在于请求消息中。 |
|
需要连接到给定的 URL。 |
您可以通过链接andExpect()调用:
mockServer.expect(connectionTo("http://example.com")).
 andExpect(payload(expectedRequestPayload)).
 andExpect(validPayload(schemaResource)).
 andRespond(...);
有关由RequestMatchers,请参阅 Javadoc。
6.2.3. 使用ResponseCreator和ResponseCreators
当请求消息经过验证并满足定义的期望时,MockWebServiceServer为WebServiceTemplate来消费。服务器使用ResponseCreatorstrategy 接口:
public interface ResponseCreator {

  WebServiceMessage createResponse(URI uri,
                                   WebServiceMessage request,
                                   WebServiceMessageFactory messageFactory)
    throws IOException;

}
同样,您可以编写此接口的自己的实现,使用消息工厂创建响应消息,但您当然不必这样做,因为ResponseCreators类提供标准ResponseCreatorimplementations 供您在测试中使用。您通常静态导入此类。
这ResponseCreatorsclass 提供以下响应:
ResponseCreators方法 |
描述 |
|---|---|
|
创建具有给定有效负载的响应消息。 |
|
在响应连接中创建错误。此方法为您提供了测试错误处理的机会。 |
|
从响应连接读取时引发异常。此方法为您提供了测试异常处理的机会。 |
|
创建包含给定 SOAP 错误的响应消息。此方法让您有机会测试 Fault 处理。 |
有关由RequestMatchers,请参阅 Javadoc。
7. 使用 Spring-WS 保护你的 Web 服务
本章介绍如何将 WS-Security 方面添加到您的 Web 服务中。我们专注于 WS-Security 的三个不同领域:
-
身份验证:这是确定委托人是否是他们声称的身份的过程。在此上下文中,“主体”通常是指可以在应用程序中执行作的用户、设备或其他系统。
-
数字签名:消息的数字签名是基于文档和签名者的私钥的一条信息。它是通过使用哈希函数和私有签名函数(使用签名者的私钥加密)创建的。
-
加密和解密:加密是将数据转换为没有适当密钥就无法读取的形式的过程。它主要用于对任何不适用的人隐藏信息。解密是加密的反面。这是将加密数据转换回可读形式的过程。
这三个区域是使用XwsSecurityInterceptor或Wss4jSecurityInterceptor,我们在XwsSecurityInterceptor和用Wss4jSecurityInterceptor分别
| 请注意,WS-Security(尤其是加密和签名)需要大量内存,并且会降低性能。如果性能对您很重要,那么您可能需要考虑不使用 WS-Security 或使用基于 HTTP 的安全性。 |
7.1.XwsSecurityInterceptor
这XwsSecurityInterceptor是一个EndpointInterceptor(参见拦截请求 — 该EndpointInterceptor接口),该软件包基于 SUN 的 XML 和 Web 服务安全包 (XWSS)。此 WS-Security 实现是 Java Web Services Developer Pack (Java WSDP) 的一部分。
与任何其他终端节点拦截器一样,它是在终端节点映射中定义的(请参阅终端节点映射)。这意味着您可以选择性地添加 WS-Security 支持。某些终端节点映射需要它,而另一些则不需要。
请注意,XWSS 需要 SUN 1.5 JDK 和 SUN SAAJ 参考实现。WSS4J 拦截器没有这些要求(请参阅用Wss4jSecurityInterceptor). |
这XwsSecurityInterceptor需要安全策略文件才能运行。此 XML 文件告诉侦听器对传入 SOAP 消息要求哪些安全方面,以及向传出消息添加哪些方面。以下部分介绍了策略文件的基本格式,但您可以在此处找到更深入的教程。您可以使用policyConfiguration属性,这需要 Spring 资源。策略文件可以包含多个元素,例如,要求在传入消息上使用用户名Tokens并对所有传出消息进行签名。它包含一个SecurityConfiguration元素(不是JAXRPCSecurity元素)作为其根。
此外,安全拦截器需要一个或多个CallbackHandler要作的实例。这些处理程序用于检索证书、私钥、验证用户凭证等。Spring-WS 为最常见的安全问题提供了处理程序——例如,根据 Spring Security 身份验证管理器进行身份验证以及基于 X509 证书对传出消息进行签名。以下部分指示要用于哪个安全问题的回调处理程序。您可以使用callbackHandler或callbackHandlers财产。
以下示例显示了如何将XwsSecurityInterceptor:
<beans>
    <bean id="wsSecurityInterceptor"
        class="org.springframework.ws.soap.security.xwss.XwsSecurityInterceptor">
        <property name="policyConfiguration" value="classpath:securityPolicy.xml"/>
        <property name="callbackHandlers">
            <list>
                <ref bean="certificateHandler"/>
                <ref bean="authenticationHandler"/>
            </list>
        </property>
    </bean>
    ...
</beans>此侦听器是使用securityPolicy.xmlfile 的它使用稍后在文件中定义的两个回调处理程序。
7.1.1. 密钥库
对于大多数加密作,您可以使用标准的java.security.KeyStore对象。这些作包括证书验证、消息签名、签名验证和加密。它们不包括用户名和时间戳验证。本节旨在为您提供一些有关密钥库的背景知识,以及可用于在密钥库文件中存储密钥和证书的 Java 工具。此信息主要与 Spring-WS 无关,而是与 Java 的一般加密功能有关。
这java.security.KeyStoreclass 表示加密密钥和证书的存储工具。它可以包含三种不同类型的元素:
-
Private Keys(私钥):这些密钥用于自我验证。私钥附带相应公钥的证书链。在 WS-Security 领域中,这考虑了消息签名和消息解密。
-
对称密钥:对称(或秘密)密钥也用于消息加密和解密——区别在于双方(发件人和收件人)共享相同的密钥。
-
可信证书:这些 X509 证书称为“可信证书”,因为密钥库所有者相信证书中的公钥确实属于证书的所有者。在 WS-Security 中,这些证书用于证书验证、签名验证和加密。
用keytool
这keytool程序是密钥和证书管理实用程序,随 Java 虚拟机一起提供。您可以使用此工具创建新的密钥库,向其添加新的私钥和证书,等等。提供keytool命令,但您可以在此处找到参考,或者使用keytool -help命令。
用KeyStoreFactoryBean
要使用 Spring 配置轻松加载密钥库,您可以使用KeyStoreFactoryBean.它有一个 resource location 属性,您可以将其设置为指向要加载的密钥库的路径。可以提供密码来检查密钥库数据的完整性。如果未提供密码,则不会执行完整性检查。下面的清单配置了KeyStoreFactoryBean:
<bean id="keyStore" class="org.springframework.ws.soap.security.support.KeyStoreFactoryBean">
    <property name="password" value="password"/>
    <property name="location" value="classpath:org/springframework/ws/soap/security/xwss/test-keystore.jks"/>
</bean>| 如果未指定 location 属性,则会创建一个新的空密钥库,这很可能不是您想要的。 |
KeyStoreCallbackHandler 函数
要在XwsSecurityInterceptor,您需要定义一个KeyStoreCallbackHandler.此回调具有三个属性,其中 typekeystore: (keyStore,trustStore和symmetricStore).处理程序使用的确切存储取决于此处理程序要执行的加密作。对于私钥作,keyStore被使用。对于对称密钥作,symmetricStore被使用。为了确定信任关系,trustStore被使用。下表表明了这一点:
| 加密作 | 使用的密钥库 |
|---|---|
证书验证 |
第一 |
基于私钥的解密 |
|
基于对称密钥的解密 |
|
基于公钥证书的加密 |
|
基于对称密钥的加密 |
|
签署 |
|
签名验证 |
|
此外,KeyStoreCallbackHandler具有privateKeyPassword属性,应将其设置为解锁 'keyStore' 中包含的私钥。
如果symmetricStore未设置,则默认为keyStore.如果未设置密钥或信任库,回调处理程序将使用标准 Java 机制加载或创建它。请参阅 JavaDoc 的KeyStoreCallbackHandler了解此机制的工作原理。
例如,如果您想使用KeyStoreCallbackHandler要验证传入的证书或签名,您可以使用信任存储:
<beans>
    <bean id="keyStoreHandler" class="org.springframework.ws.soap.security.xwss.callback.KeyStoreCallbackHandler">
        <property name="trustStore" ref="trustStore"/>
    </bean>

    <bean id="trustStore" class="org.springframework.ws.soap.security.support.KeyStoreFactoryBean">
        <property name="location" value="classpath:truststore.jks"/>
        <property name="password" value="changeit"/>
    </bean>
</beans>
如果要使用它来解密传入证书或签署传出消息,可以使用密钥存储:
<beans>
    <bean id="keyStoreHandler" class="org.springframework.ws.soap.security.xwss.callback.KeyStoreCallbackHandler">
        <property name="keyStore" ref="keyStore"/>
        <property name="privateKeyPassword" value="changeit"/>
    </bean>

    <bean id="keyStore" class="org.springframework.ws.soap.security.support.KeyStoreFactoryBean">
        <property name="location" value="classpath:keystore.jks"/>
        <property name="password" value="changeit"/>
    </bean>
</beans>以下部分指示KeyStoreCallbackHandler以及要为特定加密作设置的属性。
7.1.2. 身份验证
如本章的介绍中所述,身份验证是确定主体是否是他们声称的身份的任务。在 WS-Security 中,身份验证可以采用两种形式:使用用户名和密码Tokens(使用纯文本密码或密码摘要)或使用 X509 证书。
纯文本用户名身份验证
最简单的用户名身份验证形式使用纯文本密码。在此方案中,SOAP 消息包含一个UsernameToken元素,它本身包含一个Username元素和Password元素,其中包含纯文本密码。纯文本身份验证可以与 HTTP 服务器提供的基本身份验证进行比较。
| 请注意,纯文本密码不是很安全。因此,如果您使用传输层,则应始终向传输层添加额外的安全措施(例如,使用 HTTPS 而不是纯 HTTP)。 |
要要求每条传入消息都包含UsernameToken使用纯文本密码时,安全策略文件应包含一个RequireUsernameToken元素,其中passwordDigestRequired属性设置为false.您可以在此处找到可能的子元素的引用。下面的清单显示了如何包含RequireUsernameToken元素:
<xwss:SecurityConfiguration xmlns:xwss="http://java.sun.com/xml/ns/xwss/config">
    ...
    <xwss:RequireUsernameToken passwordDigestRequired="false" nonceRequired="false"/>
    ...
</xwss:SecurityConfiguration>
如果 username Tokens不存在,则XwsSecurityInterceptor向发送方返回 SOAP 错误。如果存在,则会触发PasswordValidationCallback替换为PlainTextPasswordRequest添加到已注册的处理程序中。在 Spring-WS 中,有三个类处理这个特定的回调。
用SimplePasswordValidationCallbackHandler
最简单的密码验证处理程序是SimplePasswordValidationCallbackHandler.此处理程序根据内存中验证密码Properties对象,您可以使用users财产:
<bean id="passwordValidationHandler"
    class="org.springframework.ws.soap.security.xwss.callback.SimplePasswordValidationCallbackHandler">
    <property name="users">
        <props>
            <prop key="Bert">Ernie</prop>
        </props>
    </property>
</bean>
在本例中,我们只允许用户 “Bert” 使用密码 “Ernie” 登录。
用SpringPlainTextPasswordValidationCallbackHandler
这SpringPlainTextPasswordValidationCallbackHandler使用 Spring Security 对用户进行身份验证。描述 Spring Security 超出了本文档的范围,但它是一个成熟的安全框架。您可以在 Spring Security 参考文档中阅读有关它的更多信息。
这SpringPlainTextPasswordValidationCallbackHandler需要AuthenticationManager进行作。它使用此管理器对UsernamePasswordAuthenticationToken它创造的。如果身份验证成功,则Tokens将存储在SecurityContextHolder.您可以使用authenticationManager财产:
<beans>
  <bean id="springSecurityHandler"
      class="org.springframework.ws.soap.security.xwss.callback.SpringPlainTextPasswordValidationCallbackHandler">
    <property name="authenticationManager" ref="authenticationManager"/>
  </bean>

  <bean id="authenticationManager" class="org.springframework.security.providers.ProviderManager">
      <property name="providers">
          <bean class="org.springframework.security.providers.dao.DaoAuthenticationProvider">
              <property name="userDetailsService" ref="userDetailsService"/>
          </bean>
      </property>
  </bean>

  <bean id="userDetailsService" class="com.mycompany.app.dao.UserDetailService" />
  ...
</beans>用JaasPlainTextPasswordValidationCallbackHandler
这JaasPlainTextPasswordValidationCallbackHandler基于标准的 Java 身份验证和授权服务。提供对 JAAS 的完整介绍超出了本文档的范围,但提供了一个很好的教程。
这JaasPlainTextPasswordValidationCallbackHandler只需要loginContextName进行作。它会创建一个新的 JAASLoginContext并处理标准 JAASNameCallback和PasswordCallback通过使用 SOAP 消息中提供的用户名和密码。这意味着此回调处理程序与任何 JAAS 集成LoginModule,这会在login()阶段,这是标准行为。
您可以将JaasPlainTextPasswordValidationCallbackHandler如下:
<bean id="jaasValidationHandler"
    class="org.springframework.ws.soap.security.xwss.callback.jaas.JaasPlainTextPasswordValidationCallbackHandler">
    <property name="loginContextName" value="MyLoginModule" />
</bean>在这种情况下,回调处理程序使用LoginContext叫MyLoginModule.此模块应在jaas.config文件,如前面提到的教程中所述。
摘要用户名身份验证
使用密码摘要时,SOAP 消息还包含一个UsernameToken元素,它本身包含一个Username元素和Password元素。区别在于密码不是以纯文本形式发送的,而是以摘要的形式发送的。收件人将此摘要与他根据用户的已知密码计算的摘要进行比较,如果它们相同,则对用户进行身份验证。此方法与 HTTP 服务器提供的摘要身份验证类似。
要要求每条传入消息都包含UsernameToken元素中,安全策略文件应包含一个RequireUsernameToken元素,其中passwordDigestRequired属性设置为true.此外,nonceRequired属性应设置为true:您可以在此处找到可能的子元素的参考。下面的清单显示了如何定义RequireUsernameToken元素:
<xwss:SecurityConfiguration xmlns:xwss="http://java.sun.com/xml/ns/xwss/config">
    ...
    <xwss:RequireUsernameToken passwordDigestRequired="true" nonceRequired="true"/>
    ...
</xwss:SecurityConfiguration>
如果 username Tokens不存在,则XwsSecurityInterceptor向发送方返回 SOAP 错误。如果存在,则会触发PasswordValidationCallback替换为DigestPasswordRequest添加到已注册的处理程序中。在 Spring-WS 中,有两个类处理这个特定的回调:SimplePasswordValidationCallbackHandler和SpringDigestPasswordValidationCallbackHandler.
用SimplePasswordValidationCallbackHandler
这SimplePasswordValidationCallbackHandler可以处理纯文本密码和密码摘要。它被描述在用SimplePasswordValidationCallbackHandler.
用SpringDigestPasswordValidationCallbackHandler
这SpringDigestPasswordValidationCallbackHandler需要 Spring SecurityUserDetailService进行作。它使用此服务检索Tokens中指定的用户的密码。然后,将此 details 对象中包含的密码摘要与消息中的摘要进行比较。如果它们相等,则用户已成功进行身份验证,并且UsernamePasswordAuthenticationToken存储在SecurityContextHolder.您可以使用userDetailsService财产。此外,您还可以设置userCache属性来缓存加载的用户详细信息。以下示例显示了如何执行此作:
<beans>
    <bean class="org.springframework.ws.soap.security.xwss.callback.SpringDigestPasswordValidationCallbackHandler">
        <property name="userDetailsService" ref="userDetailsService"/>
    </bean>

    <bean id="userDetailsService" class="com.mycompany.app.dao.UserDetailService" />
    ...
</beans>
证书认证
更安全的身份验证方式使用 X509 证书。在此方案中,SOAP 消息包含一个“BinarySecurityToken”,其中包含 X509 证书的 Base 64 编码版本。收件人使用证书进行身份验证。存储在邮件中的证书也用于对邮件进行签名(请参阅验证签名)。
为了确保所有传入的 SOAP 消息都带有 'BinarySecurityToken',安全策略文件应包含一个RequireSignature元素。此元素可以进一步携带其他元素,这些元素在 验证签名 中进行了介绍。您可以在此处找到可能的子元素的引用。下面的清单显示了如何定义RequireSignature元素:
<xwss:SecurityConfiguration xmlns:xwss="http://java.sun.com/xml/ns/xwss/config">
    ...
    <xwss:RequireSignature requireTimestamp="false">
    ...
</xwss:SecurityConfiguration>当收到不携带证书的消息时,XwsSecurityInterceptor向发送方返回 SOAP 错误。如果存在,则会触发CertificateValidationCallback.Spring-WS 中的三个处理程序处理此回调以进行身份验证:
|
在大多数情况下,证书身份验证应在证书验证之前进行,因为您只想针对有效证书进行身份验证。应忽略无效证书,例如过期日期已过或不在受信任证书存储中的证书。 在 Spring-WS 术语中,这意味着 使用此设置,侦听器首先确定消息中的证书是否有效,然后对密钥库进行身份验证。 |
用KeyStoreCallbackHandler
这KeyStoreCallbackHandler使用标准 Java 密钥库来验证证书。此证书验证过程包括以下步骤:。
-
处理程序检查证书是否在私有
keyStore.如果是,则有效。 -
如果证书不在私有密钥库中,则处理程序将检查当前日期和时间是否在证书中给定的有效期内。如果不是,则证书无效。如果是,则继续执行最后一步。
-
将创建证书的认证路径。这基本上意味着处理程序确定证书是否由
trustStore.如果可以成功构建认证路径,则证书有效。否则,证书无效。
要使用KeyStoreCallbackHandler出于证书验证目的,您很可能只需要设置trustStore财产:
<beans>
    <bean id="keyStoreHandler" class="org.springframework.ws.soap.security.xwss.callback.KeyStoreCallbackHandler">
        <property name="trustStore" ref="trustStore"/>
    </bean>

    <bean id="trustStore" class="org.springframework.ws.soap.security.support.KeyStoreFactoryBean">
        <property name="location" value="classpath:truststore.jks"/>
        <property name="password" value="changeit"/>
    </bean>
</beans>
使用前面示例中所示的设置,要验证的证书必须位于信任存储区本身中,或者信任存储区必须包含颁发证书的证书颁发机构。
用SpringCertificateValidationCallbackHandler
这SpringCertificateValidationCallbackHandler需要 Spring SecurityAuthenticationManager进行作。它使用此管理器对X509AuthenticationToken它创造的。配置的身份验证管理器应提供可以处理此Tokens的提供程序(通常是X509AuthenticationProvider).如果身份验证成功,则Tokens将存储在SecurityContextHolder.您可以使用authenticationManager财产:
<beans>
    <bean id="springSecurityCertificateHandler"
        class="org.springframework.ws.soap.security.xwss.callback.SpringCertificateValidationCallbackHandler">
        <property name="authenticationManager" ref="authenticationManager"/>
    </bean>

    <bean id="authenticationManager"
        class="org.springframework.security.providers.ProviderManager">
        <property name="providers">
            <bean class="org.springframework.ws.soap.security.x509.X509AuthenticationProvider">
                <property name="x509AuthoritiesPopulator">
                    <bean class="org.springframework.ws.soap.security.x509.populator.DaoX509AuthoritiesPopulator">
                        <property name="userDetailsService" ref="userDetailsService"/>
                    </bean>
                </property>
            </bean>
        </property>
    </bean>

  <bean id="userDetailsService" class="com.mycompany.app.dao.UserDetailService" />
  ...
</beans>
在这种情况下,我们使用自定义用户详细信息服务来获取基于证书的身份验证详细信息。有关针对 X509 证书进行身份验证的更多信息,请参阅 Spring Security 参考文档。
用JaasCertificateValidationCallbackHandler
这JaasCertificateValidationCallbackHandler需要loginContextName进行作。它会创建一个新的 JAASLoginContext通过使用此名称和X500Principal的证书。这意味着此回调处理程序与任何 JAAS 集成LoginModule处理 X500 个主体。
您可以将JaasCertificateValidationCallbackHandler如下:
<bean id="jaasValidationHandler"
    class="org.springframework.ws.soap.security.xwss.callback.jaas.JaasCertificateValidationCallbackHandler">
    <property name="loginContextName">MyLoginModule</property>
</bean>在这种情况下,回调处理程序使用LoginContext叫MyLoginModule.此模块应在jaas.config文件,并且应该能够针对 X500 主体进行身份验证。
7.1.3. 数字签名
消息的数字签名是基于文档和签名者的私钥的一条信息。两个主要任务与 WS-Security 中的签名相关:验证签名和对消息进行签名。
验证签名
与基于证书的身份验证一样,签名消息包含BinarySecurityToken,其中包含用于对消息进行签名的证书。此外,它还包含一个SignedInfo块,指示消息的哪一部分已签名。
要确保所有传入的 SOAP 消息都带有BinarySecurityToken,则安全策略文件应包含一个RequireSignature元素。它还可以包含一个SignatureTarget元素,该元素指定要签名的目标消息部分和各种其他子元素。您还可以定义要使用的私有密钥别名、是否使用对称密钥而不是私有密钥以及许多其他属性。您可以在此处找到可能的子元素的引用。下面的清单配置了RequireSignature元素:
<xwss:SecurityConfiguration xmlns:xwss="http://java.sun.com/xml/ns/xwss/config">
    <xwss:RequireSignature requireTimestamp="false"/>
</xwss:SecurityConfiguration>如果签名不存在,则XwsSecurityInterceptor向发送方返回 SOAP 错误。如果存在,则会触发SignatureVerificationKeyCallback添加到已注册的处理程序中。在 Spring-WS 中,一个类处理这个特定的回调:KeyStoreCallbackHandler.
用KeyStoreCallbackHandler
如 KeyStoreCallbackHandler 中所述,KeyStoreCallbackHandler使用java.security.KeyStore用于处理各种加密回调,包括签名验证。对于签名验证,处理程序使用trustStore财产:
<beans>
    <bean id="keyStoreHandler" class="org.springframework.ws.soap.security.xwss.callback.KeyStoreCallbackHandler">
        <property name="trustStore" ref="trustStore"/>
    </bean>

    <bean id="trustStore" class="org.springframework.ws.soap.security.support.KeyStoreFactoryBean">
        <property name="location" value="classpath:org/springframework/ws/soap/security/xwss/test-truststore.jks"/>
        <property name="password" value="changeit"/>
    </bean>
</beans>
对消息进行签名
对消息进行签名时,XwsSecurityInterceptor添加BinarySecurityToken添加到消息中。它还添加了一个SignedInfo块,指示消息的哪一部分已签名。
要对所有传出 SOAP 消息进行签名,安全策略文件应包含一个Sign元素。它还可以包含一个SignatureTarget元素,该元素指定要签名的目标消息部分和各种其他子元素。您还可以定义要使用的私有密钥别名、是否使用对称密钥而不是私有密钥以及许多其他属性。您可以在此处找到可能的子元素的引用。以下示例包括一个Sign元素:
<xwss:SecurityConfiguration xmlns:xwss="http://java.sun.com/xml/ns/xwss/config">
	<xwss:Sign includeTimestamp="false" />
</xwss:SecurityConfiguration>这XwsSecurityInterceptor触发SignatureKeyCallback添加到已注册的处理程序中。在 Spring-WS 中,KeyStoreCallbackHandler类处理此特定回调。
用KeyStoreCallbackHandler
如 KeyStoreCallbackHandler 中所述,KeyStoreCallbackHandler使用java.security.KeyStore处理各种加密回调,包括对消息进行签名。为了添加签名,处理程序使用keyStore财产。此外,您必须将privateKeyPassword属性来解锁用于签名的私钥。以下示例使用KeyStoreCallbackHandler:
<beans>
    <bean id="keyStoreHandler" class="org.springframework.ws.soap.security.xwss.callback.KeyStoreCallbackHandler">
        <property name="keyStore" ref="keyStore"/>
        <property name="privateKeyPassword" value="changeit"/>
    </bean>

    <bean id="keyStore" class="org.springframework.ws.soap.security.support.KeyStoreFactoryBean">
        <property name="location" value="classpath:keystore.jks"/>
        <property name="password" value="changeit"/>
    </bean>
</beans>
7.1.4. 解密和加密
加密时,消息将转换为只能使用适当密钥读取的形式。可以解密该消息以显示原始的可读消息。
解密
要解密传入的 SOAP 消息,安全策略文件应包含一个RequireEncryption元素。此元素可以进一步携带EncryptionTarget元素指示应加密邮件的哪一部分,而SymmetricKey以指示应使用共享密钥而不是常规私有密钥来解密消息。您可以在此处阅读其他元素的描述。以下示例使用RequireEncryption元素:
<xwss:SecurityConfiguration xmlns:xwss="http://java.sun.com/xml/ns/xwss/config">
    <xwss:RequireEncryption />
</xwss:SecurityConfiguration>如果传入邮件未加密,则XwsSecurityInterceptor将 SOAP ault 返回给发送方。如果存在,则会触发DecryptionKeyCallback添加到已注册的处理程序中。在 Spring-WS 中,KeyStoreCallbackHandler类处理此特定回调。
用KeyStoreCallbackHandler
如 KeyStoreCallbackHandler 中所述,KeyStoreCallbackHandler使用java.security.KeyStore处理各种加密回调,包括解密。对于解密,处理程序使用keyStore财产。此外,您必须将privateKeyPassword属性来解锁用于解密的私钥。对于基于对称密钥的解密,它使用symmetricStore.以下示例使用KeyStoreCallbackHandler:
<beans>
    <bean id="keyStoreHandler" class="org.springframework.ws.soap.security.xwss.callback.KeyStoreCallbackHandler">
        <property name="keyStore" ref="keyStore"/>
        <property name="privateKeyPassword" value="changeit"/>
    </bean>

    <bean id="keyStore" class="org.springframework.ws.soap.security.support.KeyStoreFactoryBean">
        <property name="location" value="classpath:keystore.jks"/>
        <property name="password" value="changeit"/>
    </bean>
</beans>
加密
要加密传出的 SOAP 消息,安全策略文件应包含一个Encrypt元素。此元素可以进一步携带EncryptionTarget元素指示应加密邮件的哪一部分,而SymmetricKey以指示应使用共享密钥而不是常规公钥来加密消息。您可以在此处阅读其他元素的描述。以下示例使用Encrypt元素:
<xwss:SecurityConfiguration xmlns:xwss="http://java.sun.com/xml/ns/xwss/config">
    <xwss:Encrypt />
</xwss:SecurityConfiguration>这XwsSecurityInterceptor触发一个EncryptionKeyCallback到已注册的处理程序中检索加密信息。在 Spring-WS 中,KeyStoreCallbackHandler类处理此特定回调。
用KeyStoreCallbackHandler
如 KeyStoreCallbackHandler 中所述,KeyStoreCallbackHandler使用java.security.KeyStore处理各种加密回调,包括加密。对于基于公钥的加密,处理程序使用trustStore财产。对于基于对称密钥的加密,它使用symmetricStore.以下示例使用KeyStoreCallbackHandler:
<beans>
    <bean id="keyStoreHandler" class="org.springframework.ws.soap.security.xwss.callback.KeyStoreCallbackHandler">
        <property name="trustStore" ref="trustStore"/>
    </bean>

    <bean id="trustStore" class="org.springframework.ws.soap.security.support.KeyStoreFactoryBean">
        <property name="location" value="classpath:truststore.jks"/>
        <property name="password" value="changeit"/>
    </bean>
</beans>
7.1.5. 安全异常处理
当保护或验证作失败时,XwsSecurityInterceptor抛出一个WsSecuritySecurementException或WsSecurityValidationException分别。这些异常绕过了标准的异常处理机制,但由侦听器本身处理。
WsSecuritySecurementException异常由handleSecurementException方法XwsSecurityInterceptor.默认情况下,此方法会记录错误并停止对消息的进一步处理。
同样地WsSecurityValidationException异常由handleValidationException方法XwsSecurityInterceptor.默认情况下,此方法会创建 SOAP 1.1 客户端或 SOAP 1.2 发送方错误,并将其作为响应发送回去。
双handleSecurementException和handleValidationException是受保护的方法,您可以覆盖这些方法以更改其默认行为。 |
7.2. 使用Wss4jSecurityInterceptor
这Wss4jSecurityInterceptor是一个EndpointInterceptor(参见拦截请求 — 该EndpointInterceptor接口),它基于 Apache 的 WSS4J。
WSS4J 实施以下标准:
-
OASIS Web 服务安全:SOAP 消息安全 1.0 标准200401,2004 年 3 月
-
用户名 Token profile V1.0
-
X.509 Tokens配置文件 v1.0
此侦听器支持由AxiomSoapMessageFactory和SaajSoapMessageFactory.
7.2.1. 配置Wss4jSecurityInterceptor
WSS4J 不使用外部配置文件。侦听器完全由 properties 配置。此侦听器调用的验证和安全作是通过validationActions和securementActions属性。作以空格分隔的字符串形式传递。下面的清单显示了一个示例配置:
<bean class="org.springframework.ws.soap.security.wss4j.Wss4jSecurityInterceptor">
    <property name="validationActions" value="UsernameToken Encrypt"/>
    ...
    <property name="securementActions" value="Encrypt"/>
    ...
</bean>
下表显示了可用的验证作:
| 验证作 | 描述 |
|---|---|
|
验证用户名Tokens |
|
验证时间戳 |
|
解密消息 |
|
验证签名 |
|
未执行任何作 |
下表显示了可用的安全保护作:
| Securement作 | 描述 |
|---|---|
|
添加用户名Tokens |
|
添加用户名Tokens和签名用户名Tokens密钥 |
|
添加时间戳 |
|
加密响应 |
|
对响应进行签名 |
|
未执行任何作 |
作的顺序很重要,由侦听器强制执行。如果其安全作的执行顺序与“validationActions”指定的顺序不同,则拦截器将拒绝传入的 SOAP 消息。
7.2.2. 处理数字证书
对于需要与密钥库交互或证书处理的加密作(签名、加密和解密作),WSS4J 需要“org.apache.ws.security.components.crypto.Crypto”的实例。
Crypto实例可以从 WSS4J 的CryptoFactory或者更方便地使用 Spring-WS'CryptoFactoryBean'。
加密工厂豆
Spring-WS 提供了一个方便的工厂 bean,CryptoFactoryBean,该 API 的构造和配置Crypto实例通过强类型属性 (preferred) 或通过Properties对象。
默认情况下,CryptoFactoryBean返回 的实例org.apache.ws.security.components.crypto.Merlin.您可以通过设置cryptoProviderproperty(或其等效项org.apache.ws.security.crypto.providerstring 属性)。
以下示例配置使用CryptoFactoryBean:
<bean class="org.springframework.ws.soap.security.wss4j.support.CryptoFactoryBean">
    <property name="keyStorePassword" value="mypassword"/>
    <property name="keyStoreLocation" value="file:/path_to_keystore/keystore.jks"/>
</bean>
7.2.3. 认证
本节介绍如何使用Wss4jSecurityInterceptor.
验证用户名Tokens
Spring-WS 提供了一组回调处理程序以与 Spring Security 集成。此外,还有一个简单的回调处理程序SimplePasswordValidationCallbackHandler用于使用内存中配置用户和密码Properties对象。
回调处理程序通过validationCallbackHandler的Wss4jSecurityInterceptor财产。
用SimplePasswordValidationCallbackHandler
SimplePasswordValidationCallbackHandler根据内存中验证纯文本和摘要用户名TokensProperties对象。您可以按如下方式对其进行配置:
<bean id="callbackHandler"
    class="org.springframework.ws.soap.security.wss4j.callback.SimplePasswordValidationCallbackHandler">
    <property name="users">
        <props>
            <prop key="Bert">Ernie</prop>
        </props>
    </property>
</bean>用SpringSecurityPasswordValidationCallbackHandler
这SpringSecurityPasswordValidationCallbackHandler使用 Spring Security 验证纯文本和摘要密码UserDetailService进行作。它使用此服务检索Tokens中指定的用户的密码(或密码的摘要)。然后,将此 details 对象中包含的密码(或密码的摘要)与消息中的摘要进行比较。如果它们相等,则用户已成功进行身份验证,并且UsernamePasswordAuthenticationToken存储在'SecurityContextHolder'中。您可以使用userDetailsService.此外,您还可以设置userCache属性来缓存加载的用户详细信息,如下所示:
<beans>
    <bean class="org.springframework.ws.soap.security.wss4j.callback.SpringDigestPasswordValidationCallbackHandler">
        <property name="userDetailsService" ref="userDetailsService"/>
    </bean>

    <bean id="userDetailsService" class="com.mycompany.app.dao.UserDetailService" />
    ...
</beans>
添加用户名Tokens
将用户名Tokens添加到外发邮件中就像添加UsernameToken到securementActions属性的Wss4jSecurityInterceptor并指定securementUsername和 'securementPassword'。
密码类型可以通过设置securementPasswordType财产。可能的值为PasswordText对于纯文本密码或PasswordDigest对于 Digest Passwords,这是默认值。
以下示例生成具有摘要密码的用户名Tokens:
<bean class="org.springframework.ws.soap.security.wss4j.Wss4jSecurityInterceptor">
    <property name="securementActions" value="UsernameToken"/>
    <property name="securementUsername" value="Ernie"/>
    <property name="securementPassword" value="Bert"/>
</bean>如果选择了纯文本密码类型,则可以指示拦截器添加Nonce和Created元素中,将securementUsernameTokenElements财产。该值必须是一个列表,其中包含以空格分隔的所需元素名称(区分大小写)。
以下示例使用纯文本密码生成用户名Tokens,即Nonce和Created元素:
<bean class="org.springframework.ws.soap.security.wss4j.Wss4jSecurityInterceptor">
    <property name="securementActions" value="UsernameToken"/>
    <property name="securementUsername" value="Ernie"/>
    <property name="securementPassword" value="Bert"/>
    <property name="securementPasswordType" value="PasswordText"/>
    <property name="securementUsernameTokenElements" value="Nonce Created"/>
</bean>
证书认证
由于证书身份验证类似于数字签名,因此 WSS4J 将其作为签名验证和保护的一部分进行处理。具体来说,securementSignatureKeyIdentifierproperty 必须设置为DirectReference为了指示 WSS4J 生成一个BinarySecurityToken元素中包含 X509 证书,并将其包含在传出消息中。证书的名称和密码通过securementUsername和securementPassword属性,如下例所示:
<bean class="org.springframework.ws.soap.security.wss4j.Wss4jSecurityInterceptor">
    <property name="securementActions" value="Signature"/>
    <property name="securementSignatureKeyIdentifier" value="DirectReference"/>
    <property name="securementUsername" value="mycert"/>
    <property name="securementPassword" value="certpass"/>
    <property name="securementSignatureCrypto">
      <bean class="org.springframework.ws.soap.security.wss4j.support.CryptoFactoryBean">
        <property name="keyStorePassword" value="123456"/>
        <property name="keyStoreLocation" value="classpath:/keystore.jks"/>
      </bean>
    </property>
</bean>
对于证书验证,常规签名验证适用:
<bean class="org.springframework.ws.soap.security.wss4j.Wss4jSecurityInterceptor">
    <property name="validationActions" value="Signature"/>
    <property name="validationSignatureCrypto">
      <bean class="org.springframework.ws.soap.security.wss4j.support.CryptoFactoryBean">
        <property name="keyStorePassword" value="123456"/>
        <property name="keyStoreLocation" value="classpath:/keystore.jks"/>
      </bean>
    </property>
</bean>
在验证结束时,拦截器通过委托给默认的 WSS4J 实现来自动验证证书的有效性。如果需要,您可以通过重新定义verifyCertificateTrust方法。
有关更多详细信息,请参阅数字签名。
7.2.4. 安全时间戳
本节介绍了Wss4jSecurityInterceptor.
验证时间戳
要验证时间戳,请添加Timestamp到validationActions财产。您可以通过设置timestampStrict自true并指定服务器端生存时间(以秒为单位)(默认值:300),方法是将timeToLive财产。拦截器总是拒绝已经过期的时间戳,无论timeToLive是。
在以下示例中,侦听器将时间戳有效性窗口限制为 10 秒,拒绝该窗口之外的任何有效时间戳Tokens:
<bean class="org.springframework.ws.soap.security.wss4j.Wss4jSecurityInterceptor">
    <property name="validationActions" value="Timestamp"/>
    <property name="timestampStrict" value="true"/>
    <property name="timeToLive" value="10"/>
</bean>
添加时间戳
添加Timestamp到securementActions属性在传出消息中生成时间戳标头。这timestampPrecisionInMilliseconds属性指定生成的时间戳的精度是否以毫秒为单位。默认值为true.下面的清单添加了一个时间戳:
<bean class="org.springframework.ws.soap.security.wss4j.Wss4jSecurityInterceptor">
    <property name="securementActions" value="Timestamp"/>
    <property name="timestampPrecisionInMilliseconds" value="true"/>
</bean>
7.2.5. 数字签名
本节介绍了Wss4jSecurityInterceptor.
验证签名
要指示Wss4jSecurityInterceptor,validationActions必须包含Signature行动。此外,validationSignatureCrypto属性必须指向包含发起方的公有证书的密钥库:
<bean id="wsSecurityInterceptor" class="org.springframework.ws.soap.security.wss4j.Wss4jSecurityInterceptor">
    <property name="validationActions" value="Signature"/>
    <property name="validationSignatureCrypto">
        <bean class="org.springframework.ws.soap.security.wss4j.support.CryptoFactoryBean">
            <property name="keyStorePassword" value="123456"/>
            <property name="keyStoreLocation" value="classpath:/keystore.jks"/>
        </bean>
    </property>
</bean>
对消息进行签名
通过添加Signatureaction 添加到securementActions.要使用的私钥的别名和密码由securementUsername和securementPassword属性。securementSignatureCrypto必须指向包含私钥的密钥库:
<bean class="org.springframework.ws.soap.security.wss4j.Wss4jSecurityInterceptor">
    <property name="securementActions" value="Signature"/>
    <property name="securementUsername" value="mykey"/>
    <property name="securementPassword" value="123456"/>
    <property name="securementSignatureCrypto">
        <bean class="org.springframework.ws.soap.security.wss4j.support.CryptoFactoryBean">
            <property name="keyStorePassword" value="123456"/>
            <property name="keyStoreLocation" value="classpath:/keystore.jks"/>
        </bean>
    </property>
</bean>此外,您可以通过设置securementSignatureAlgorithm财产。
您可以通过设置securementSignatureKeyIdentifier财产。只IssuerSerial和DirectReference对签名有效。
这securementSignatureParts属性控制对消息的哪一部分进行签名。此属性的值是标识要签名的元素的分号分隔元素名称列表。签名部分的一般形式是{}{namespace}Element.请注意,第一个空括号仅用于加密部分。默认行为是对 SOAP 正文进行签名。
以下示例演示如何对echoResponse元素:
<property name="securementSignatureParts"
value="{}{http://www.springframework.org/spring-ws/samples/echo}echoResponse"/>要指定没有命名空间的元素,请使用字符串Null(区分大小写),作为命名空间名称。
如果请求中没有其他元素的本地名称Body,则 SOAP 命名空间标识符可以为空 ()。{}
签名确认
通过设置enableSignatureConfirmation自true.请注意,签名确认作跨越请求和响应。这意味着secureResponse和validateRequest必须设置为true(这是默认值),即使没有相应的安全作。以下示例将enableSignatureConfirmationproperty 设置为true:
<bean class="org.springframework.ws.soap.security.wss4j.Wss4jSecurityInterceptor">
    <property name="validationActions" value="Signature"/>
    <property name="enableSignatureConfirmation" value="true"/>
    <property name="validationSignatureCrypto">
        <bean class="org.springframework.ws.soap.security.wss4j.support.CryptoFactoryBean">
            <property name="keyStorePassword" value="123456"/>
            <property name="keyStoreLocation" value="file:/keystore.jks"/>
        </bean>
    </property>
</bean>
7.2.6. 解密和加密
本节介绍了Wss4jSecurityInterceptor.
解密
解密传入的 SOAP 消息需要Encrypt作添加到validationActions财产。其余配置取决于消息中显示的关键信息。(这是因为 WSS4J 只需要加密密钥的 Crypto,而嵌入的密钥名称验证则委托给回调处理程序。
要使用嵌入式加密对称密钥解密消息(xenc:EncryptedKey元素)、validationDecryptionCrypto需要指向包含解密私有密钥的密钥库。此外validationCallbackHandler必须注射org.springframework.ws.soap.security.wss4j.callback.KeyStoreCallbackHandler指定密钥的密码:
<bean class="org.springframework.ws.soap.security.wss4j.Wss4jSecurityInterceptor">
    <property name="validationActions" value="Encrypt"/>
    <property name="validationDecryptionCrypto">
        <bean class="org.springframework.ws.soap.security.wss4j.support.CryptoFactoryBean">
            <property name="keyStorePassword" value="123456"/>
            <property name="keyStoreLocation" value="classpath:/keystore.jks"/>
        </bean>
    </property>
    <property name="validationCallbackHandler">
        <bean class="org.springframework.ws.soap.security.wss4j.callback.KeyStoreCallbackHandler">
            <property name="privateKeyPassword" value="mykeypass"/>
        </bean>
    </property>
</bean>
要支持解密具有嵌入式密钥名称 (ds:KeyName元素),则可以配置KeyStoreCallbackHandler,该密钥指向具有对称密钥的密钥库。这symmetricKeyPasswordproperty 表示密钥的密码,密钥名称是ds:KeyName元素:
<bean class="org.springframework.ws.soap.security.wss4j.Wss4jSecurityInterceptor">
    <property name="validationActions" value="Encrypt"/>
    <property name="validationCallbackHandler">
        <bean class="org.springframework.ws.soap.security.wss4j.callback.KeyStoreCallbackHandler">
            <property name="keyStore">
                <bean class="org.springframework.ws.soap.security.support.KeyStoreFactoryBean">
                    <property name="location" value="classpath:keystore.jks"/>
                    <property name="type" value="JCEKS"/>
                    <property name="password" value="123456"/>
                </bean>
            </property>
            <property name="symmetricKeyPassword" value="mykeypass"/>
        </bean>
    </property>
</bean>
加密
添加Encrypt到securementActions启用传出邮件的加密。您可以通过设置securementEncryptionUser财产。证书所在的密钥库可通过securementEncryptionCrypto财产。由于加密依赖于公共证书,因此不需要传递密码。以下示例使用securementEncryptionCrypto财产:
<bean class="org.springframework.ws.soap.security.wss4j.Wss4jSecurityInterceptor">
    <property name="securementActions" value="Encrypt"/>
    <property name="securementEncryptionUser" value="mycert"/>
    <property name="securementEncryptionCrypto">
        <bean class="org.springframework.ws.soap.security.wss4j.support.CryptoFactoryBean">
            <property name="keyStorePassword" value="123456"/>
            <property name="keyStoreLocation" value="file:/keystore.jks"/>
        </bean>
    </property>
</bean>您可以通过多种方式自定义加密:要使用的密钥标识符类型由securementEncryptionKeyIdentifier财产。可能的值为IssuerSerial,X509KeyIdentifier,DirectReference,Thumbprint,SKIKeyIdentifier和EmbeddedKeyName.
如果您选择EmbeddedKeyName类型,您需要指定用于加密的密钥。键的别名在securementEncryptionUser属性,就像其他键标识符类型一样。但是,WSS4J 需要一个回调处理程序来获取密钥。因此,您必须提供securementCallbackHandler替换为KeyStoreCallbackHandler,这指向相应的密钥库。默认情况下,ds:KeyName元素采用securementEncryptionUser财产。要指示不同的名称,您可以设置securementEncryptionEmbeddedKeyName替换为所需的值。在下一个示例中,传出邮件使用别名为secretKey而myKey出现在ds:KeyName元素:
<bean class="org.springframework.ws.soap.security.wss4j.Wss4jSecurityInterceptor">
    <property name="securementActions" value="Encrypt"/>
    <property name="securementEncryptionKeyIdentifier" value="EmbeddedKeyName"/>
    <property name="securementEncryptionUser" value="secretKey"/>
    <property name="securementEncryptionEmbeddedKeyName" value="myKey"/>
    <property name="securementCallbackHandler">
        <bean class="org.springframework.ws.soap.security.wss4j.callback.KeyStoreCallbackHandler">
            <property name="symmetricKeyPassword" value="keypass"/>
            <property name="keyStore">
                <bean class="org.springframework.ws.soap.security.support.KeyStoreFactoryBean">
                    <property name="location" value="file:/keystore.jks"/>
                    <property name="type" value="jceks"/>
                    <property name="password" value="123456"/>
                </bean>
            </property>
        </bean>
    </property>
</bean>这securementEncryptionKeyTransportAlgorithm属性定义用于加密生成的对称密钥的算法。支持的值包括http://www.w3.org/2001/04/xmlenc#rsa-1_5,这是默认值,而http://www.w3.org/2001/04/xmlenc#rsa-oaep-mgf1p.
您可以通过设置securementEncryptionSymAlgorithm财产。支持的值包括http://www.w3.org/2001/04/xmlenc#aes128-cbc(默认)、http://www.w3.org/2001/04/xmlenc#tripledes-cbc,http://www.w3.org/2001/04/xmlenc#aes256-cbc和http://www.w3.org/2001/04/xmlenc#aes192-cbc.
最后,securementEncryptionParts属性定义消息的哪些部分被加密。此属性的值是标识要加密的元素的分号分隔元素名称列表。加密模式说明符和命名空间标识(每个都位于一对大括号内)可以位于每个元素名称之前。加密模式说明符是{Content}或{Element}请参阅 W3C XML 加密规范,了解 Element 加密和内容加密之间的区别。以下示例标识echoResponse来自 Echo 示例:
<property name="securementEncryptionParts"
    value="{Content}{http://www.springframework.org/spring-ws/samples/echo}echoResponse"/>
请注意,元素名称、命名空间标识符和加密修饰符区分大小写。您可以省略 encryption 修饰符和命名空间标识符。如果这样做,则加密模式默认为Content,并将命名空间设置为 SOAP 命名空间。
要指定没有命名空间的元素,请使用值Null(区分大小写),作为命名空间名称。如果未指定 list,则处理程序将加密Content模式。
7.2.7. 安全异常处理
对Wss4jSecurityInterceptor与XwsSecurityInterceptor.有关更多信息,请参阅安全异常处理。