开始
1. Spring Cloud Contract 简介
Spring Cloud Contract 将 TDD 移至软件体系结构级别。 它允许您执行使用者驱动和生产者驱动的合同测试。
1.1. 历史
在成为 Spring Cloud Contract 之前,这个项目被称为 Accurest。 它由来自 (Codearte) 的 Marcin Grzejszczak 和 Jakub Kubrynski 创建。
这0.1.0发布于 2015 年 1 月 26 日,并随着1.0.0于 2016 年 2 月 29 日发布。

1.1.2. 测试问题
如果我们想测试前面图片左上角的应用程序 部分来确定它是否可以与其他服务通信,我们可以执行 两件事:
-
部署所有微服务并执行端到端测试。
-
在单元测试和集成测试中模拟其他微服务。
两者都有其优点,但也有很多缺点。
部署所有微服务并执行端到端测试
优势:
-
模拟生产。
-
测试服务之间的真实通信。
弊:
-
要测试一个微服务,我们必须部署六个微服务、几个数据库、 和其他项目。
-
运行测试的环境被锁定为一组测试(没有其他人 将能够同时运行测试)。
-
它们需要很长时间才能运行。
-
反馈在这个过程中很晚才出现。
-
它们非常难以调试。
在单元测试和集成测试中模拟其他微服务
优势:
-
他们提供非常快速的反馈。
-
他们没有基础设施要求。
弊:
-
服务的实现者创建的存根可能与 现实。
-
您可以在通过测试但生产失败的情况下进入生产环境。
为了解决上述问题,创建了 Spring Cloud Contract。主要思想是 为您提供非常快速的反馈,而无需设置 整个微服务世界。如果您处理存根,那么您唯一需要的应用程序 是您的应用程序直接使用的值。下图显示了这种关系 of stub 添加到应用程序:
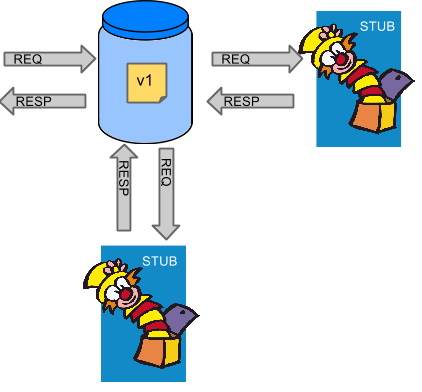
Spring Cloud Contract 可以确定您使用的存根是 由您调用的服务创建。此外,如果您可以使用它们,则意味着它们 对制片人一方进行了测试。简而言之,您可以信任这些存根。
1.2. 目的
Spring Cloud Contract 的主要目的是:
-
确保 HTTP 和消息收根(在开发客户端时使用)完全执行 实际的服务器端实现的作用。
-
推广 ATDD(验收测试驱动开发)方法和微服务架构风格。
-
提供一种在合同中发布更改的方法,这些更改在双方都立即可见。
-
生成要在服务器端使用的样板测试代码。
默认情况下,Spring Cloud Contract 作为 HTTP 服务器存根与 Wiremock 集成。
| Spring Cloud Contract 的目的不是开始编写业务 合同中的特征。假设我们有一个欺诈检查的业务使用案例。如果 用户可能由于 100 种不同的原因而成为欺诈者,我们假设您会创建两个 合同,一个用于 positive 情况,一个用于 negative 情况。Contract 测试包括 用于测试应用程序之间的协定,而不是模拟完整行为。 |
1.3. 什么是合同?
作为服务的消费者,我们需要定义我们到底想要实现什么。我们需要 制定我们的期望。这就是我们编写合同的原因。换句话说,合约是 关于 API 或消息通信外观的协议。请考虑以下示例:
假设您要发送一个请求,其中包含客户公司的 ID 和
它想向我们借款的金额。您还需要将其发送到/fraudcheckURL 使用
这PUT方法。下面的清单显示了一个合同,用于检查客户是否应该
在 Groovy 和 YAML 中都标记为欺诈:
/*
 * Copyright 2013-2020 the original author or authors.
 *
 * Licensed under the Apache License, Version 2.0 (the "License");
 * you may not use this file except in compliance with the License.
 * You may obtain a copy of the License at
 *
 *      https://www.apache.org/licenses/LICENSE-2.0
 *
 * Unless required by applicable law or agreed to in writing, software
 * distributed under the License is distributed on an "AS IS" BASIS,
 * WITHOUT WARRANTIES OR CONDITIONS OF ANY KIND, either express or implied.
 * See the License for the specific language governing permissions and
 * limitations under the License.
 */

package contracts

org.springframework.cloud.contract.spec.Contract.make {
    request { // (1)
        method 'PUT' // (2)
        url '/fraudcheck' // (3)
        body([ // (4)
               "client.id": $(regex('[0-9]{10}')),
               loanAmount : 99999
        ])
        headers { // (5)
            contentType('application/json')
        }
    }
    response { // (6)
        status OK() // (7)
        body([ // (8)
               fraudCheckStatus  : "FRAUD",
               "rejection.reason": "Amount too high"
        ])
        headers { // (9)
            contentType('application/json')
        }
    }
}

/*
From the Consumer perspective, when shooting a request in the integration test:

(1) - If the consumer sends a request
(2) - With the "PUT" method
(3) - to the URL "/fraudcheck"
(4) - with the JSON body that
 * has a field `client.id` that matches a regular expression `[0-9]{10}`
 * has a field `loanAmount` that is equal to `99999`
(5) - with header `Content-Type` equal to `application/json`
(6) - then the response will be sent with
(7) - status equal `200`
(8) - and JSON body equal to
 { "fraudCheckStatus": "FRAUD", "rejectionReason": "Amount too high" }
(9) - with header `Content-Type` equal to `application/json`

From the Producer perspective, in the autogenerated producer-side test:

(1) - A request will be sent to the producer
(2) - With the "PUT" method
(3) - to the URL "/fraudcheck"
(4) - with the JSON body that
 * has a field `client.id` that will have a generated value that matches a regular expression `[0-9]{10}`
 * has a field `loanAmount` that is equal to `99999`
(5) - with header `Content-Type` equal to `application/json`
(6) - then the test will assert if the response has been sent with
(7) - status equal `200`
(8) - and JSON body equal to
 { "fraudCheckStatus": "FRAUD", "rejectionReason": "Amount too high" }
(9) - with header `Content-Type` matching `application/json.*`
 */
request: # (1)
  method: PUT # (2)
  url: /yamlfraudcheck # (3)
  body: # (4)
    "client.id": 1234567890
    loanAmount: 99999
  headers: # (5)
    Content-Type: application/json
  matchers:
    body:
      - path: $.['client.id'] # (6)
        type: by_regex
        value: "[0-9]{10}"
response: # (7)
  status: 200 # (8)
  body:  # (9)
    fraudCheckStatus: "FRAUD"
    "rejection.reason": "Amount too high"
  headers: # (10)
    Content-Type: application/json


#From the Consumer perspective, when shooting a request in the integration test:
#
#(1) - If the consumer sends a request
#(2) - With the "PUT" method
#(3) - to the URL "/yamlfraudcheck"
#(4) - with the JSON body that
# * has a field `client.id`
# * has a field `loanAmount` that is equal to `99999`
#(5) - with header `Content-Type` equal to `application/json`
#(6) - and a `client.id` json entry matches the regular expression `[0-9]{10}`
#(7) - then the response will be sent with
#(8) - status equal `200`
#(9) - and JSON body equal to
# { "fraudCheckStatus": "FRAUD", "rejectionReason": "Amount too high" }
#(10) - with header `Content-Type` equal to `application/json`
#
#From the Producer perspective, in the autogenerated producer-side test:
#
#(1) - A request will be sent to the producer
#(2) - With the "PUT" method
#(3) - to the URL "/yamlfraudcheck"
#(4) - with the JSON body that
# * has a field `client.id` `1234567890`
# * has a field `loanAmount` that is equal to `99999`
#(5) - with header `Content-Type` equal to `application/json`
#(7) - then the test will assert if the response has been sent with
#(8) - status equal `200`
#(9) - and JSON body equal to
# { "fraudCheckStatus": "FRAUD", "rejectionReason": "Amount too high" }
#(10) - with header `Content-Type` equal to `application/json`| 预计 Contract 来自受信任的来源。切勿下载来自不受信任位置的合约,也不应与之交互。 |
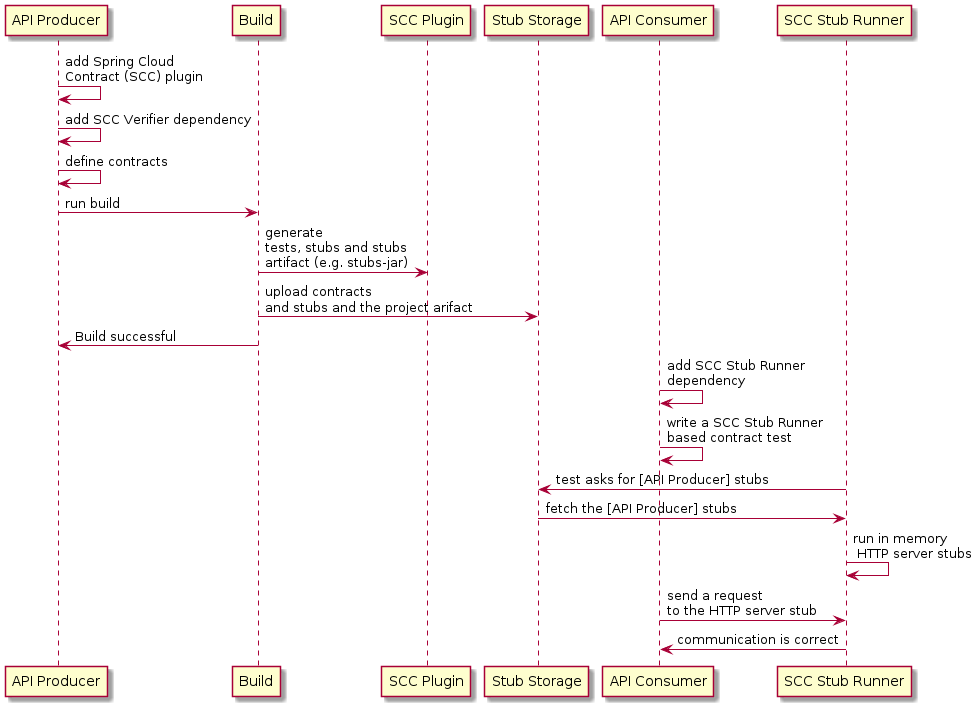
2. 三秒游览
这个非常简短的教程将介绍如何使用 Spring Cloud Contract。它由 以下主题:
你可以在这里找到一个稍长的旅行。
下面的 UML 图显示了 Spring Cloud Contract 中各部分的关系:
2.1. 在 Producer 端
要开始使用 Spring Cloud Contract,您可以使用 REST 或消息传递 Contract 添加文件
以 Groovy DSL 或 YAML 表示到 contracts 目录,该目录由contractsDslDir财产。默认情况下,它是$rootDir/src/test/resources/contracts.
然后,您可以将 Spring Cloud Contract Verifier 依赖项和插件添加到您的构建文件中,例如 以下示例显示:
<dependency>
    <groupId>org.springframework.cloud</groupId>
    <artifactId>spring-cloud-starter-contract-verifier</artifactId>
    <scope>test</scope>
</dependency>
下面的清单显示了如何添加插件,它应该放在 build/plugins 中 部分:
<plugin>
    <groupId>org.springframework.cloud</groupId>
    <artifactId>spring-cloud-contract-maven-plugin</artifactId>
    <version>${spring-cloud-contract.version}</version>
    <extensions>true</extensions>
</plugin>运行./mvnw clean install自动生成验证应用程序的测试
遵守添加的合同。默认情况下,测试在org.springframework.cloud.contract.verifier.tests..
由于合同中描述的功能尚未实现 存在,则测试失败。
要使它们通过,您必须添加处理 HTTP 的正确实现
请求或消息。此外,您必须为自动生成的
tests 添加到项目中。这个类由所有自动生成的测试扩展,并且它
应包含运行它们所需的所有设置信息(例如RestAssuredMockMvc控制器设置或消息传递测试设置)。
以下示例来自pom.xml显示了如何指定 Base Test 类:
<build>
        <plugins>
            <plugin>
                <groupId>org.springframework.cloud</groupId>
                <artifactId>spring-cloud-contract-maven-plugin</artifactId>
                <version>2.1.2.RELEASE</version>
                <extensions>true</extensions>
                <configuration>
                    <baseClassForTests>com.example.contractTest.BaseTestClass</baseClassForTests> (1)
                </configuration>
            </plugin>
            <plugin>
                <groupId>org.springframework.boot</groupId>
                <artifactId>spring-boot-maven-plugin</artifactId>
            </plugin>
        </plugins>
</build>| 1 | 这baseClassForTests元素允许您指定基本测试类。它必须是 child
的configuration元素spring-cloud-contract-maven-plugin. |
一旦实现和测试基类就位,测试就会通过,并且 应用程序和存根工件在本地 Maven 存储库中构建和安装。 现在,您可以合并更改,并且可以发布应用程序和存根工件 在联机存储库中。
2.2. 在消费者方面
您可以使用Spring Cloud Contract Stub Runner在集成测试中运行
模拟实际服务的 WireMock 实例或消息传送路由。
为此,请将依赖项添加到Spring Cloud Contract Stub Runner,作为
以下示例显示:
<dependency>
    <groupId>org.springframework.cloud</groupId>
    <artifactId>spring-cloud-starter-contract-stub-runner</artifactId>
    <scope>test</scope>
</dependency>
您可以通过以下两种方式将生产者端存根安装在 Maven 存储库中 方式:
-
通过签出 Producer 端存储库并添加 Contract 并生成存根 通过运行以下命令:
$ cd local-http-server-repo
$ ./mvnw clean install -DskipTests
| 跳过测试是因为生产者端合约实现不是 ,因此自动生成的 Contract 测试会失败。 |
-
通过从远程存储库获取已经存在的生产者服务存根。为此, 将存根构件 ID 和构件存储库 URL 作为
Spring Cloud Contract Stub Runner属性,如下例所示:stubrunner: ids: 'com.example:http-server-dsl:+:stubs:8080' repositoryRoot: https://repo.spring.io/libs-snapshot
现在,您可以使用@AutoConfigureStubRunner.在注释中,
提供group-id和artifact-id的值Spring Cloud Contract Stub Runner自
为您运行 Collaborators' Stubs,如下例所示:
@RunWith(SpringRunner.class)
@SpringBootTest(webEnvironment=WebEnvironment.NONE)
@AutoConfigureStubRunner(ids = {"com.example:http-server-dsl:+:stubs:6565"},
stubsMode = StubRunnerProperties.StubsMode.LOCAL)
public class LoanApplicationServiceTests {
. . .
}
使用REMOTE stubsMode从联机存储库下载存根时,以及LOCAL用于离线工作。 |
现在,在集成测试中,您可以接收 HTTP 响应的存根版本或 预期由 Collaborator 服务发出的消息。
3. 开发您的第一个基于 Spring Cloud Contract 的应用程序
这个简短的教程将介绍如何使用 Spring Cloud Contract。它由以下主题组成:
您可以在此处找到更简短的游览。
对于此示例,Stub Storage是 Nexus/Artifactory。
下面的 UML 图显示了 Spring Cloud Contract 的各个部分之间的关系:
3.1. 在 Producer 端
开始使用Spring Cloud Contract中,您可以添加 Spring Cloud Contract Verifier
dependency 和 plugin 添加到您的构建文件中,如下例所示:
<dependency>
<groupId>org.springframework.cloud</groupId>
<artifactId>spring-cloud-starter-contract-verifier</artifactId>
<scope>test</scope>
</dependency>下面的清单显示了如何添加插件,它应该放在 build/plugins 中 部分:
<plugin>
<groupId>org.springframework.cloud</groupId>
<artifactId>spring-cloud-contract-maven-plugin</artifactId>
<version>${spring-cloud-contract.version}</version>
<extensions>true</extensions>
</plugin>|
最简单的入门方法是转到 Spring Initializr 并添加 “Web” 和 “Contract Verifier” 作为依赖项。这样做会引入以前的
提到的依赖项以及 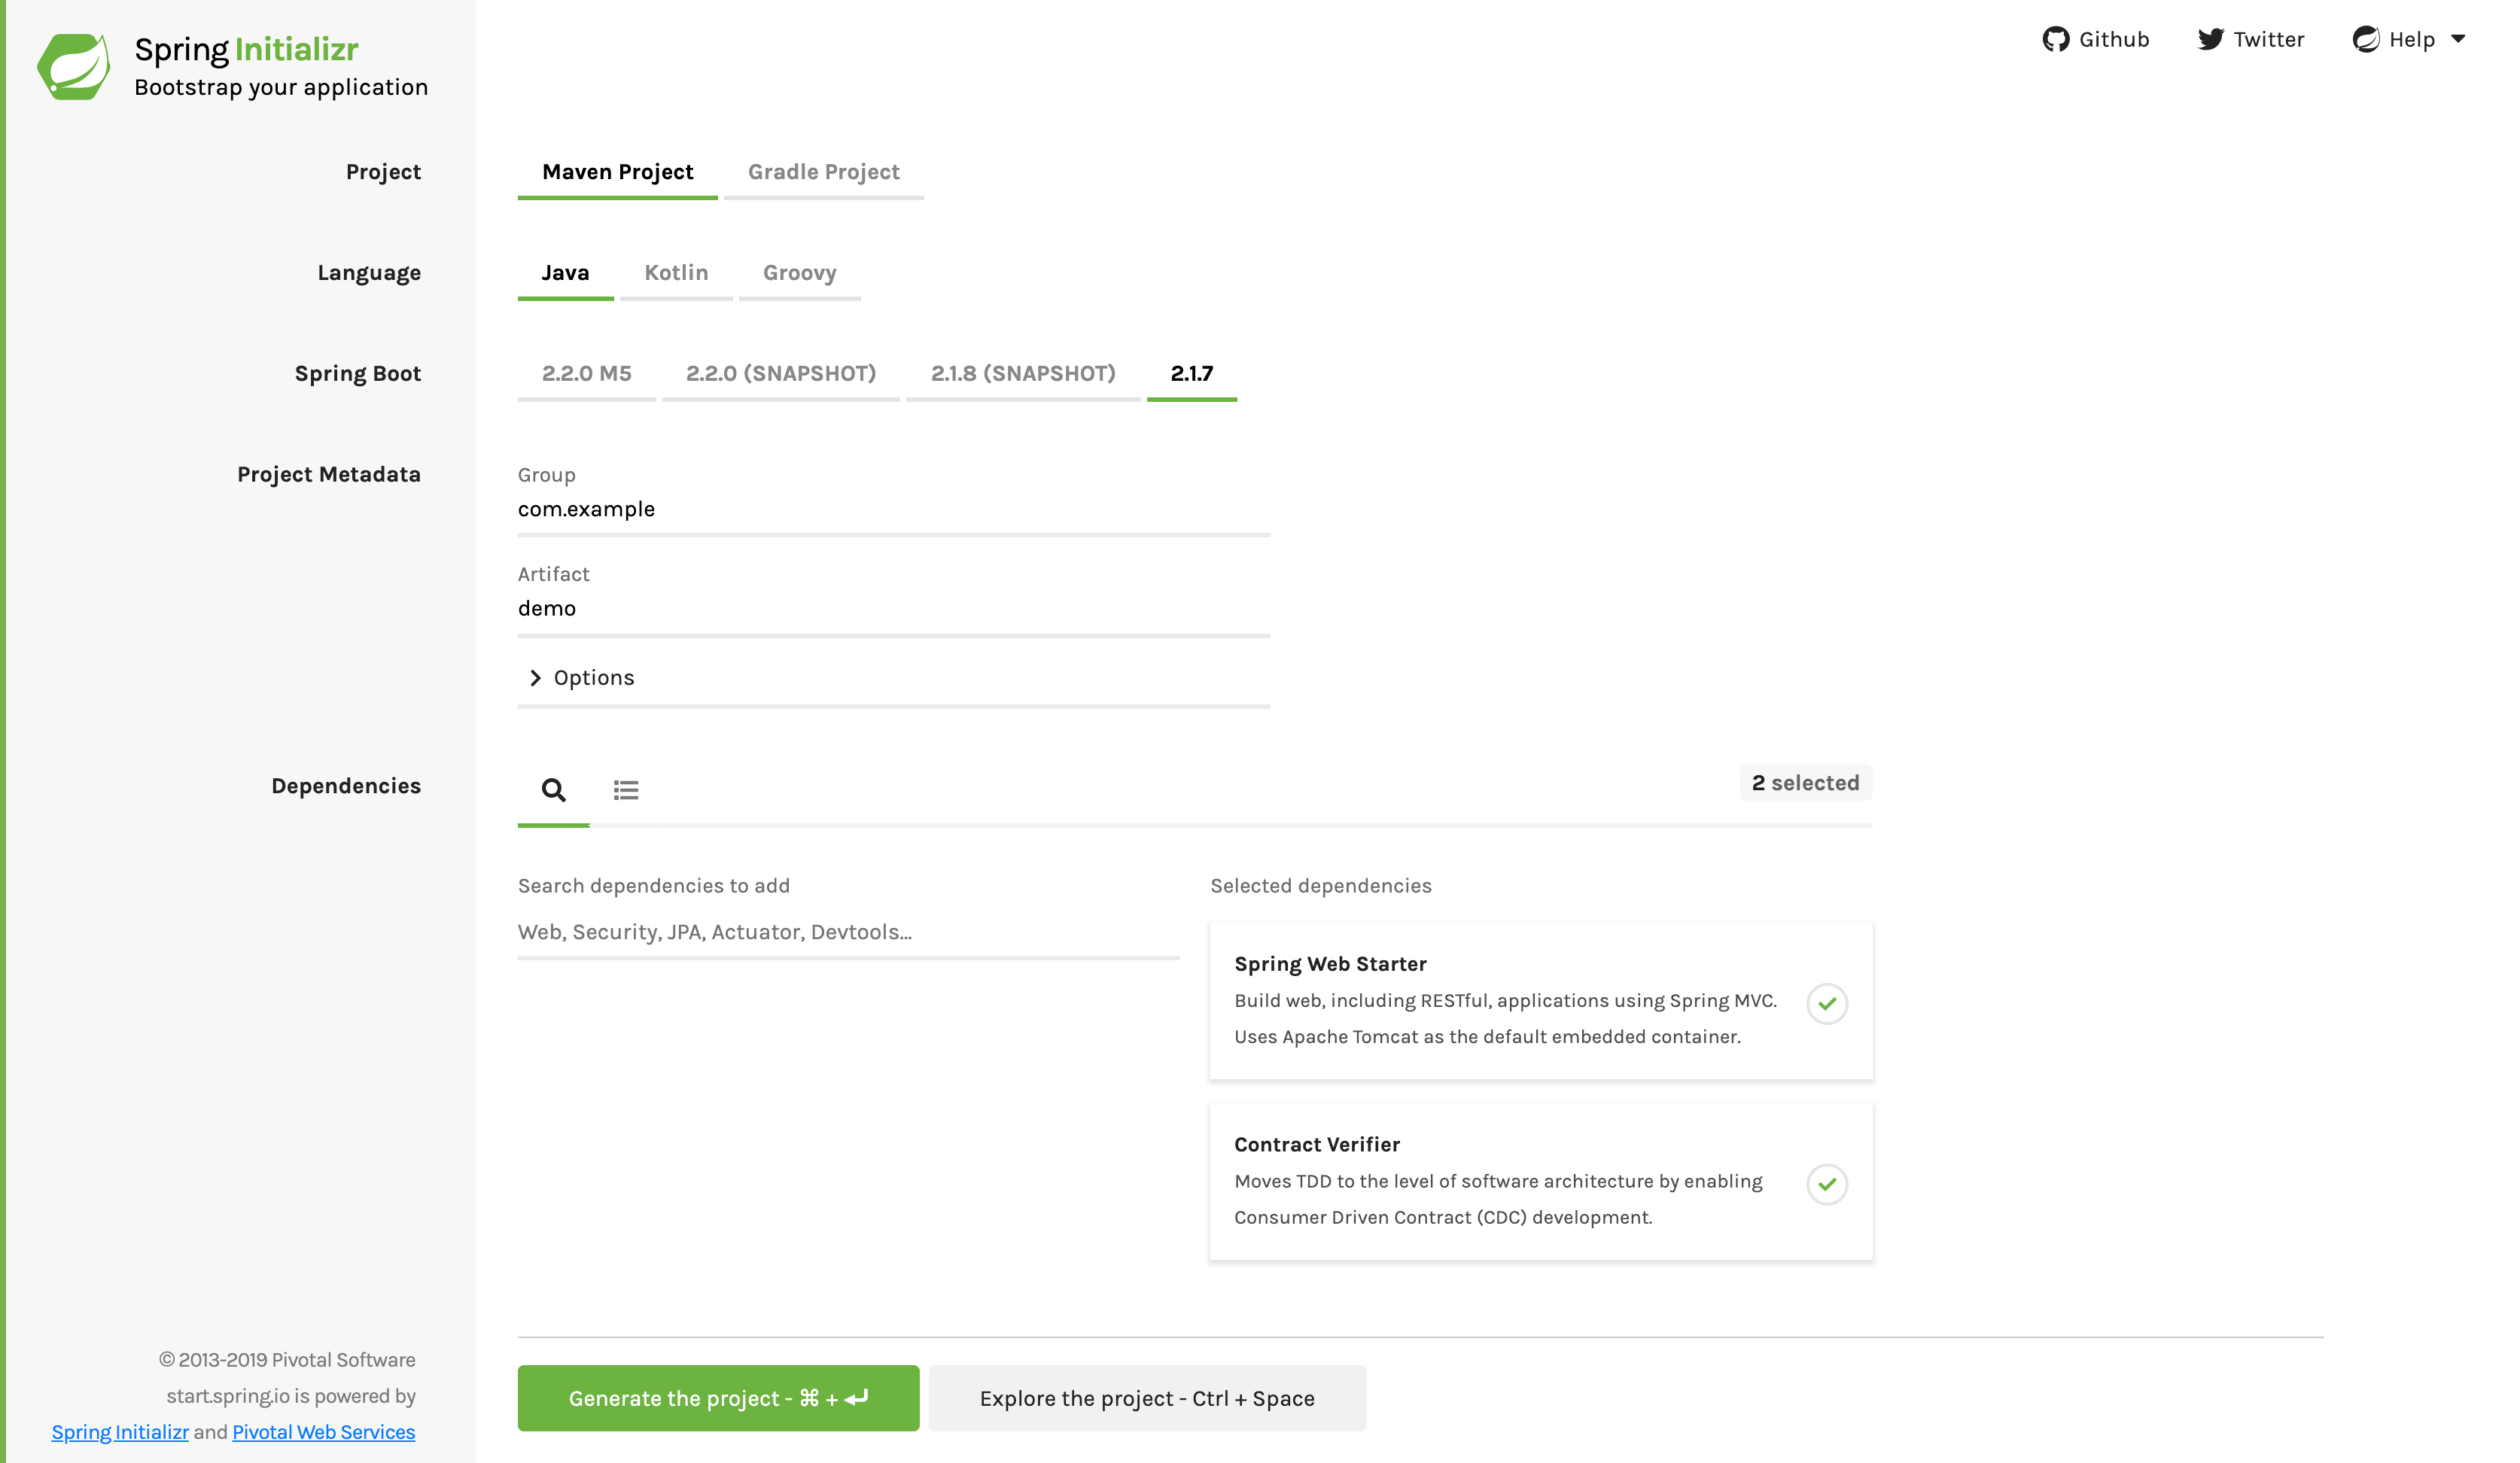
|
现在,您可以使用REST/消息传递协定
以 Groovy DSL 或 YAML 表示到 contracts 目录,该目录由contractsDslDir财产。默认情况下,它是$rootDir/src/test/resources/contracts.
请注意,文件名无关紧要。您可以在此
目录中。
对于 HTTP 存根,协定定义了应为 给定的请求(考虑 HTTP 方法、URL、标头、状态代码等 on) 的 S S以下示例显示了 Groovy 和 YAML 中的 HTTP 存根 Contract:
package contracts
org.springframework.cloud.contract.spec.Contract.make {
request {
method 'PUT'
url '/fraudcheck'
body([
"client.id": $(regex('[0-9]{10}')),
loanAmount: 99999
])
headers {
contentType('application/json')
}
}
response {
status OK()
body([
fraudCheckStatus: "FRAUD",
"rejection.reason": "Amount too high"
])
headers {
contentType('application/json')
}
}
}
request:
method: PUT
url: /fraudcheck
body:
"client.id": 1234567890
loanAmount: 99999
headers:
Content-Type: application/json
matchers:
body:
- path: $.['client.id']
type: by_regex
value: "[0-9]{10}"
response:
status: 200
body:
fraudCheckStatus: "FRAUD"
"rejection.reason": "Amount too high"
headers:
Content-Type: application/json;charset=UTF-8如果需要使用消息传递,您可以定义:
-
输入和输出消息(考虑到它的位置 、邮件正文和标头)。
-
收到消息后应调用的方法。
-
调用时应触发消息的方法。
以下示例显示了 Camel 消息传递协定:
def contractDsl = Contract.make {
name "foo"
label 'some_label'
input {
messageFrom('jms:delete')
messageBody([
bookName: 'foo'
])
messageHeaders {
header('sample', 'header')
}
assertThat('bookWasDeleted()')
}
}
label: some_label
input:
messageFrom: jms:delete
messageBody:
bookName: 'foo'
messageHeaders:
sample: header
assertThat: bookWasDeleted()运行./mvnw clean install自动生成验证应用程序的测试
遵守添加的合同。默认情况下,生成的测试位于org.springframework.cloud.contract.verifier.tests..
生成的测试可能会有所不同,具体取决于您设置的框架和测试类型 在你的插件中。
在下一个列表中,您可以找到:
-
HTTP Contract 的默认测试模式
MockMvc -
具有
JAXRS测试模式 -
一个
WebTestClient的测试(在使用 反应性的Web-Flux-based applications) 与WEBTESTCLIENT测试模式 -
基于 Spock 的测试,使用
testFramework属性设置为SPOCK
| 您只需要其中一个测试框架。MockMvc 是默认值。要使用一个 ,将其库添加到您的 Classpath 中。 |
下面的清单显示了所有框架的示例:
@Test
public void validate_shouldMarkClientAsFraud() throws Exception {
// given:
MockMvcRequestSpecification request = given()
.header("Content-Type", "application/vnd.fraud.v1+json")
.body("{\"client.id\":\"1234567890\",\"loanAmount\":99999}");
// when:
ResponseOptions response = given().spec(request)
.put("/fraudcheck");
// then:
assertThat(response.statusCode()).isEqualTo(200);
assertThat(response.header("Content-Type")).matches("application/vnd.fraud.v1.json.*");
// and:
DocumentContext parsedJson = JsonPath.parse(response.getBody().asString());
assertThatJson(parsedJson).field("['fraudCheckStatus']").matches("[A-Z]{5}");
assertThatJson(parsedJson).field("['rejection.reason']").isEqualTo("Amount too high");
}
public class FooTest {
WebTarget webTarget;
@Test
public void validate_() throws Exception {
// when:
Response response = webTarget
.path("/users")
.queryParam("limit", "10")
.queryParam("offset", "20")
.queryParam("filter", "email")
.queryParam("sort", "name")
.queryParam("search", "55")
.queryParam("age", "99")
.queryParam("name", "Denis.Stepanov")
.queryParam("email", "[email protected]")
.request()
.build("GET")
.invoke();
String responseAsString = response.readEntity(String.class);
// then:
assertThat(response.getStatus()).isEqualTo(200);
// and:
DocumentContext parsedJson = JsonPath.parse(responseAsString);
assertThatJson(parsedJson).field("['property1']").isEqualTo("a");
}
}
@Test
public void validate_shouldRejectABeerIfTooYoung() throws Exception {
// given:
WebTestClientRequestSpecification request = given()
.header("Content-Type", "application/json")
.body("{\"age\":10}");
// when:
WebTestClientResponse response = given().spec(request)
.post("/check");
// then:
assertThat(response.statusCode()).isEqualTo(200);
assertThat(response.header("Content-Type")).matches("application/json.*");
// and:
DocumentContext parsedJson = JsonPath.parse(response.getBody().asString());
assertThatJson(parsedJson).field("['status']").isEqualTo("NOT_OK");
}
given:
ContractVerifierMessage inputMessage = contractVerifierMessaging.create(
\'\'\'{"bookName":"foo"}\'\'\',
['sample': 'header']
)
when:
contractVerifierMessaging.send(inputMessage, 'jms:delete')
then:
noExceptionThrown()
bookWasDeleted()
由于合同中描述的功能尚未实现 存在,则测试失败。
要使它们通过,您必须添加处理 HTTP 的正确实现
请求或消息。此外,您必须为自动生成的
tests 添加到项目中。这个类由所有自动生成的测试扩展,并且应该
包含运行它们所需的所有设置必要信息(例如,RestAssuredMockMvc控制器设置或消息传递测试设置)。
以下示例来自pom.xml显示了如何指定 Base Test 类:
<build>
<plugins>
<plugin>
<groupId>org.springframework.cloud</groupId>
<artifactId>spring-cloud-contract-maven-plugin</artifactId>
<version>2.1.2.RELEASE</version>
<extensions>true</extensions>
<configuration>
<baseClassForTests>com.example.contractTest.BaseTestClass</baseClassForTests> (1)
</configuration>
</plugin>
<plugin>
<groupId>org.springframework.boot</groupId>
<artifactId>spring-boot-maven-plugin</artifactId>
</plugin>
</plugins>
</build>| 1 | 这baseClassForTests元素允许您指定基本测试类。它必须是 child
的configuration元素spring-cloud-contract-maven-plugin. |
以下示例显示了一个最小(但功能正常)的基测试类:
package com.example.contractTest;
public class BaseTestClass {
@Before
public void setup() {
RestAssuredMockMvc.standaloneSetup(new FraudController());
}
}
这个最小的类确实是使测试正常工作所需的全部。它充当 自动生成的测试附加到的起始位置。
现在我们可以继续实现。为此,我们首先需要一个 data 类,我们 然后在我们的控制器中使用。下面的清单显示了 data 类:
package com.example.Test;
public class LoanRequest {
@JsonProperty("client.id")
private String clientId;
private Long loanAmount;
public String getClientId() {
return clientId;
}
public void setClientId(String clientId) {
this.clientId = clientId;
}
public Long getLoanAmount() {
return loanAmount;
}
public void setLoanRequestAmount(Long loanAmount) {
this.loanAmount = loanAmount;
}
}
前面的类提供了一个对象,我们可以在其中存储参数。因为
client ID 调用。client.id,我们需要使用@JsonProperty("client.id")参数将其映射到clientId田。
现在我们可以转到控制器,下面的清单显示了这一点:
package com.example.docTest;
@RestController
public class FraudController {
@PutMapping(value = "/fraudcheck", consumes="application/json", produces="application/json")
public String check(@RequestBody LoanRequest loanRequest) { (1)
if (loanRequest.getLoanAmount() > 10000) { (2)
return "{fraudCheckStatus: FRAUD, rejection.reason: Amount too high}"; (3)
} else {
return "{fraudCheckStatus: OK, acceptance.reason: Amount OK}"; (4)
}
}
}
| 1 | 我们将传入的参数映射到LoanRequest对象。 |
| 2 | 我们检查请求的贷款金额,看看是否太多。 |
| 3 | 如果太多,我们返回 JSON(在此处使用简单字符串创建),其中 test 期望。 |
| 4 | 如果我们有一个测试要捕获的数量何时允许,我们可以将其与此输出匹配。 |
这FraudController就这么简单。您可以执行更多作,包括
logging、验证客户端 ID 等。
一旦实现和测试基类就位,测试就会通过,并且 应用程序和存根工件在本地 Maven 存储库中构建和安装。 有关将 stubs jar 安装到本地存储库的信息显示在日志中,如 以下示例显示:
[INFO] --- spring-cloud-contract-maven-plugin:1.0.0.BUILD-SNAPSHOT:generateStubs (default-generateStubs) @ http-server ---
[INFO] Building jar: /some/path/http-server/target/http-server-0.0.1-SNAPSHOT-stubs.jar
[INFO]
[INFO] --- maven-jar-plugin:2.6:jar (default-jar) @ http-server ---
[INFO] Building jar: /some/path/http-server/target/http-server-0.0.1-SNAPSHOT.jar
[INFO]
[INFO] --- spring-boot-maven-plugin:1.5.5.BUILD-SNAPSHOT:repackage (default) @ http-server ---
[INFO]
[INFO] --- maven-install-plugin:2.5.2:install (default-install) @ http-server ---
[INFO] Installing /some/path/http-server/target/http-server-0.0.1-SNAPSHOT.jar to /path/to/your/.m2/repository/com/example/http-server/0.0.1-SNAPSHOT/http-server-0.0.1-SNAPSHOT.jar
[INFO] Installing /some/path/http-server/pom.xml to /path/to/your/.m2/repository/com/example/http-server/0.0.1-SNAPSHOT/http-server-0.0.1-SNAPSHOT.pom
[INFO] Installing /some/path/http-server/target/http-server-0.0.1-SNAPSHOT-stubs.jar to /path/to/your/.m2/repository/com/example/http-server/0.0.1-SNAPSHOT/http-server-0.0.1-SNAPSHOT-stubs.jar现在,您可以合并更改并发布应用程序和存根工件 在联机存储库中。
3.2. 在消费者方面
您可以在集成测试中使用 Spring Cloud Contract Stub Runner 来运行 模拟实际服务的 WireMock 实例或消息传送路由。
首先,将依赖项添加到Spring Cloud Contract Stub Runner如下:
<dependency>
<groupId>org.springframework.cloud</groupId>
<artifactId>spring-cloud-starter-contract-stub-runner</artifactId>
<scope>test</scope>
</dependency>您可以通过以下两种方式将生产者端存根安装在 Maven 存储库中 方式:
-
通过签出 Producer 端存储库并添加合约并生成 stubs 来运行以下命令:
$ cd local-http-server-repo $ ./mvnw clean install -DskipTests跳过测试,因为 Producer 端合约实现尚未 就位,因此自动生成的合约测试将失败。 -
通过从远程存储库获取现有的生产者服务存根。为此, 将存根构件 ID 和构件存储库 URL 作为
Spring Cloud Contract Stub Runner属性,如下例所示:stubrunner: ids: 'com.example:http-server-dsl:+:stubs:8080' repositoryRoot: https://repo.spring.io/libs-snapshot
现在,您可以使用@AutoConfigureStubRunner.在注释中,
提供group-id和artifact-id为Spring Cloud Contract Stub Runner运行
协作者的存根,如下例所示:
@RunWith(SpringRunner.class)
@SpringBootTest(webEnvironment=WebEnvironment.NONE)
@AutoConfigureStubRunner(ids = {"com.example:http-server-dsl:+:stubs:6565"},
stubsMode = StubRunnerProperties.StubsMode.LOCAL)
public class LoanApplicationServiceTests {
. . .
}
使用REMOTE stubsMode从联机存储库下载存根时,以及LOCAL用于离线工作。 |
在集成测试中,您可以接收 HTTP 响应或消息的存根版本 ,这些请求应由 Collaborator 服务发出。您可以看到类似的条目 添加到构建日志中的以下内容:
2016-07-19 14:22:25.403 INFO 41050 --- [ main] o.s.c.c.stubrunner.AetherStubDownloader : Desired version is + - will try to resolve the latest version
2016-07-19 14:22:25.438 INFO 41050 --- [ main] o.s.c.c.stubrunner.AetherStubDownloader : Resolved version is 0.0.1-SNAPSHOT
2016-07-19 14:22:25.439 INFO 41050 --- [ main] o.s.c.c.stubrunner.AetherStubDownloader : Resolving artifact com.example:http-server:jar:stubs:0.0.1-SNAPSHOT using remote repositories []
2016-07-19 14:22:25.451 INFO 41050 --- [ main] o.s.c.c.stubrunner.AetherStubDownloader : Resolved artifact com.example:http-server:jar:stubs:0.0.1-SNAPSHOT to /path/to/your/.m2/repository/com/example/http-server/0.0.1-SNAPSHOT/http-server-0.0.1-SNAPSHOT-stubs.jar
2016-07-19 14:22:25.465 INFO 41050 --- [ main] o.s.c.c.stubrunner.AetherStubDownloader : Unpacking stub from JAR [URI: file:/path/to/your/.m2/repository/com/example/http-server/0.0.1-SNAPSHOT/http-server-0.0.1-SNAPSHOT-stubs.jar]
2016-07-19 14:22:25.475 INFO 41050 --- [ main] o.s.c.c.stubrunner.AetherStubDownloader : Unpacked file to [/var/folders/0p/xwq47sq106x1_g3dtv6qfm940000gq/T/contracts100276532569594265]
2016-07-19 14:22:27.737 INFO 41050 --- [ main] o.s.c.c.stubrunner.StubRunnerExecutor : All stubs are now running RunningStubs [namesAndPorts={com.example:http-server:0.0.1-SNAPSHOT:stubs=8080}]4. 包含生产者端合同的消费者驱动合同 (CDC) 分步指南
考虑欺诈检测和贷款发放流程的示例。业务 情况是这样的,我们想向人们发放贷款,但不希望他们从 我们。我们系统的当前实施向所有人提供贷款。
假设Loan Issuance是Fraud Detection服务器。在当前的
sprint,我们必须开发一个新功能:如果客户想借太多钱,
我们将客户标记为欺诈者。
技术说明
-
Fraud Detection 有一个
artifact-id之http-server. -
贷款发行具有
artifact-id之http-client. -
两者都有
group-id之com.example. -
对于此示例,
Stub Storage是 Nexus/Artifactory。
社会评论
-
客户端和服务器开发团队都需要直接沟通,并且 在完成该过程时讨论更改。
-
CDC 是关于沟通的。
服务器端代码位于 Spring Cloud Contract 的存储库下samples/standalone/dsl/http-server路径,客户端代码位于 Spring Cloud Contract 的存储库下samples/standalone/dsl/http-client路径。
| 在这种情况下,生产商拥有合同。从物理上讲,所有的合同都是 在生产者的存储库中。 |
4.1. 技术说明
如果您使用 SNAPSHOT、Milestone 或 Release Candidate 版本,则需要添加 以下部分添加到您的 build 中:
<repositories>
<repository>
<id>spring-snapshots</id>
<name>Spring Snapshots</name>
<url>https://repo.spring.io/snapshot</url>
<snapshots>
<enabled>true</enabled>
</snapshots>
</repository>
<repository>
<id>spring-milestones</id>
<name>Spring Milestones</name>
<url>https://repo.spring.io/milestone</url>
<snapshots>
<enabled>false</enabled>
</snapshots>
</repository>
<!--<repository>
<id>spring-releases</id>
<name>Spring Releases</name>
<url>https://repo.spring.io/release</url>
<snapshots>
<enabled>false</enabled>
</snapshots>
</repository>-->
</repositories>
<pluginRepositories>
<pluginRepository>
<id>spring-snapshots</id>
<name>Spring Snapshots</name>
<url>https://repo.spring.io/snapshot</url>
<snapshots>
<enabled>true</enabled>
</snapshots>
</pluginRepository>
<pluginRepository>
<id>spring-milestones</id>
<name>Spring Milestones</name>
<url>https://repo.spring.io/milestone</url>
<snapshots>
<enabled>false</enabled>
</snapshots>
</pluginRepository>
<!--<pluginRepository>
<id>spring-releases</id>
<name>Spring Releases</name>
<url>https://repo.spring.io/release</url>
<snapshots>
<enabled>false</enabled>
</snapshots>
</pluginRepository>-->
</pluginRepositories>repositories {
mavenCentral()
mavenLocal()
maven { url "https://repo.spring.io/snapshot" }
maven { url "https://repo.spring.io/milestone" }
maven { url "https://repo.spring.io/release" }
}
为简单起见,我们使用以下首字母缩略词:
-
贷款发放 (LI):HTTP 客户端
-
欺诈检测 (FD):HTTP 服务器
-
SCC:Spring Cloud Contract
4.2. 消费者方面(贷款发放)
作为 Loan Issuance 服务的开发人员(Fraud Detection 服务器的使用者),您可以执行以下步骤:
-
通过为您的功能编写测试来开始执行 TDD。
-
编写缺少的实现。
-
在本地克隆 Fraud Detection 服务存储库。
-
在欺诈检测服务的存储库中本地定义合同。
-
添加 Spring Cloud Contract (SCC) 插件。
-
运行集成测试。
-
提交拉取请求。
-
创建初始实施。
-
接管拉取请求。
-
编写缺少的实现。
-
部署您的应用程序。
-
在线工作。
我们从贷款发放流程开始,下面的 UML 图显示了该流程:
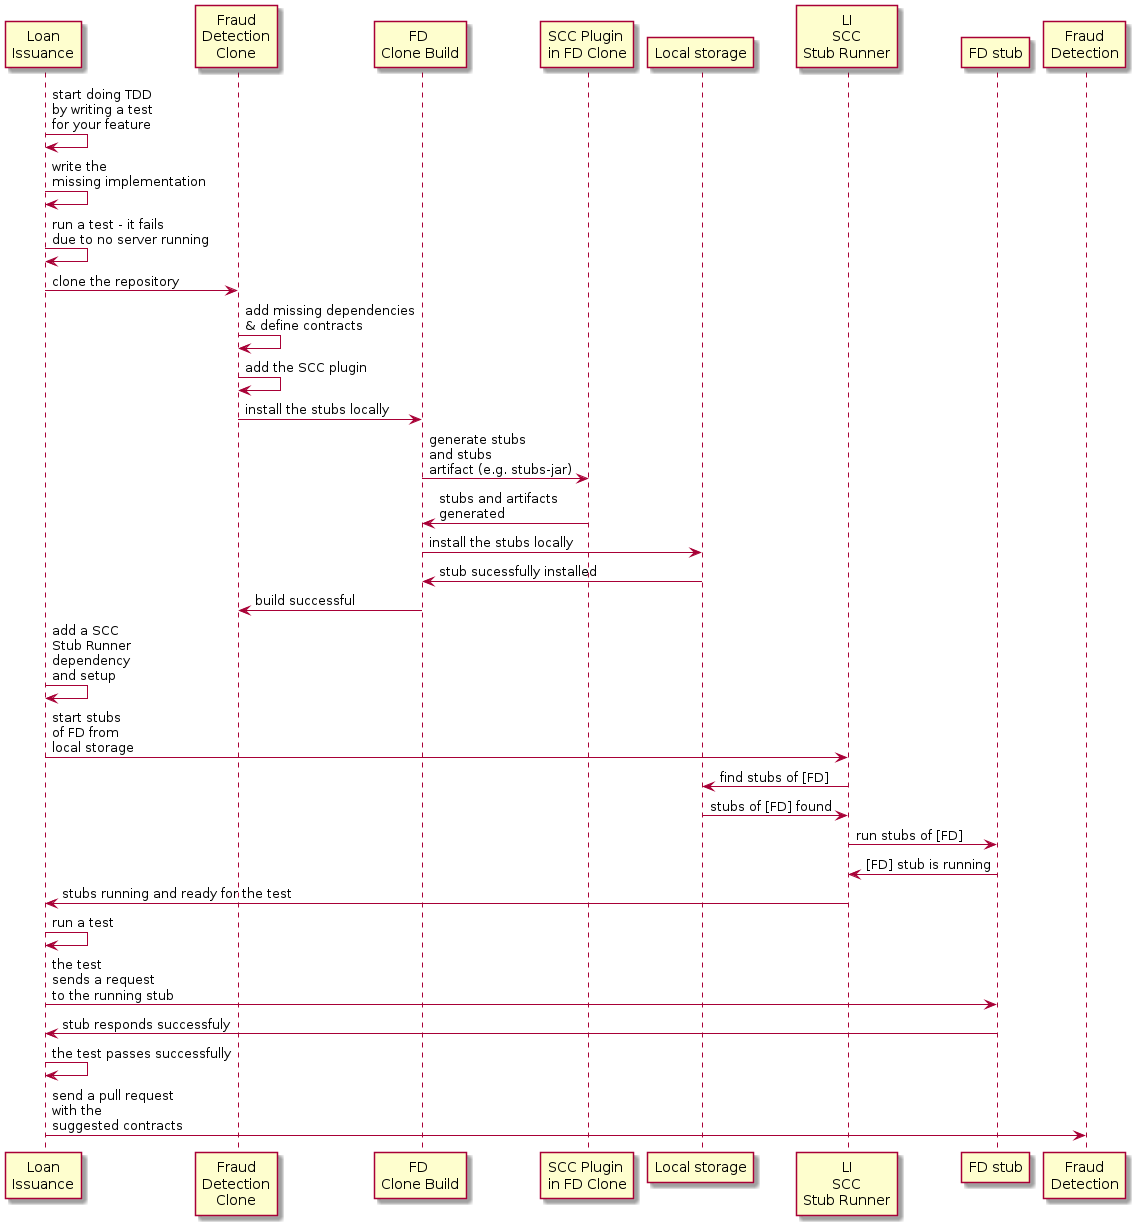
4.2.1. 通过为你的功能编写测试来开始执行 TDD
下面的清单显示了一个测试,我们可能使用它来检查贷款金额是否太过 大:
@Test
public void shouldBeRejectedDueToAbnormalLoanAmount() {
// given:
LoanApplication application = new LoanApplication(new Client("1234567890"),
99999);
// when:
LoanApplicationResult loanApplication = service.loanApplication(application);
// then:
assertThat(loanApplication.getLoanApplicationStatus())
.isEqualTo(LoanApplicationStatus.LOAN_APPLICATION_REJECTED);
assertThat(loanApplication.getRejectionReason()).isEqualTo("Amount too high");
}
假设您已经编写了新功能的测试。如果贷款申请为大 收到金额后,系统应拒绝该贷款申请,并提供一些说明。
4.2.2. 编写缺失的实现
在某个时间点,您需要向 Fraud Detection 服务发送请求。假设
您需要发送包含客户端 ID 和金额的请求
客户想借钱。您希望将其发送到/fraudcheckURL 使用PUT方法。
为此,您可以使用类似于以下内容的代码:
ResponseEntity<FraudServiceResponse> response = restTemplate.exchange(
"http://localhost:" + port + fraudCheck(), HttpMethod.PUT,
new HttpEntity<>(request, httpHeaders), FraudServiceResponse.class);
为简单起见,Fraud Detection 服务的端口设置为8080和
应用程序在8090.
如果此时启动测试,它将中断,因为当前没有服务在 port 上运行8080. |
4.2.3. 在本地克隆 Fraud Detection 服务存储库
你可以从玩弄服务器端合约开始。为此,您必须首先 通过运行以下命令克隆它:
$ git clone https://your-git-server.com/server-side.git local-http-server-repo4.2.4. 在 Fraud Detection Service 的存储库中本地定义合同
作为消费者,您需要定义您到底想要实现的目标。您需要制定 您的期望。为此,请编写以下 contract:
将合约放在src/test/resources/contracts/fraud文件夹。这fraud文件夹
很重要,因为生成者的测试基类名称引用该文件夹。 |
以下示例显示了我们在 Groovy 和 YAML 中的合约:
/*
* Copyright 2013-2020 the original author or authors.
*
* Licensed under the Apache License, Version 2.0 (the "License");
* you may not use this file except in compliance with the License.
* You may obtain a copy of the License at
*
* https://www.apache.org/licenses/LICENSE-2.0
*
* Unless required by applicable law or agreed to in writing, software
* distributed under the License is distributed on an "AS IS" BASIS,
* WITHOUT WARRANTIES OR CONDITIONS OF ANY KIND, either express or implied.
* See the License for the specific language governing permissions and
* limitations under the License.
*/
package contracts
org.springframework.cloud.contract.spec.Contract.make {
request { // (1)
method 'PUT' // (2)
url '/fraudcheck' // (3)
body([ // (4)
"client.id": $(regex('[0-9]{10}')),
loanAmount : 99999
])
headers { // (5)
contentType('application/json')
}
}
response { // (6)
status OK() // (7)
body([ // (8)
fraudCheckStatus : "FRAUD",
"rejection.reason": "Amount too high"
])
headers { // (9)
contentType('application/json')
}
}
}
/*
From the Consumer perspective, when shooting a request in the integration test:
(1) - If the consumer sends a request
(2) - With the "PUT" method
(3) - to the URL "/fraudcheck"
(4) - with the JSON body that
* has a field `client.id` that matches a regular expression `[0-9]{10}`
* has a field `loanAmount` that is equal to `99999`
(5) - with header `Content-Type` equal to `application/json`
(6) - then the response will be sent with
(7) - status equal `200`
(8) - and JSON body equal to
{ "fraudCheckStatus": "FRAUD", "rejectionReason": "Amount too high" }
(9) - with header `Content-Type` equal to `application/json`
From the Producer perspective, in the autogenerated producer-side test:
(1) - A request will be sent to the producer
(2) - With the "PUT" method
(3) - to the URL "/fraudcheck"
(4) - with the JSON body that
* has a field `client.id` that will have a generated value that matches a regular expression `[0-9]{10}`
* has a field `loanAmount` that is equal to `99999`
(5) - with header `Content-Type` equal to `application/json`
(6) - then the test will assert if the response has been sent with
(7) - status equal `200`
(8) - and JSON body equal to
{ "fraudCheckStatus": "FRAUD", "rejectionReason": "Amount too high" }
(9) - with header `Content-Type` matching `application/json.*`
*/
request: # (1)
method: PUT # (2)
url: /yamlfraudcheck # (3)
body: # (4)
"client.id": 1234567890
loanAmount: 99999
headers: # (5)
Content-Type: application/json
matchers:
body:
- path: $.['client.id'] # (6)
type: by_regex
value: "[0-9]{10}"
response: # (7)
status: 200 # (8)
body: # (9)
fraudCheckStatus: "FRAUD"
"rejection.reason": "Amount too high"
headers: # (10)
Content-Type: application/json
#From the Consumer perspective, when shooting a request in the integration test:
#
#(1) - If the consumer sends a request
#(2) - With the "PUT" method
#(3) - to the URL "/yamlfraudcheck"
#(4) - with the JSON body that
# * has a field `client.id`
# * has a field `loanAmount` that is equal to `99999`
#(5) - with header `Content-Type` equal to `application/json`
#(6) - and a `client.id` json entry matches the regular expression `[0-9]{10}`
#(7) - then the response will be sent with
#(8) - status equal `200`
#(9) - and JSON body equal to
# { "fraudCheckStatus": "FRAUD", "rejectionReason": "Amount too high" }
#(10) - with header `Content-Type` equal to `application/json`
#
#From the Producer perspective, in the autogenerated producer-side test:
#
#(1) - A request will be sent to the producer
#(2) - With the "PUT" method
#(3) - to the URL "/yamlfraudcheck"
#(4) - with the JSON body that
# * has a field `client.id` `1234567890`
# * has a field `loanAmount` that is equal to `99999`
#(5) - with header `Content-Type` equal to `application/json`
#(7) - then the test will assert if the response has been sent with
#(8) - status equal `200`
#(9) - and JSON body equal to
# { "fraudCheckStatus": "FRAUD", "rejectionReason": "Amount too high" }
#(10) - with header `Content-Type` equal to `application/json`YML 合约非常简单。但是,当您查看合同时
使用静态类型的 Groovy DSL 编写,您可能想知道value(client(…), server(…))零件是。通过使用此表示法,Spring Cloud
Contract 允许您定义 JSON 块、URL 或其他动态结构的各个部分。在案例中
的标识符或时间戳,则无需对值进行硬编码。您希望允许一些
不同的值范围。要启用值范围,您可以设置正则表达式
与使用者端的这些值匹配。您可以通过以下方式提供正文
映射表示法或带有插值的 String。我们强烈建议使用 map 表示法。
| 要设置合约,您必须了解 map 表示法。请参阅有关 JSON 的 Groovy 文档。 |
前面显示的合同是双方之间的协议,该协议:
-
如果发送的 HTTP 请求包含所有:
-
一个
PUT方法上的/fraudcheck端点 -
具有
client.id匹配正则表达式[0-9]{10}和loanAmount等于99999 -
一个
Content-Type标头,其值为application/vnd.fraud.v1+json
-
-
然后,将 HTTP 响应发送给使用者,该响应
-
具有状态
200 -
包含一个 JSON 正文,其中
fraudCheckStatus字段,其中包含FRAUD和 这rejectionReason值为Amount too high -
具有
Content-Type标头,其值为application/vnd.fraud.v1+json
-
准备好在集成测试中实际检查 API 后,您需要 在本地安装存根。
4.2.5. 添加 Spring Cloud Contract Verifier 插件
我们可以添加 Maven 或 Gradle 插件。在此示例中,我们将展示如何添加 Maven。
首先,我们将Spring Cloud ContractBOM,如下例所示:
<dependencyManagement>
<dependencies>
<dependency>
<groupId>org.springframework.cloud</groupId>
<artifactId>spring-cloud-dependencies</artifactId>
<version>${spring-cloud-release.version}</version>
<type>pom</type>
<scope>import</scope>
</dependency>
</dependencies>
</dependencyManagement>接下来,添加Spring Cloud Contract VerifierMaven 插件,如下例所示:
<plugin>
<groupId>org.springframework.cloud</groupId>
<artifactId>spring-cloud-contract-maven-plugin</artifactId>
<version>${spring-cloud-contract.version}</version>
<extensions>true</extensions>
<configuration>
<packageWithBaseClasses>com.example.fraud</packageWithBaseClasses>
<!-- <convertToYaml>true</convertToYaml>-->
</configuration>
<!-- if additional dependencies are needed e.g. for Pact -->
<dependencies>
<dependency>
<groupId>org.springframework.cloud</groupId>
<artifactId>spring-cloud-contract-pact</artifactId>
<version>${spring-cloud-contract.version}</version>
</dependency>
</dependencies>
</plugin>由于添加了插件,因此您将获得Spring Cloud Contract Verifier功能,其中,
从提供的 Contract 中:
-
生成并运行测试
-
生成并安装存根
您不想生成测试,因为您作为使用者只想使用 存根。您需要跳过测试生成和调用。为此,请运行以下命令:
$ cd local-http-server-repo
$ ./mvnw clean install -DskipTests运行这些命令后,您应该会在日志中看到类似以下内容的内容:
[INFO] --- spring-cloud-contract-maven-plugin:1.0.0.BUILD-SNAPSHOT:generateStubs (default-generateStubs) @ http-server ---
[INFO] Building jar: /some/path/http-server/target/http-server-0.0.1-SNAPSHOT-stubs.jar
[INFO]
[INFO] --- maven-jar-plugin:2.6:jar (default-jar) @ http-server ---
[INFO] Building jar: /some/path/http-server/target/http-server-0.0.1-SNAPSHOT.jar
[INFO]
[INFO] --- spring-boot-maven-plugin:1.5.5.BUILD-SNAPSHOT:repackage (default) @ http-server ---
[INFO]
[INFO] --- maven-install-plugin:2.5.2:install (default-install) @ http-server ---
[INFO] Installing /some/path/http-server/target/http-server-0.0.1-SNAPSHOT.jar to /path/to/your/.m2/repository/com/example/http-server/0.0.1-SNAPSHOT/http-server-0.0.1-SNAPSHOT.jar
[INFO] Installing /some/path/http-server/pom.xml to /path/to/your/.m2/repository/com/example/http-server/0.0.1-SNAPSHOT/http-server-0.0.1-SNAPSHOT.pom
[INFO] Installing /some/path/http-server/target/http-server-0.0.1-SNAPSHOT-stubs.jar to /path/to/your/.m2/repository/com/example/http-server/0.0.1-SNAPSHOT/http-server-0.0.1-SNAPSHOT-stubs.jar以下行非常重要:
[INFO] Installing /some/path/http-server/target/http-server-0.0.1-SNAPSHOT-stubs.jar to /path/to/your/.m2/repository/com/example/http-server/0.0.1-SNAPSHOT/http-server-0.0.1-SNAPSHOT-stubs.jar它确认了http-server已安装在本地
存储 库。
4.2.6. 运行集成测试
为了从 Spring Cloud Contract Stub Runner 的自动
stub 下载,则必须在使用者端项目 (Loan
Application service):
-
添加
Spring Cloud ContractBOM 中,如下所示:<dependencyManagement> <dependencies> <dependency> <groupId>org.springframework.cloud</groupId> <artifactId>spring-cloud-dependencies</artifactId> <version>${spring-cloud-release-train.version}</version> <type>pom</type> <scope>import</scope> </dependency> </dependencies> </dependencyManagement> -
将依赖项添加到
Spring Cloud Contract Stub Runner如下:<dependency> <groupId>org.springframework.cloud</groupId> <artifactId>spring-cloud-starter-contract-stub-runner</artifactId> <scope>test</scope> </dependency> -
使用
@AutoConfigureStubRunner.在注释中,提供group-id和artifact-id供 Stub Runner 下载您的 合作。@SpringBootTest(webEnvironment = WebEnvironment.NONE) @AutoConfigureStubRunner(ids = { "com.example:http-server-dsl:0.0.1:stubs"}, stubsMode = StubRunnerProperties.StubsMode.LOCAL) public class LoanApplicationServiceTests { -
(可选)由于您正在离线与协作者一起玩游戏,因此您 还可以提供离线工作开关 (
StubRunnerProperties.StubsMode.LOCAL).
现在,当您运行测试时,您会在日志中看到类似于以下输出的内容:
2016-07-19 14:22:25.403 INFO 41050 --- [ main] o.s.c.c.stubrunner.AetherStubDownloader : Desired version is + - will try to resolve the latest version
2016-07-19 14:22:25.438 INFO 41050 --- [ main] o.s.c.c.stubrunner.AetherStubDownloader : Resolved version is 0.0.1-SNAPSHOT
2016-07-19 14:22:25.439 INFO 41050 --- [ main] o.s.c.c.stubrunner.AetherStubDownloader : Resolving artifact com.example:http-server:jar:stubs:0.0.1-SNAPSHOT using remote repositories []
2016-07-19 14:22:25.451 INFO 41050 --- [ main] o.s.c.c.stubrunner.AetherStubDownloader : Resolved artifact com.example:http-server:jar:stubs:0.0.1-SNAPSHOT to /path/to/your/.m2/repository/com/example/http-server/0.0.1-SNAPSHOT/http-server-0.0.1-SNAPSHOT-stubs.jar
2016-07-19 14:22:25.465 INFO 41050 --- [ main] o.s.c.c.stubrunner.AetherStubDownloader : Unpacking stub from JAR [URI: file:/path/to/your/.m2/repository/com/example/http-server/0.0.1-SNAPSHOT/http-server-0.0.1-SNAPSHOT-stubs.jar]
2016-07-19 14:22:25.475 INFO 41050 --- [ main] o.s.c.c.stubrunner.AetherStubDownloader : Unpacked file to [/var/folders/0p/xwq47sq106x1_g3dtv6qfm940000gq/T/contracts100276532569594265]
2016-07-19 14:22:27.737 INFO 41050 --- [ main] o.s.c.c.stubrunner.StubRunnerExecutor : All stubs are now running RunningStubs [namesAndPorts={com.example:http-server:0.0.1-SNAPSHOT:stubs=8080}]此输出意味着 Stub Runner 已找到您的存根并为您的应用程序启动了一个服务器
组 ID 为com.example工件 ID 为http-server带版本0.0.1-SNAPSHOT之
存根和stubs端口上的分类器8080.
4.2.7. 提交 Pull Request
到目前为止,您所做的是一个迭代过程。你可以尝试使用 Contract 中,将其安装在本地,并在 Consumer 端工作,直到 Contract 像 你希望。
对结果和测试通过感到满意后,您可以将拉取请求发布到 服务器端。目前,消费者端的工作已经完成。
4.3. 生产者端(欺诈检测服务器)
作为 Fraud Detection 服务器(贷款发放服务的服务器)的开发人员,您 可能想要:
-
接管拉取请求
-
编写缺失的实现
-
部署应用程序
以下 UML 图显示了欺诈检测流程:
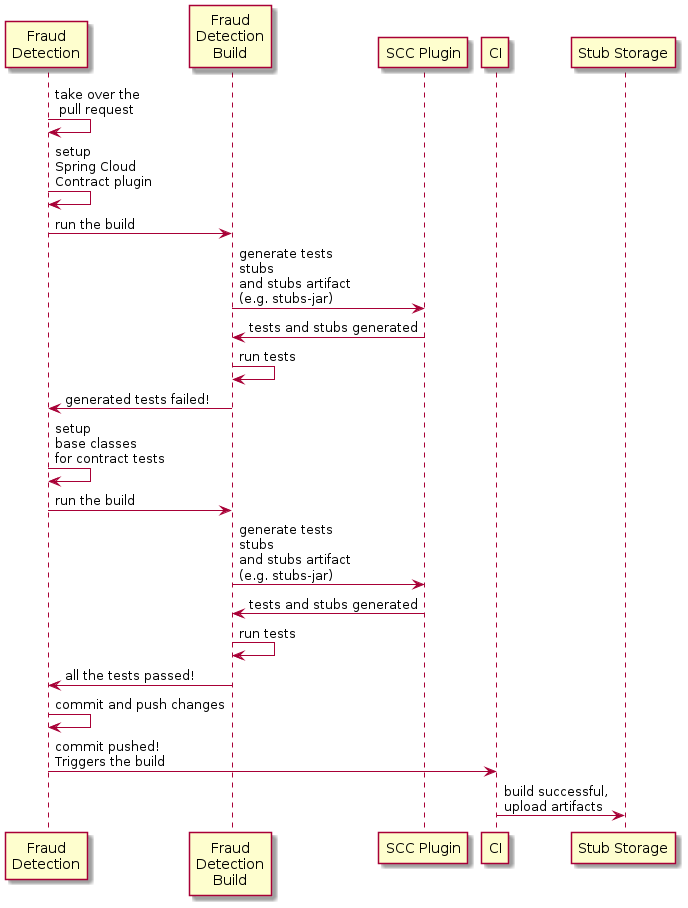
4.3.1. 接管 Pull Request
提醒一下,下面的清单显示了初始实现:
@RequestMapping(value = "/fraudcheck", method = PUT)
public FraudCheckResult fraudCheck(@RequestBody FraudCheck fraudCheck) {
return new FraudCheckResult(FraudCheckStatus.OK, NO_REASON);
}
然后,您可以运行以下命令:
$ git checkout -b contract-change-pr master
$ git pull https://your-git-server.com/server-side-fork.git contract-change-pr您必须添加自动生成的测试所需的依赖项,如下所示:
<dependency>
<groupId>org.springframework.cloud</groupId>
<artifactId>spring-cloud-starter-contract-verifier</artifactId>
<scope>test</scope>
</dependency>在 Maven 插件的配置中,必须将packageWithBaseClasses属性,如下所示:
<plugin>
<groupId>org.springframework.cloud</groupId>
<artifactId>spring-cloud-contract-maven-plugin</artifactId>
<version>${spring-cloud-contract.version}</version>
<extensions>true</extensions>
<configuration>
<packageWithBaseClasses>com.example.fraud</packageWithBaseClasses>
<!-- <convertToYaml>true</convertToYaml>-->
</configuration>
<!-- if additional dependencies are needed e.g. for Pact -->
<dependencies>
<dependency>
<groupId>org.springframework.cloud</groupId>
<artifactId>spring-cloud-contract-pact</artifactId>
<version>${spring-cloud-contract.version}</version>
</dependency>
</dependencies>
</plugin>此示例使用“基于约定”的命名,方法是将packageWithBaseClasses财产。这样做意味着最后两个包合并为
make 基测试类的名称。在我们的例子中,合同被放在src/test/resources/contracts/fraud.由于您没有两个从
这contracts文件夹中,只选择一个,它应该是fraud.添加Basesuffix 和
利用fraud.这样,你就可以得到FraudBasetest 类名称。 |
所有生成的测试都扩展了该类。在那里,你可以设置你的 Spring Context
或任何必要的。在这种情况下,您应该使用 Rest Assured MVC 来
启动服务器端FraudDetectionController.下面的清单显示了FraudBase类:
/*
* Copyright 2013-2020 the original author or authors.
*
* Licensed under the Apache License, Version 2.0 (the "License");
* you may not use this file except in compliance with the License.
* You may obtain a copy of the License at
*
* https://www.apache.org/licenses/LICENSE-2.0
*
* Unless required by applicable law or agreed to in writing, software
* distributed under the License is distributed on an "AS IS" BASIS,
* WITHOUT WARRANTIES OR CONDITIONS OF ANY KIND, either express or implied.
* See the License for the specific language governing permissions and
* limitations under the License.
*/
package com.example.fraud;
public class FraudBase {
@BeforeEach
public void setup() {
RestAssuredMockMvc.standaloneSetup(new FraudDetectionController(),
new FraudStatsController(stubbedStatsProvider()));
}
private StatsProvider stubbedStatsProvider() {
return fraudType -> {
switch (fraudType) {
case DRUNKS:
return 100;
case ALL:
return 200;
}
return 0;
};
}
public void assertThatRejectionReasonIsNull(Object rejectionReason) {
assert rejectionReason == null;
}
}
现在,如果您运行./mvnw clean install,您会得到类似于以下输出的内容:
Results :
Tests in error:
ContractVerifierTest.validate_shouldMarkClientAsFraud:32 » IllegalState Parsed...发生此错误的原因是您有一个生成测试的新合同,并且它 失败,因为您尚未实现该功能。自动生成的测试将看起来 类似于以下测试方法:
@Test
public void validate_shouldMarkClientAsFraud() throws Exception {
// given:
MockMvcRequestSpecification request = given()
.header("Content-Type", "application/vnd.fraud.v1+json")
.body("{\"client.id\":\"1234567890\",\"loanAmount\":99999}");
// when:
ResponseOptions response = given().spec(request)
.put("/fraudcheck");
// then:
assertThat(response.statusCode()).isEqualTo(200);
assertThat(response.header("Content-Type")).matches("application/vnd.fraud.v1.json.*");
// and:
DocumentContext parsedJson = JsonPath.parse(response.getBody().asString());
assertThatJson(parsedJson).field("['fraudCheckStatus']").matches("[A-Z]{5}");
assertThatJson(parsedJson).field("['rejection.reason']").isEqualTo("Amount too high");
}
如果你使用过 Groovy DSL,你可以看到所有producer()合约中存在于value(consumer(…), producer(…))blocks 被注入到测试中。
如果您使用 YAML,则这同样适用于matchers部分的response.
请注意,在生产者端,您也在执行 TDD。期望被表达出来
以测试的形式。此测试向我们自己的应用程序发送一个请求,其中包含 URL
headers 和 body 中定义的 Body。它还需要精确定义的值
在响应中。换句话说,您拥有red部分red,green和refactor.是时候转换red到green.
4.3.2. 编写缺失的实现
因为您知道预期的输入和预期的输出,所以您可以编写缺失的 实现如下:
@RequestMapping(value = "/fraudcheck", method = PUT)
public FraudCheckResult fraudCheck(@RequestBody FraudCheck fraudCheck) {
if (amountGreaterThanThreshold(fraudCheck)) {
return new FraudCheckResult(FraudCheckStatus.FRAUD, AMOUNT_TOO_HIGH);
}
return new FraudCheckResult(FraudCheckStatus.OK, NO_REASON);
}
当您运行./mvnw clean install同样,测试通过。由于 Spring Cloud
Contract Verifier 插件将测试添加到generated-test-sources您可以
实际从 IDE 运行这些测试。
4.3.3. 部署应用程序
完成工作后,您可以部署更改。为此,您必须首先合并 branch 来运行以下命令:
$ git checkout master
$ git merge --no-ff contract-change-pr
$ git push origin master您的 CI 可能会运行如下命令./mvnw clean deploy,这将发布
application 和 stub 工件。
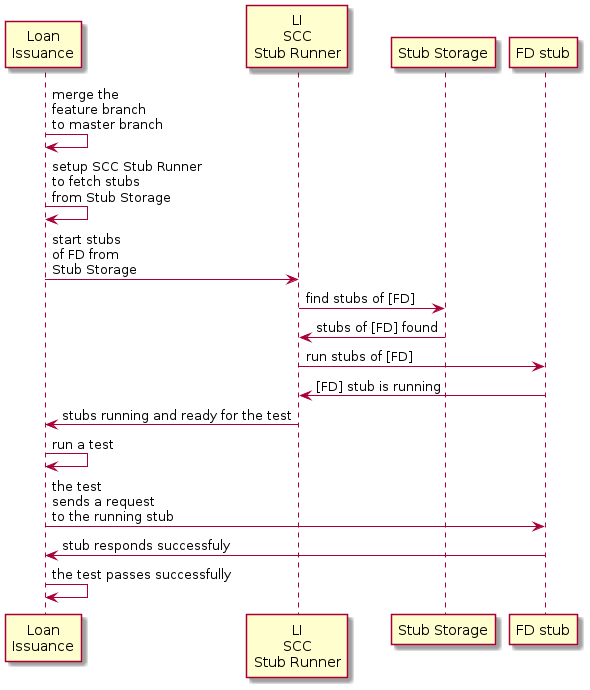
4.4. 消费者方(贷款发放),最后一步
作为贷款发放服务的开发人员(Fraud Detection 服务器的使用者),您需要:
-
将我们的功能分支合并到
master -
切换到在线工作模式
下面的 UML 图显示了进程的最终状态:
4.4.1. 将分支合并到 Master
以下命令显示了使用 Git 将分支合并到 master 的一种方法:
$ git checkout master
$ git merge --no-ff contract-change-pr4.4.2. 在线工作
现在,您可以禁用 Spring Cloud Contract Stub Runner 的离线工作,并指示
包含存根的存储库所在的位置。此时,服务器的存根
side 会自动从 Nexus/Artifactory 下载。您可以设置stubsMode自REMOTE.以下代码显示了
通过更改 properties 来实现相同的目的:
stubrunner:
  ids: 'com.example:http-server-dsl:+:stubs:8080'
repositoryRoot: https://repo.spring.io/libs-snapshot就是这样。您已完成本教程。
5. 下一步
希望本节提供了一些 Spring Cloud Contract 基础知识,并帮助您入门 编写您自己的应用程序。如果您是面向任务的开发人员类型,您可能会 想要跳转到 spring.io 并查看一些解决特定“我该怎么做 与Spring?我们还有特定于 Spring Cloud Contract 的 “how-to” 参考文档。
否则,下一个逻辑步骤是阅读 Using Spring Cloud Contract。如果 你真的很不耐烦,你也可以跳到前面阅读 Spring Cloud Contract 功能。
此外,您还可以观看以下视频:
-
“消费者驱动的合同和您的微服务架构”,作者:Olga Maciaszek-Sharma 和 Marcin Grzejszczak
-
“企业中的合同测试”,作者:Marcin Grzejszczak
-
“为什么合同测试很重要?” 作者:Marcin Grzejszczak
您可以在 samples 中找到默认项目示例。